
Do you spend a lot of time fixing your Word documents after translating them because the original formatting has decided to take a vacation? It’s frustrating for everyone involved but luckily there are ways to prevent these post-translation issues.
If this problem hits close to home, I hope the tips shared in this article can help you:
- Produce consistent assets
- Spend less time and money on manual interventions
- Overcome common problems in translation
- Avoid the need to quadruple-check your translated documents
- Work better with your translator or translation tool
- Translate and deliver more Word documents quickly
These tips are beginner-friendly so let’s dive right in!
Overview
- Common Document Issues
- Formatting Issues
- Issues with Images
- Issues with the Table of Contents (TOC)
- Using Text Boxes
- Table Issues
- Using Header and Footer
- Using Hard page Break
Like this resource? Download the ebook version for free!
{{banner-component}}
Common Document Issues
1) Use the original Word file
Always use the original file format for translation purposes. If a document was created in Microsoft Word, use the Microsoft Word document (.doc or .docx) instead of saving it as a PDF file.
1.1. Why shouldn’t I use a PDF file?
- The process of converting a Word file to a PDF file may render certain text or formatting unreadable during the translation process.
- The PDF format won’t adapt the page layout to the translated text. If one line of text becomes two lines of text after being translated, it’s going to take a lot of manual work to fix the layout.
2) Use the newer Word file format
Word documents are usually saved as a file with the .doc or a .docx extension. While most translation software supports both formats, it’s better to use the DOCX format when preparing a document for your translators.
2.1. Why are there two types of Word files?
Files with the DOC extension are created with the older versions of Word (anything before 2007). The DOCX extension was introduced in 2007 when Microsoft introduced a newer version of Word that would use an open file format. Think of DOCX as the “update” to DOC.
2.2. Why should I use DOCX instead of DOC?
- DOCX is an open-source file type so it’s smaller, lighter, and easier to open, which means that translation programs can process them better.
- DOCX is much less prone to file corruption when you pass it around among your collaborators.
- Images embedded in DOCX files are much higher quality than those in DOC files when compressed.
- DOCX is future proof and works better with other systems you may use. DOC will slowly become obsolete as technology evolves.
3) Turn off “Track Changes”
3.1. What are tracked changes?
With the “track changes” feature on, Word will mark all the changes made to a document so that you can accept or reject them. It’s useful in situations where you have multiple collaborators involved in reviewing a document before producing the finalized version.
3.2. Why turn it off?
Tracked changes function like suggestions. They are not really a part of the document until you accept them. If you leave these tracked edits as they are:
- They indicate the document is not finalized.
- Deleted text may be detected and used by the translation software.
- The tracked changes may not be extracted.
- Some translation tools will automatically accept all tracked changes.
3.3. How to turn off tracked changes?
Go to the Review section on your Microsoft toolbar and make sure that the Track Changes button is turned off. Otherwise, the subsequent edits on the document would turn up as suggestions that are marked up for further action.

4) Resolve changes and comments
Once the Track Changes feature is switched off, check the entire document for any remaining tracked changes and comments that have not been “resolved.” This simply means accepting or rejecting suggested edits to finalize the content.
- The quick way to find these changes is through Review > Changes.
- On the Changes panel, click Next to skip directly to the section of the document where there is a comment or a suggested change.
- Then, click on Accept to approve the edit, or Reject to remove it. Repeat until a pop-up informs you that there are no changes left.

4.1. Why is this important?
- As mentioned earlier, unresolved edits cannot be detected and extracted by some translation tools. When this happens, new words and phrases would not be extracted into your translation memory system as well, so you would need to translate these segments again when they appear in future documents.
- If you send your translators a document with unresolved changes, they wouldn't know which edits to keep or disregard.
5) Use just one language per document
A big thanks to Colin Pascal-Röhken for this suggestion!
If your document has been translated into multiple languages, avoid putting all translations into one document as a way to "consolidate" the content.
Why not?
- It's inconvenient for both you and your translator to navigate the document.
- The document won't work well with translation tools, which only pick up one source language at a time.
- The spell check feature in Word can only detect mistakes in one language at a time.
- The translations would still need to be separated in the end as you prepare to deliver the document to a specific market.
What should I do instead?
Prepare one document for each target language.
6) Name your documents with language codes and version number
Once again, thank you to Colin Pascal-Röhken for this tip!
The issue with naming your document "Catalog.docx" is that it does not provide any key information about the contents within. What language is it in? Which version of the document is this?
This could cause a lot of confusion because
- Your team might mistake an old file for the latest one if there is more than one version of the document.
- When you have a folder with many documents, it will be hard to locate the right one when everything is named "Catalog (1).docx," "Catalog (2).docx," etc. This is the case for translators who work on multiple translations at a time.
What should I do instead?
- Include a language code in the filename so you can easily identify the document you want at a glance.
- You should also include the version number if the document has been revised multiple times.
For example, you can label a document as "GER Catalog V2.docx" if it contains the German translation. Click here to find the complete list of language codes.
Formatting Issues
7) Show hidden characters
7.1. What are hidden characters?
Word uses hidden characters, also known as control markers, to format the text in your document. They never appear in print, and they won’t appear while you’re editing a document either unless you choose to show them.
Hidden characters represent the “deep” structure of a document, indicating formatting choices like spacing, line breaks, paragraph breaks, and so on. Misused characters are often the reason behind poorly formatted documents.
Later in this guide, we will explain more about hidden characters and which ones you should pay attention to in translation.
7.2. Why should I turn on the hidden characters?
They can help you:
- Understand how your text is structured
- Anticipate how the text structure will be perceived by a translation tool
- Identify the changes needed to improve the structure
- Clean up a file with complex formatting
7.3. How to view them?
To show or hide the control characters, simply toggle the pilcrow symbol (¶) on the Home tab in the toolbar.

8) Break up lines with hard/soft return
8.1. What are they?
Hard and soft returns are both control markers that indicate how a body of text is divided. They are hidden characters so remember to toggle the show button!
8.2. How should I use them?
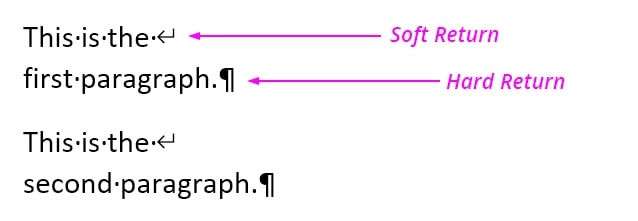
Hard returns are used to signify the end of a paragraph, whereas soft returns simply signify the end of a line. (Allen Wyatt, “Understanding Hard and Soft Returns”)
Here’s an example:
8.3. How do you place them?
To break into a new paragraph, simply press the Enter key to create a hard return.
To create a line break while staying in the same paragraph, press Shift + Enter to create a soft return.
8.4. Why should I use them?
You should use hard and soft returns to organize your text because they
- make it easier for you to apply styles to different groups of text quickly
- help your translation tool recognize how to segment and display text in the translation editor
9) Format your text using styles
When you want to change the appearance of your text, there are generally two ways to do it:
- Apply a style to the text
- Use explicit formatting on the text
9.1. What’s the difference?
- A style is a predefined combination of font style, color, size, and spacing that you can apply instantly to any group of text in your document. You can either create your own combinations or use the default styles provided in Word. We’ll talk more about the types of style you can use in Word later.
- Explicit formatting is done when you manually select the font style, color, size, and spacing for your text from the toolbar, menus, and dialog boxes.
9.2. Why should I use styles instead of explicit formatting?
Explicit formatting is the manual way of altering your text. You must remember and repeat the process for different groups of text throughout the entire document.
It’s better to use styles to change the appearance of your text because it is
- quick
- automated
- standardized across different groups of text belonging to the same level or category (e.g. heading or subheading).
In fact, putting new formatting over a style is something you should never do because it won’t stay consistent across all the text using the same style.
For example, if you want to change the appearance of a paragraph that’s using the Heading 1 style, DON’T highlight the paragraph and customize the appearance using this ribbon:
That would result in explicit formatting.
Instead, you should customize the appearance from the Styles menu. If you’re new to using styles in Microsoft Word, we will teach you the quick and easy way to do so in the next few tips.
However, to apply styles effectively, you must first get rid of any remaining explicit formatting in your document.
9.3. How do I get rid of unwanted formatting?
Fixing a poorly formatted document is not always easy, especially when it comes from an external source. Before applying new styles to a document, you might want to hit that “reset” button first.
One way to do it is to remove all explicit formatting from the document so that they won’t conflict with the styles you will use later.
Take note that this won’t discard any unwanted styles from your document, but it will make it easier to fix them because you won’t have to deal with formatting that was “forcibly” applied over an active style.
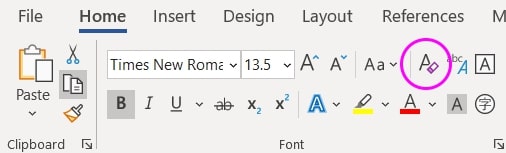
9.4. How do I remove all explicit formatting?
First, highlight the entire document by pressing Ctrl + A, then:
- Press Ctrl + Q to remove all explicit paragraph formatting
- Press Ctrl + Space to remove all explicit character formatting
9.5. How do I remove all formatting including styles?
Use this method if you want to get rid of any explicit formatting AND styles.
- Highlight a specific group of text or the entire document
- Click the Clear All Formatting button on the Home tab (shown in the screenshot below).
Now you can start afresh instead of trying to diagnose and fix the formatting issues.
10) Use heading & paragraph styles
10.1. What are they?
A paragraph style is a combination of rules that controls how a paragraph behaves and looks. You can customize the rules to apply formatting to both
- The characters in a paragraph – font style, size, color, etc.
- The paragraph itself – spacing, indentation, alignment, etc.
A heading style is basically the same thing, but you use them on text that serves as heading, subheadings, and so on.
10.2. Why should I use them?
Heading and paragraph styles enable you to organize and format your text quickly based on common content structures. You can quickly apply the same customizations to different texts at the same content level.
Using styles helps you save time and stay consistent in formatting groups of text throughout the entire document.
Heading styles and paragraph styles help translation tools recognize the hierarchy of information in your document and subsequently preserve the formatting better after the content has been translated.
10.3. How do I use styles?
Using styles is essentially creating a template for existing and new paragraphs with similar content, which automatically changes their font, size, color, spacing, alignment, indentation, and more based on your settings. There are 3 ways to do this:
- Use the default styles in Word
- Modify a preset style
- Create a new style entirely
(1) Use the default styles in Word
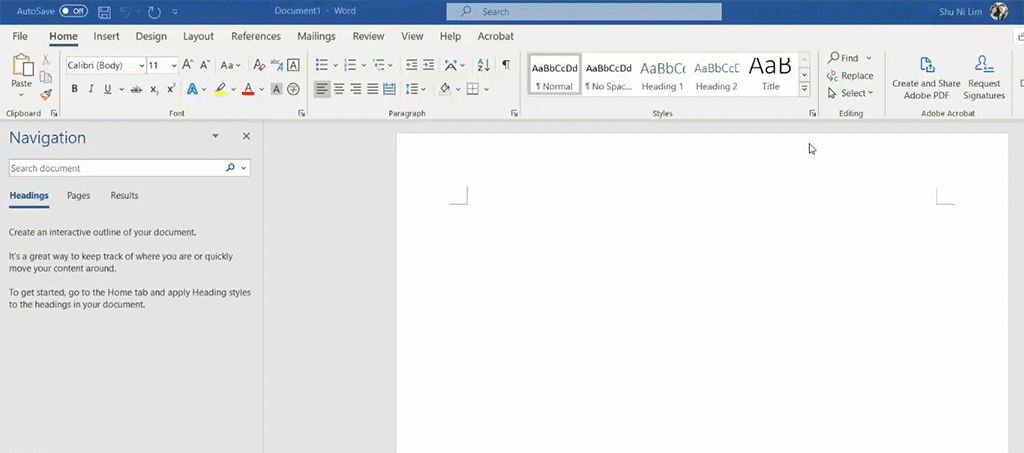
To apply a preset style, highlight a paragraph and select the options available on the Styles panel on the Home tab.
Tip: To expand the list and view more styles, click on the bottom-right arrow in the highlighted area shown below.

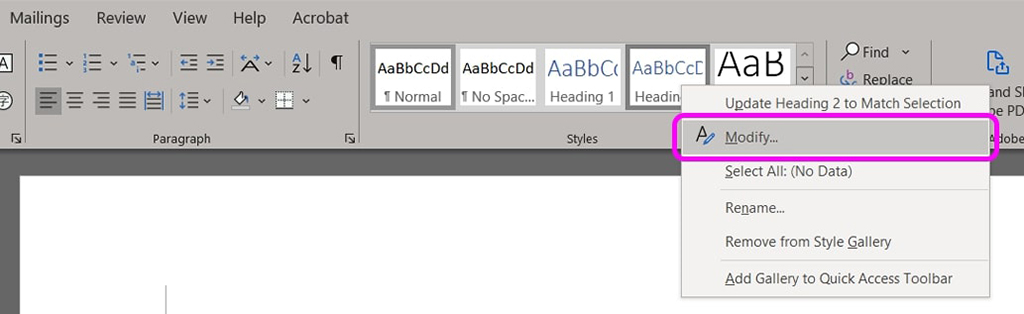
(2) Modify a preset style
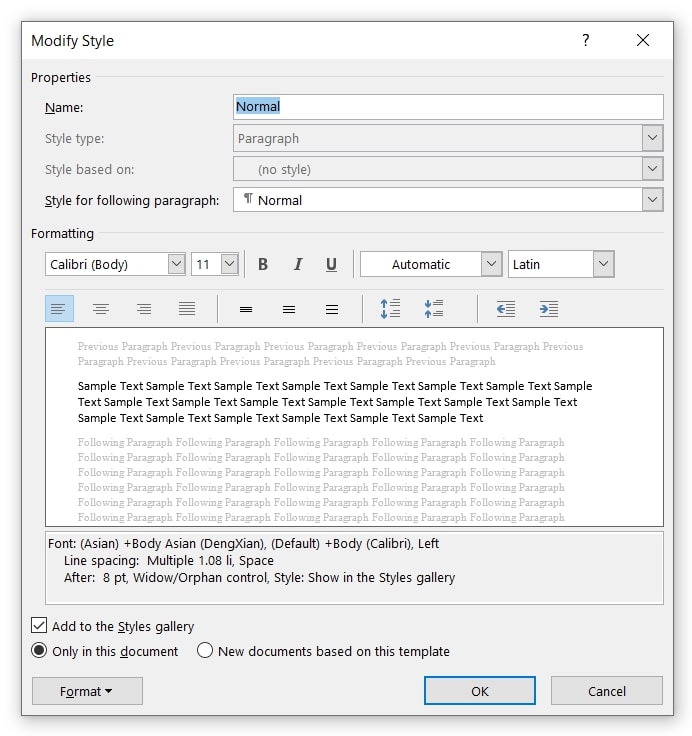
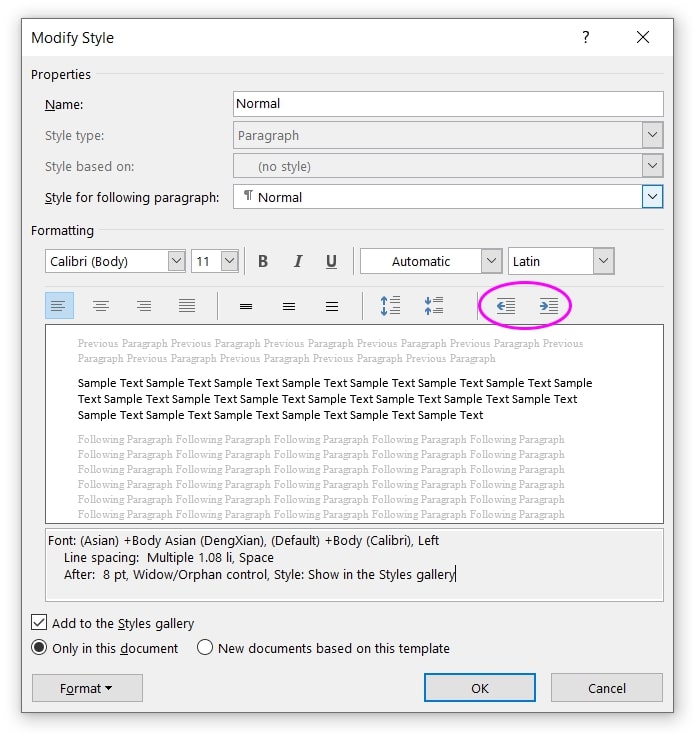
You can also modify the preset styles to suit your company branding and guidelines. Right-click on the style and select Modify in the drop-down list.
A new window where you can create the customizations will appear. Once you’re satisfied with the text appearance and formatting, click OK to save the style.
Important: To save a style for use in all future documents, make sure that the Add to the Styles gallery box is checked so you can find it in the menu later. To override Microsoft Word’s default settings for the preset styles, check the box that says New documents based on this template at the bottom. Finally, click OK to save.
(3) Create a new style entirely
To create a new style, expand the Styles menu on your Home tab by clicking on the

button found near the bottom-right of the Styles ribbon (see screenshot). Then, select Create a Style.
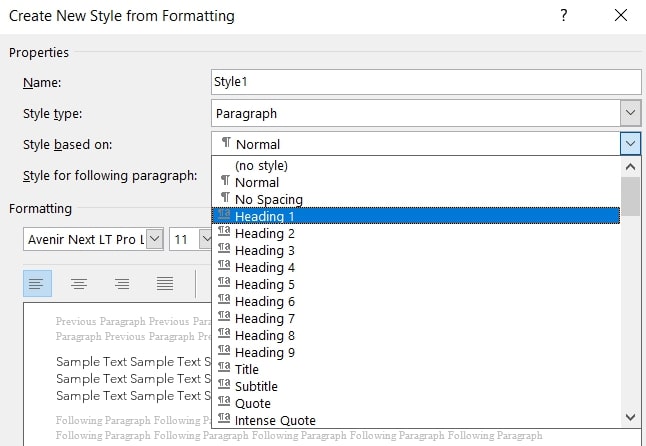
You can name the style first, then click Modify to customize the formatting. Remember to set the Style type to “paragraph” before saving.
If you are creating a heading style, which is typically applied to title and subtitles, you should always number your heading to create a hierarchy of categories. In other words, the top-level heading would be Heading 1, the sub-heading would be Heading 2, the sub-sub-heading would be Heading 3, and the list goes on.
To assign a number to the heading style, click on the box for Style based on and select the heading level from the dropdown list.
11) Don't skip heading levels
While we’re talking about numbering your headings, never skip heading levels. Always follow the ascending order without missing any numbers. If you want to use a preset heading style but don’t like the appearance, modify the style instead of skipping to the next suitable one.
11.1. Why shouldn’t I skip heading levels?
- Consistently numbered headings are easier to remember and apply when your documents repeat and reuse the same multi-level text structures. Heading 1, 2, 3, 4, 5 is much easier to remember than Heading 2, 5, 7, 1, 3.
- You want your document to be screen reader-friendly. Screen readers announce the heading levels to the blind and visually impaired to help them navigate the content easily. A skipped number may mislead them into thinking there is missing content and thus reducing the usability of your document. (Source: Stack Overflow)
12) Use character styles
12.1. What are they?
Unlike paragraph styles, character styles are applied to smaller units of text like phrases, terms, words, right down to single characters – basically any segment of text smaller than a paragraph.
12.2. Why should I use them?
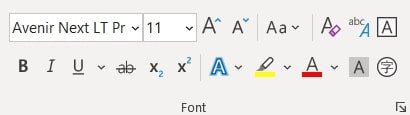
We modify text all the time by bolding, italicizing, and underlining specific words and phrases directly via the Font section. However, this can be time-consuming when you have bits and pieces of text that need to be formatted a certain way spread across a long document.
For example, when preparing a document for your company, all product names mentioned in a document might need to be in bold and in a different font.
The best way to format this is NOT to click bold and change the font manually for each product name found. Instead, you should create a character style to use as a shortcut.
12.3. How to create a character style?
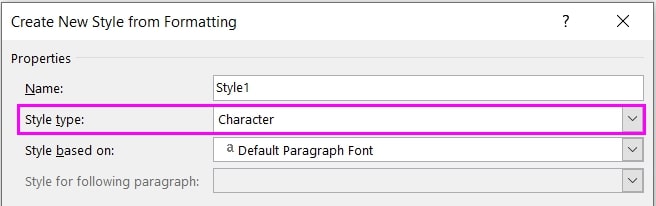
To create one, expand the Styles menu as shown earlier and select Create a Style. Then, you can customize the font, size, and more. Important: Remember to set the Style type to “character” so that the formatting would only be applied at the character level and not the paragraph level.
After you click OK to save the character style, you can find it in the Styles panel. Now you just have to highlight a word or a phrase (e.g. product name) and click on the style to change its appearance instantly.
13) Indent paragraphs at style level
Many people like to indent paragraphs by hitting Tab or Space Bar. You can save a lot of time by setting indents at the style level so that every time you hit Enter, an indent is automatically created for all the paragraphs using that particular style.
It also ensures that your text is well-structured and that a translation tool can read and replace the content correctly. This has implications on the translation process (it becomes faster) but also on the assets you create (Translation Memories)
To do so, locate the Styles section on your Home tab and right-click on any style to Modify it (or create a new one).
A new window will appear. Now you can click on the Indent Left or Indent Right buttons as highlighted in the screenshot below to control how much indentation you want for all paragraphs using this style. Finally, click OK to save.
14) Avoid linked styles
A linked style is a combination of paragraph and character styles. It either applies as a paragraph style when a paragraph is selected or as a character style when a character is selected. People may use linked styles when they want to set the first few words of a paragraph as the heading.
14.1. Why should I avoid them?
Linked styles should generally be avoided in translation because of potential formatting issues they may cause.
They can cause problems with some of the key things people use styles for, such as creating tables of contents and using the navigation pane.
– Margie Belharz, “What are Word Styles and how do you use them?”
In fact, many Word experts would advise you to turn the feature off by opening the Styles window (Press Alt + Ctrl + Shift + S simultaneously) and checking the box labeled Disable Linked Styles.
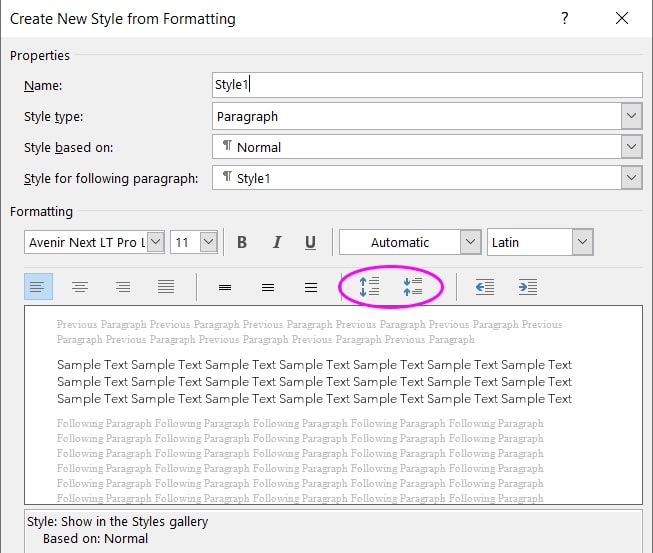
15) Create space between paragraphs by modifying styles, not hitting enter
Only use the Enter key to mark the end of a paragraph, which creates a hard return. Never use Enter to create more space.
To increase or decrease the space between paragraphs, modify your styles to specify space before or space after the paragraph.
- Select a preset style or create a new one.
- In the Modify window, you can adjust the spacing using these buttons:
16) Use list styles
You should use styles to customize the appearance of single-level and multi-level bulleted lists.
16.1. What are they?
List styles are templates for numbered and bullet lists in your document.
16.2. Why should I use them?
Using list styles makes it easier to retain the formatting of numbered and bullet lists after translation.
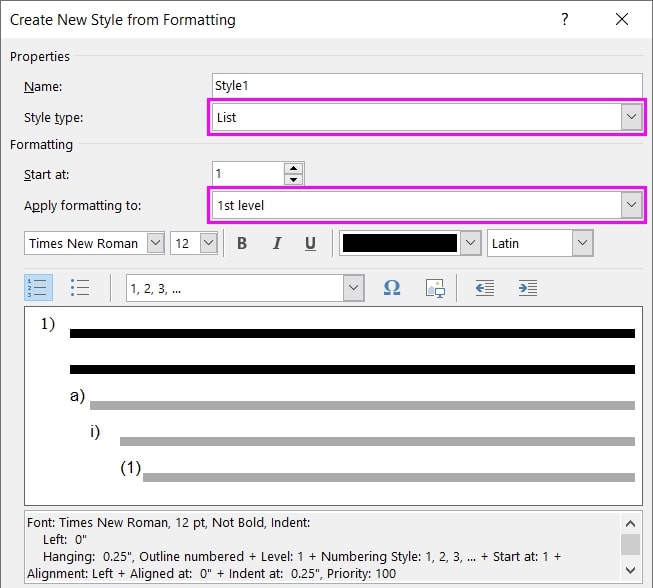
16.3. How to create a list style?
Creating a list style follows the same steps as creating a heading or paragraph style as we’ve shown earlier.
- First, expand the Styles menu by clicking More and select Create a Style.
- Name the style and set the Style type to List
- Under the Apply formatting to box, choose the list level you want to customize, which allows you to change the font, size, indentation, etc. for that particular level only.
The top level of the list would be the 1st level, and the first sub-point would be 2nd level, so on and so forth. You can apply individual styles for each level by switching the levels as shown in the screenshot.
17) Use styles to control automatic numbering
The same principle applies to the automatic numbering of lists. While creating a list style, you can also define the type of numbering you prefer.
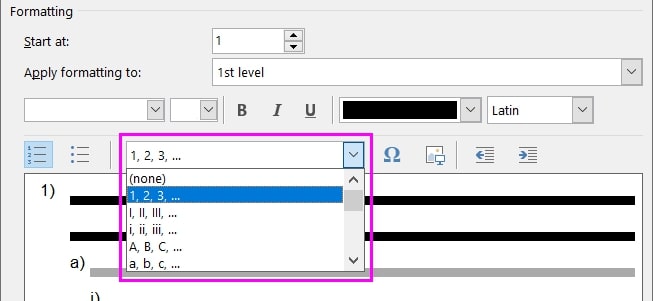
For more information about style-based numbering, check out this resource by Word MVP.
18) Temporarily modify body text style to print a double-spaced draft
While your document is still in development, you might need a double-spaced printout to review and annotate its content. You can temporarily modify the text style to make it double-spaced.
18.1. Why should I do this?
Double spacing gives your reviewers more space to jot down their comments between lines of texts, but of course you don’t want it to replace all the formatting you’ve already applied to your document.
18.2. How do I temporarily modify the body text style?
- Save your document. Don’t lose your precious progress!
- Press Ctrl + A to select the entire document.
- Press Ctrl + 2 to apply double spacing. Once this is done, don’t save or close your document until you have reversed the changes!
- Press Ctrl + P to print the double-spaced document.
- Finally, press Ctrl + Z to undo the double-spacing and save your document again.
18.3. Another way to do it?
Of course, you can always create a copy of the original document, modify the spacing, and print from there. That can prevent you from accidentally saving the double-spaced version over your original formatting but remember to delete the copy after you’re done printing the draft. Otherwise, having two copies of the same document might cause confusion.
Source: "Double-Spacing Your Document" by Allen Wyatt
19) Create a document template that prevents new styles from being added
It’s common to send your document to an external collaborator for review and edits. However, the document might sometimes come back with messy text structures because the other person copy-pasted new content with its own style and formatting from another source. When this happens, you spend more time trying to diagnose and restore the styles you’ve previously defined.
19.1. How do I make sure my collaborator doesn’t add unwanted formatting to the document?
You can create a document template that restricts new styles from being added. Here’s how:
- Open the Styles pane by pressing Alt + Ctrl + Shift + S or by clicking the bottom-rightmost button on the Styles
- Select the Manage Styles icon (It’s a picture of the capital letter A with a green checkmark).
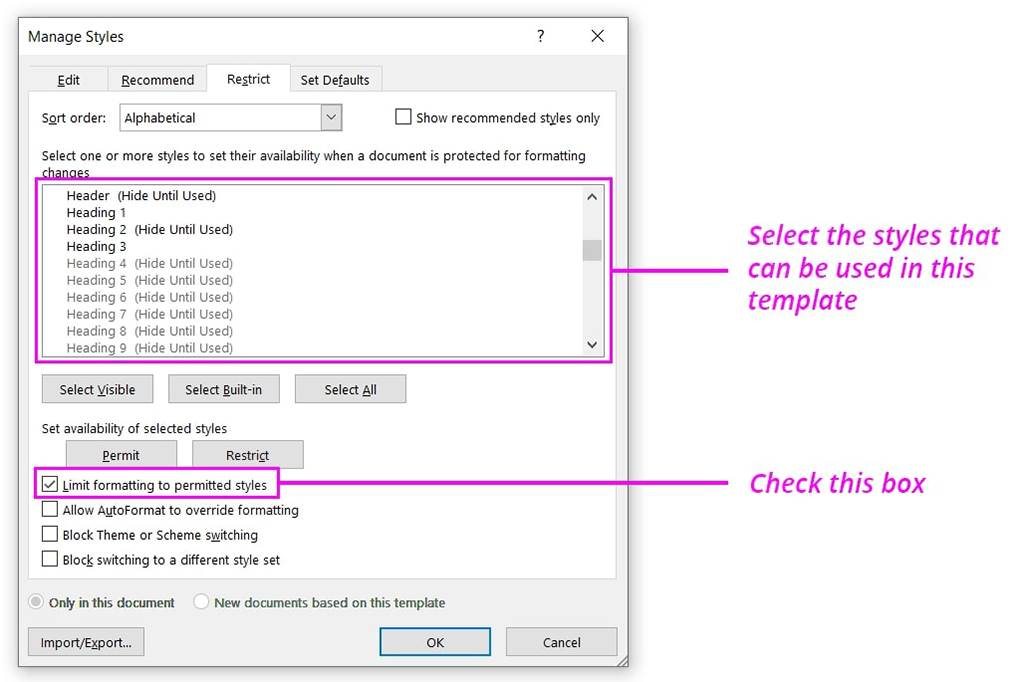
- Select the Restrict tab in the dialog box. You will see a list of preset styles and those you have created.
- Choose a set of styles that your collaborator is permitted to use in the document template. Simply click on one style to select it, then hold down the Ctrl key and click on other styles to select more.
- Most importantly, tick the box that says Limit formatting to permitted styles. Click OK to save.
After saving the document, you can send it to your collaborator and ask them to only work within the template and its permitted styles.
For advanced Word users, you can create a set of macros to stop others from pasting formatted text into your document. Find out how in this resource by Allen Wyatt.
Issues with Images
20) Wrap text around objects
20.1. Why is it important?
Documents containing objects must be handled with care. These could be images, shapes, clip art, charts, SmartArt, and more. Bad placement of objects in a document could spoil how the text looks on the page, which usually becomes worse after translation. You could experience problems like
- sections of paragraphs that are obscured or awkwardly cut off
- translated text that end up behind or in front of an image
20.2. How to wrap text around an image?
- Click on an image and go to the Picture Format
- Select Wrap Text and choose your preferred type of text wrapping.
Images with text wrapping applied are known as floating images. They can be placed almost anywhere on a page, and wherever you put them, the text in that area will “make way” for the image by surrounding it. Each floating image has its own anchor, which can be seen when you click on an image like so:
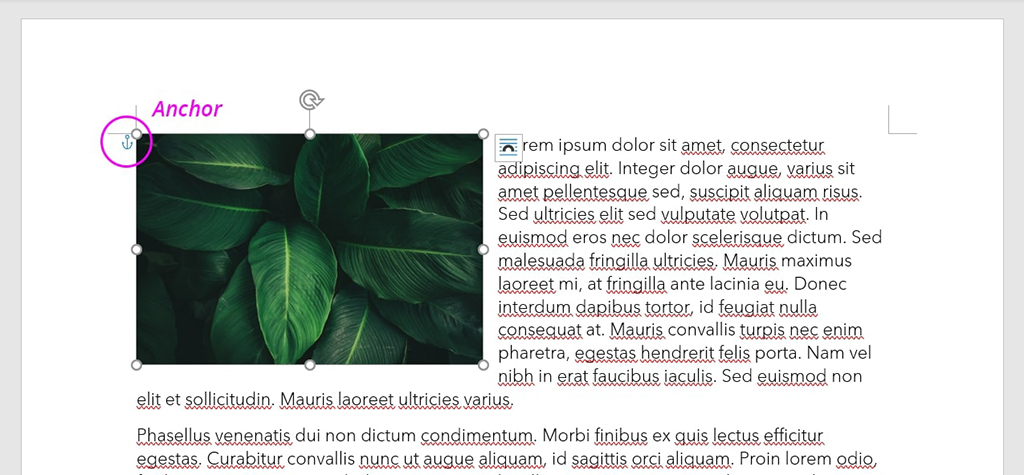
The anchor is a very important tool that helps you control how the image behaves as you edit the text. To learn more about anchoring images, check out Theresa Estrada’s article on working with images in Word.
21) Ensure images are “In Line with Text” if you don’t want a floating image
Sometimes you might want an image to behave like a character because it’s easier to predict how the image will move on a page as the document is edited or translated. In these cases, you should set the image to be In Line with Text instead of making it a floating image with text wrapping. To do so:
- Select the image
- Go to the Picture Format ribbon
- Select Wrap Text
- Select In Line with Text
21.1. What does this setting do?
This setting will constrain the movement of the image to the lines of text in your document. While you won’t be able to place inline images anywhere on a page like you would a floating image, they won’t suddenly jump to another page when you edit a document because they are not fixed to an anchor.
22) Place images between paragraphs
Since inline images tend to move with the text as you edit and translate the text, it’s safer to place images between paragraphs, as opposed to within a paragraph. This way, the image will exist on its own line of text that does not move around as much, especially left and right, when the surrounding text changes.
23) Use image captions to generate list of figures automatically
23.1. What are image captions?
Captions are snippets of text that are linked to specific images in your document.
23.2. Why use them?
In the front matter of certain documents, you might want to have a list of figures that points to all the images in a document and what page they’re on. Some people manually number and itemize each visual content by scrolling through all the pages and typing out the list themselves. This is time-consuming for three reasons:
- The list of figures needs to be manually revised every time there is a change in the image’s name or page number.
- After translating a document, the page numbers of each image may change so you would need to find them yourself and add them to the list of figures.
- Word has a feature where the list of figures can be automatically generated through image captions.
Therefore, you should label or number the images in your document using captions.
23.3. How to add captions?
Never press Enter and type the name or number (e.g. Figure 1.2) under an image – Word won’t recognize this as a caption. Instead, right-click on the image and select Insert Caption.
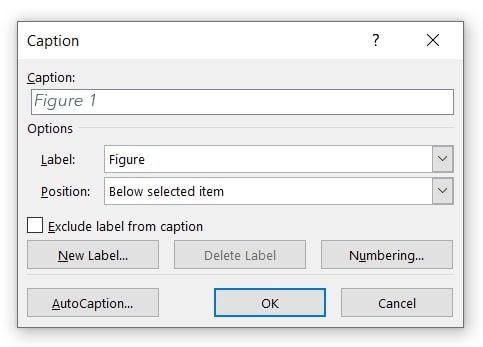
In the dialog box, you can customize the caption text and positioning, and numbering style. After you do this for one image, the figure numbers will be automatically generated when you click Insert Caption for the other images in your document.
23.4. How do I generate a list of figures from the captions?
To generate the list of figures:
- Go to the References ribbon
- Under the Captions section, select Insert Table of Figures
- Change the formatting as preferred and click OK
Issues with the Table of Contents (TOC)
24) Create an auto-generated table of contents
24.1. What’s the issue?
Before learning how to do this, I was creating my table of contents quite tediously by manually
- typing out the section titles and page numbers
- setting indentations to indicate subsection titles
- changing the character font and size to distinguish section and subsections
- adding or deleting information whenever I made changes to the body
It’s not the most productive method because you must repeat these manual processes after the document has been translated.
Why waste time doing extra work when Word allows you to automatically generate the Table of Contents for a document?
24.2. What should I do instead?
The better approach is to set up a table with auto-generated data and field codes, which is the technical way of saying “I’m telling this table where and what to point to in the document.” It’s better for two reasons:
- Even after you translate the content, the table will still point to the same sections as you’ve configured them and reflect the changes in the translated titles.
- Earlier in this guide, I emphasized using styled headings to segment your sections, subsections, etc. without skipping heading levels. This is also because Word generates the table by drawing from your heading levels and styles.
24.3. How to generate the table of contents?
After all the headings in your document are properly segmented using different styles and levels,
- Click on the space where you want to add the table of contents
- Go to the References ribbon
- Select Table of Contents on the far-left corner and choose either Automatic Table 1 or 2
A table containing the names of all the headings and subheadings in your document should appear.
Tip: To avoid confusion, generate and format the table BEFORE translating a document.
25) Use styles in table of contents
By now you’ve probably realized the importance of using styles to format various text elements in your Word document. It’s not a surprise that it applies to table of contents as well.
If you don’t like the text appearance of the auto-generated table, DON’T make changes to the table directly. You should use styles instead because Microsoft Word bases the formatting of the table on them.
For advanced information on how to map a style to each level in the table of contents, check out this resource by Microsoft.
26) Update Table of Contents
Whenever you edit your document, always remember to update the table of contents so it reflects any changes made to the headings and pages.
26.1. How to Update?
- Go to the References tab on the ribbon
- Click Update Table
- Select one of the following:
- Update page numbers only – This will only update the page numbers where all your headings are.
- Update entire table – This will update the page numbers and the heading text if you have updated them in the body.
- Click OK to confirm
27) Use cross-references to refer to content within the document
27.1. What are cross-references?
A cross-reference in Word is a type of field code that either
- links to something else within the same Word document, like a subheading, or
- shows information that can be automatically referenced, like the date or filename
27.2. Why should I use them?
You should generally insert auto-generated field codes to display information that can be automatically detected and inserted by Word. From headings to figures to page numbers, cross-references get updated for you every time there’s a change in the content, which in translation means saving a ton of time and manual effort in perfecting the translated document.
27.3. How do I add cross-references?
To add a cross-reference in a Word document:
- Head over to the References ribbon on the toolbar
- Under the captions section, select Cross-reference
- Choose the type of cross-reference you want to insert
Using Text Boxes
28) Avoid text boxes
Text boxes in Microsoft Word behave somewhat like an image. You may wrap your main text around them or place them “in front of text” to drag them around and place them anywhere on a page.
While text boxes add a visually pleasing element to highlight or segment information, it’s better to avoid them when preparing a Word document for translation because:
- They may obscure parts of the main text if not formatted correctly.
- Some translation software may not be able to detect the content within text boxes.
This isn’t to say that you should avoid text boxes completely in creating your document. Just use them sparingly and where necessary, and most importantly follow the same text wrapping principles for images as mentioned earlier.
Table Issues
29) Use tables, not tabs, to segment content across the width of a page
29.1. What’s wrong with using tabs?
The Tab key is often used to create space between text in the same line. The problem with this method is that the single line of text could easily turn into two lines after translation, which would mess up the spacing.
29.2. What should I do instead?
Use a table when you want to organize and segment content across the width of a page more legibly – even if the table would only have one row. The cells in a table are better equipped to handle post-translation textual changes. For example, if the text takes up more space/lines after it has been translated, the cell will expand vertically to accommodate the change, retaining the horizontal text distribution.
30) Format columns properly
Is there a table in your Word document that seems to be off-center or have exceeded the page margins?
This may have happened because the width of the table columns was manually increased to a point where the width of the entire table no longer fits within the page margins. Here’s a quick and simple fix:
- Click anywhere within the table
- Go to the Layout ribbon
- Click AutoFit
- Select AutoFit Window
31) Avoid using tables in documents for the visually impaired
Not to be confused with table of contents! The one we’re referring to here is the ones containing rows and columns of text. The reason you should avoid using them isn’t necessarily related to translation but it’s crucial in improving the accessibility of your document for the visually impaired.
31.1. Why does it matter?
If the visually impaired is a part of your target demographic, you should be mindful of their communication standards when preparing a document for their use. It’s just like you would for any audience that speaks another language, but it’s more about the usability of your document in this case.
The visually impaired uses assistive technology to consume content. They may use screen readers or Braille displays, which tend to read out the information in a table row by row from left to right. This pattern doesn’t always make sense depending on how the information is configured in a table.
Therefore, it’s better to use lists to convey information if possible because there is only one way to read them: from top to bottom!
Using Header and Footer
32) Use headers and footers
32.1. What are they?
Headers and footers are used to display information about a page or the document itself at the top and bottom margins of a page. This includes
- Titles
- Dates
- Page numbers
- Boilerplate text
- Images serving as page decoration
32.2. Why use them?
Headers and footers are useful for multipage Word documents because the information you entered on one page will be automatically generated and applied to each page.
In translation, it’s common for the translated text to be longer than the source text and take up more pages than the original document. When this happens, headers and footers ensure that the top and bottom margins of the new pages are consistent with the rest of the document.
32.3. How to create headers and footers?
- To create a header, hover your mouse over the top margin of your document and double-click. The header space will become isolated so you can start customizing the area.
- To create a footer, double-click on the bottom margin of your document.
- Alternatively, you can apply preset header and footer layouts by going to the Insert ribbon, then Header / Footer. Select your preferred preset and start customizing the information.
There are plenty of customizations you can apply from the Header & Footer ribbon, which appears when you’re working in the isolated margin space. You can even set different header and footer text for odd and even pages.
Using Hard page Break
33) Use hard page break
You know how sometimes when you delete one small section of text in Word, the rest of the documents would suddenly go crazy?
This could also happen while translating the document, especially if the translated text is shorter or longer than the source text. One of the culprits of this issue could be improper spacing between sections that begin on a new page.
You might have encountered a situation like this… You want to start a line of text on a new page to indicate a new chapter or to segment your content more clearly, but the current page has not been filled up yet.
33.1. Why shouldn’t I just press Enter until a new page is created?
If you do, every time you add or revise the text in the preceding pages, you will need to readjust all the subsequent paragraphs manually so that they start on the right page.
33.2. What should I do instead?
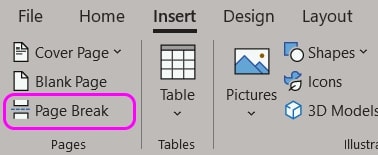
Go to the Insert tab on your toolbar and click on Page Break. This creates a hard page break, which commands a particular group of text to always start on a new page, no matter what changes are made to the preceding pages.
Find this resource useful? Click here to download it as a PDF file. Share it with your clients and collaborators so they know how to optimize Word documents for translation too.
If curious, here's where you can learn how to translate a word document with Redokun and how to translate other versatile documents.
Happy translating,
Shu Ni