


- How to Translate FrameMaker Files in 3 Steps
- ~ Export your FrameMaker File to XLIFF
- ~ Translate your file using Redokun
- ~ Import the translated XLIFF back to FrameMaker
- Best Practices for Translating FrameMaker Files
- Why translate FrameMaker with Redokun?
How to Translate FrameMaker Files in 3 Steps

You can translate your FrameMaker files by using the XLIFF export and import function, which Adobe introduced in the 2020 update.
XLIFF (XML Localization Interchange File Format) supports the exchange of data between various tools involved in your content translation process. It ensures that your texts are structured properly when being transferred from one tool to another.
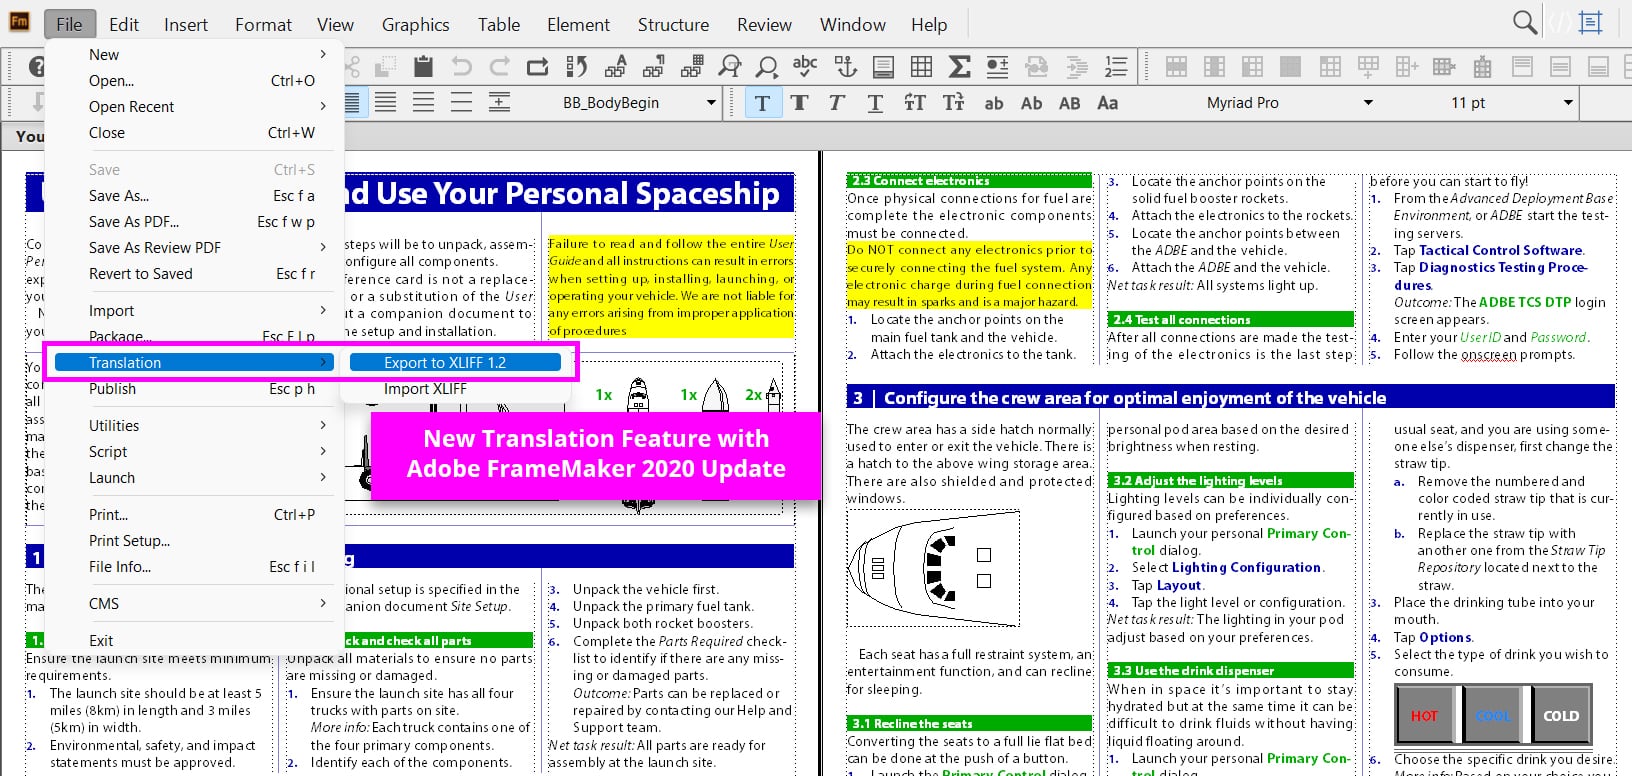
Step 1: Export your FrameMaker File to XLIFF
Since FrameMaker doesn’t have a built-in translation feature, your first step is to export your content as an XLIFF file and translate it elsewhere. To do so:
- Duplicate the FM document you want to translate and place it in a new folder.
- Open the duplicated document.
- Go to File → Translation → Export to XLIFF 1.2
- A dialog like the one pictured below will appear. But keep in mind that yours may look slightly different depending on the file type you’re trying to export.
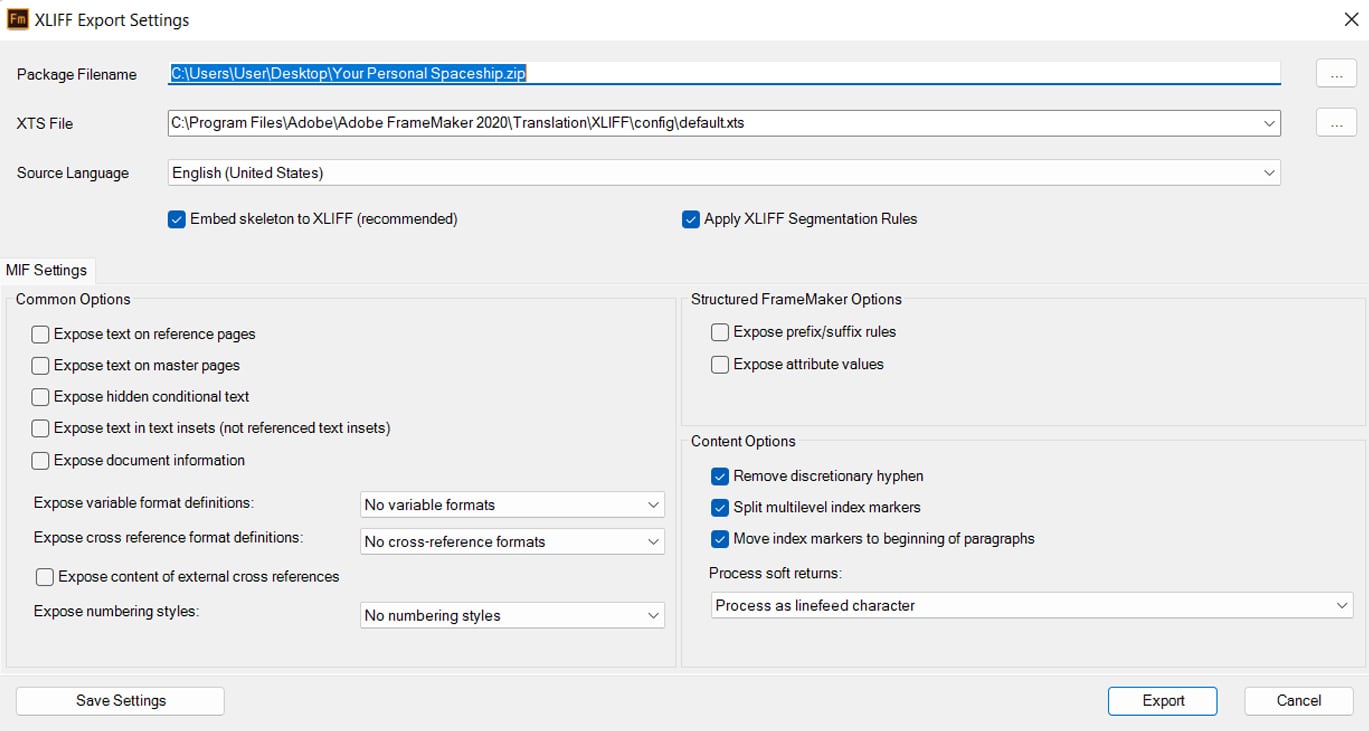
In this example, I’m exporting a FrameMaker document. If yours is a structured map or topic, then your dialog will have less configuration settings.
- You can modify the settings based on your needs but here are the main items you should pay attention to for a basic translation project:
- Package Filename: This is the name of your exported ZIP package file, which will contain the ZIP file.
- Source Language: The original language of the document you are exporting.
- Embed Skeleton to XLIFF (Recommended): If selected, you ensure that your translated document can be reverted to its original form, even if you lose the original FrameMaker document.
- Apply XLIFF Segmentation Rules (Recommended): If selected, your content would be divided into smaller text segments. These smaller units can be more easily matched to the content in other documents by translation software so that you can automatically reuse their translations. For advanced users, check out this guide to customize your segmentation rules.
Once you’re satisfied with the settings, click Export and you’ll find the ZIP package in the folder where you saved the original FM document.
Step 2: Translate your file using a translation management system
After exporting your an XLIFF file, you can start translating it by importing it to a translation management system that supports XLIFF.
I’m using Redokun in this example because of several advantages it offers in terms of collaboration and ease of use. But the steps should be generally the same for other tools.
Translating on Redokun
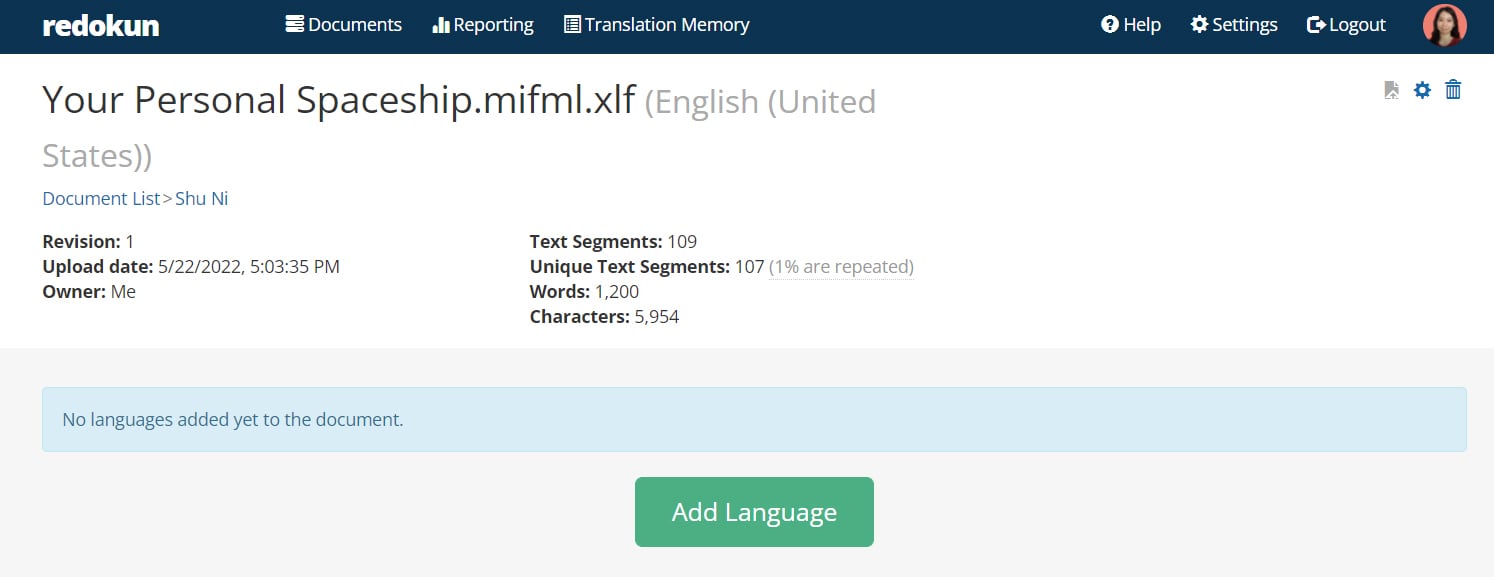
- Extract the ZIP package you exported to the same folder as your source FM document.
- Create an account on Redokun and start your free trial. No credit card is needed so you can try it out without worrying about random charges.
- Click Upload Document and select the XLIFF file you just extracted.
- Follow the upload wizard to set up your translation project, which entails adding your target language(s) and inviting your preferred translators for each one. They could be your colleagues or translation vendors.
Here is a list of 40+ places to find a translator for every target language you need.
- Optional: Staring at a blank page while deciding how to start translating is the worst feeling ever. At the end of the setup, you can Pre-Translate the document using Redokun’s built-in Google Translate or DeepL engines. And if you’ve translated a file before on Redokun, the Pre-Translate feature also digs into your past projects for matching segments and applies their translations to the current document.
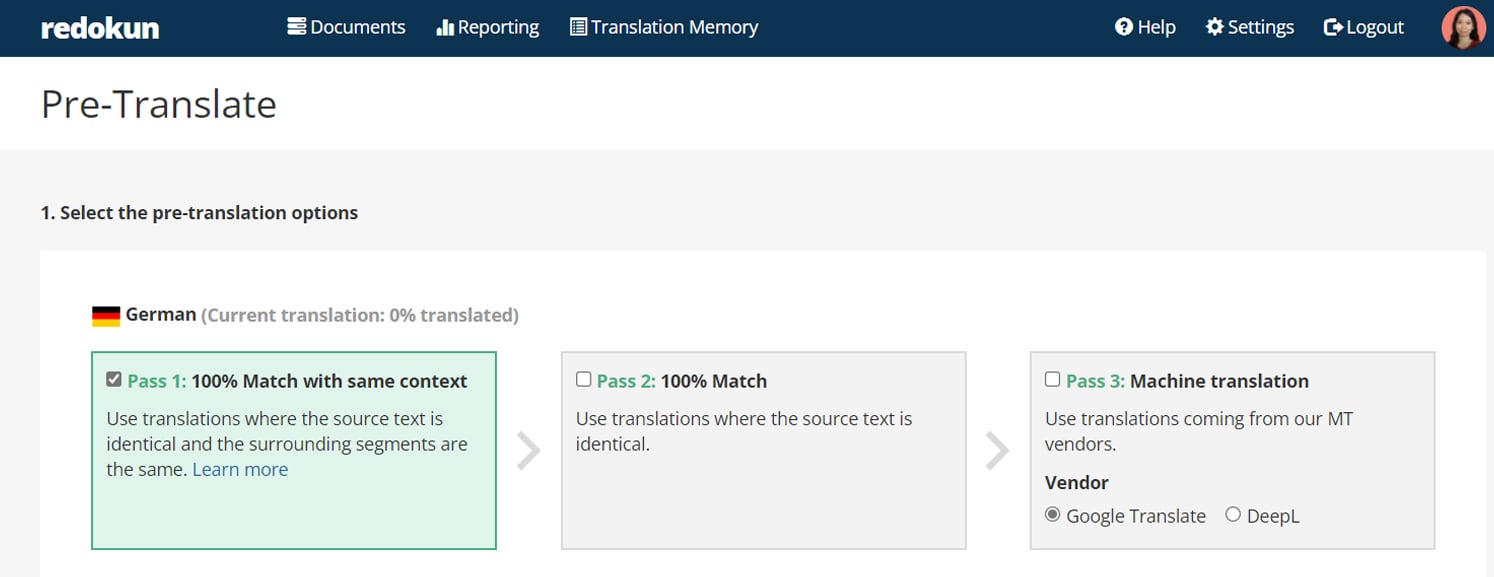
In short, you can use Pre-Translate to lay some much needed groundwork before the project goes to the people responsible for translating and approving the text. They’ll be free to edit the pre-filled translations in the next step.
- Your translators will receive an email inviting them to translate the document on Redokun’s Web Editor. The text extracted from your FrameMaker XLIFF file will be organized in segments that are easy to view and translate:
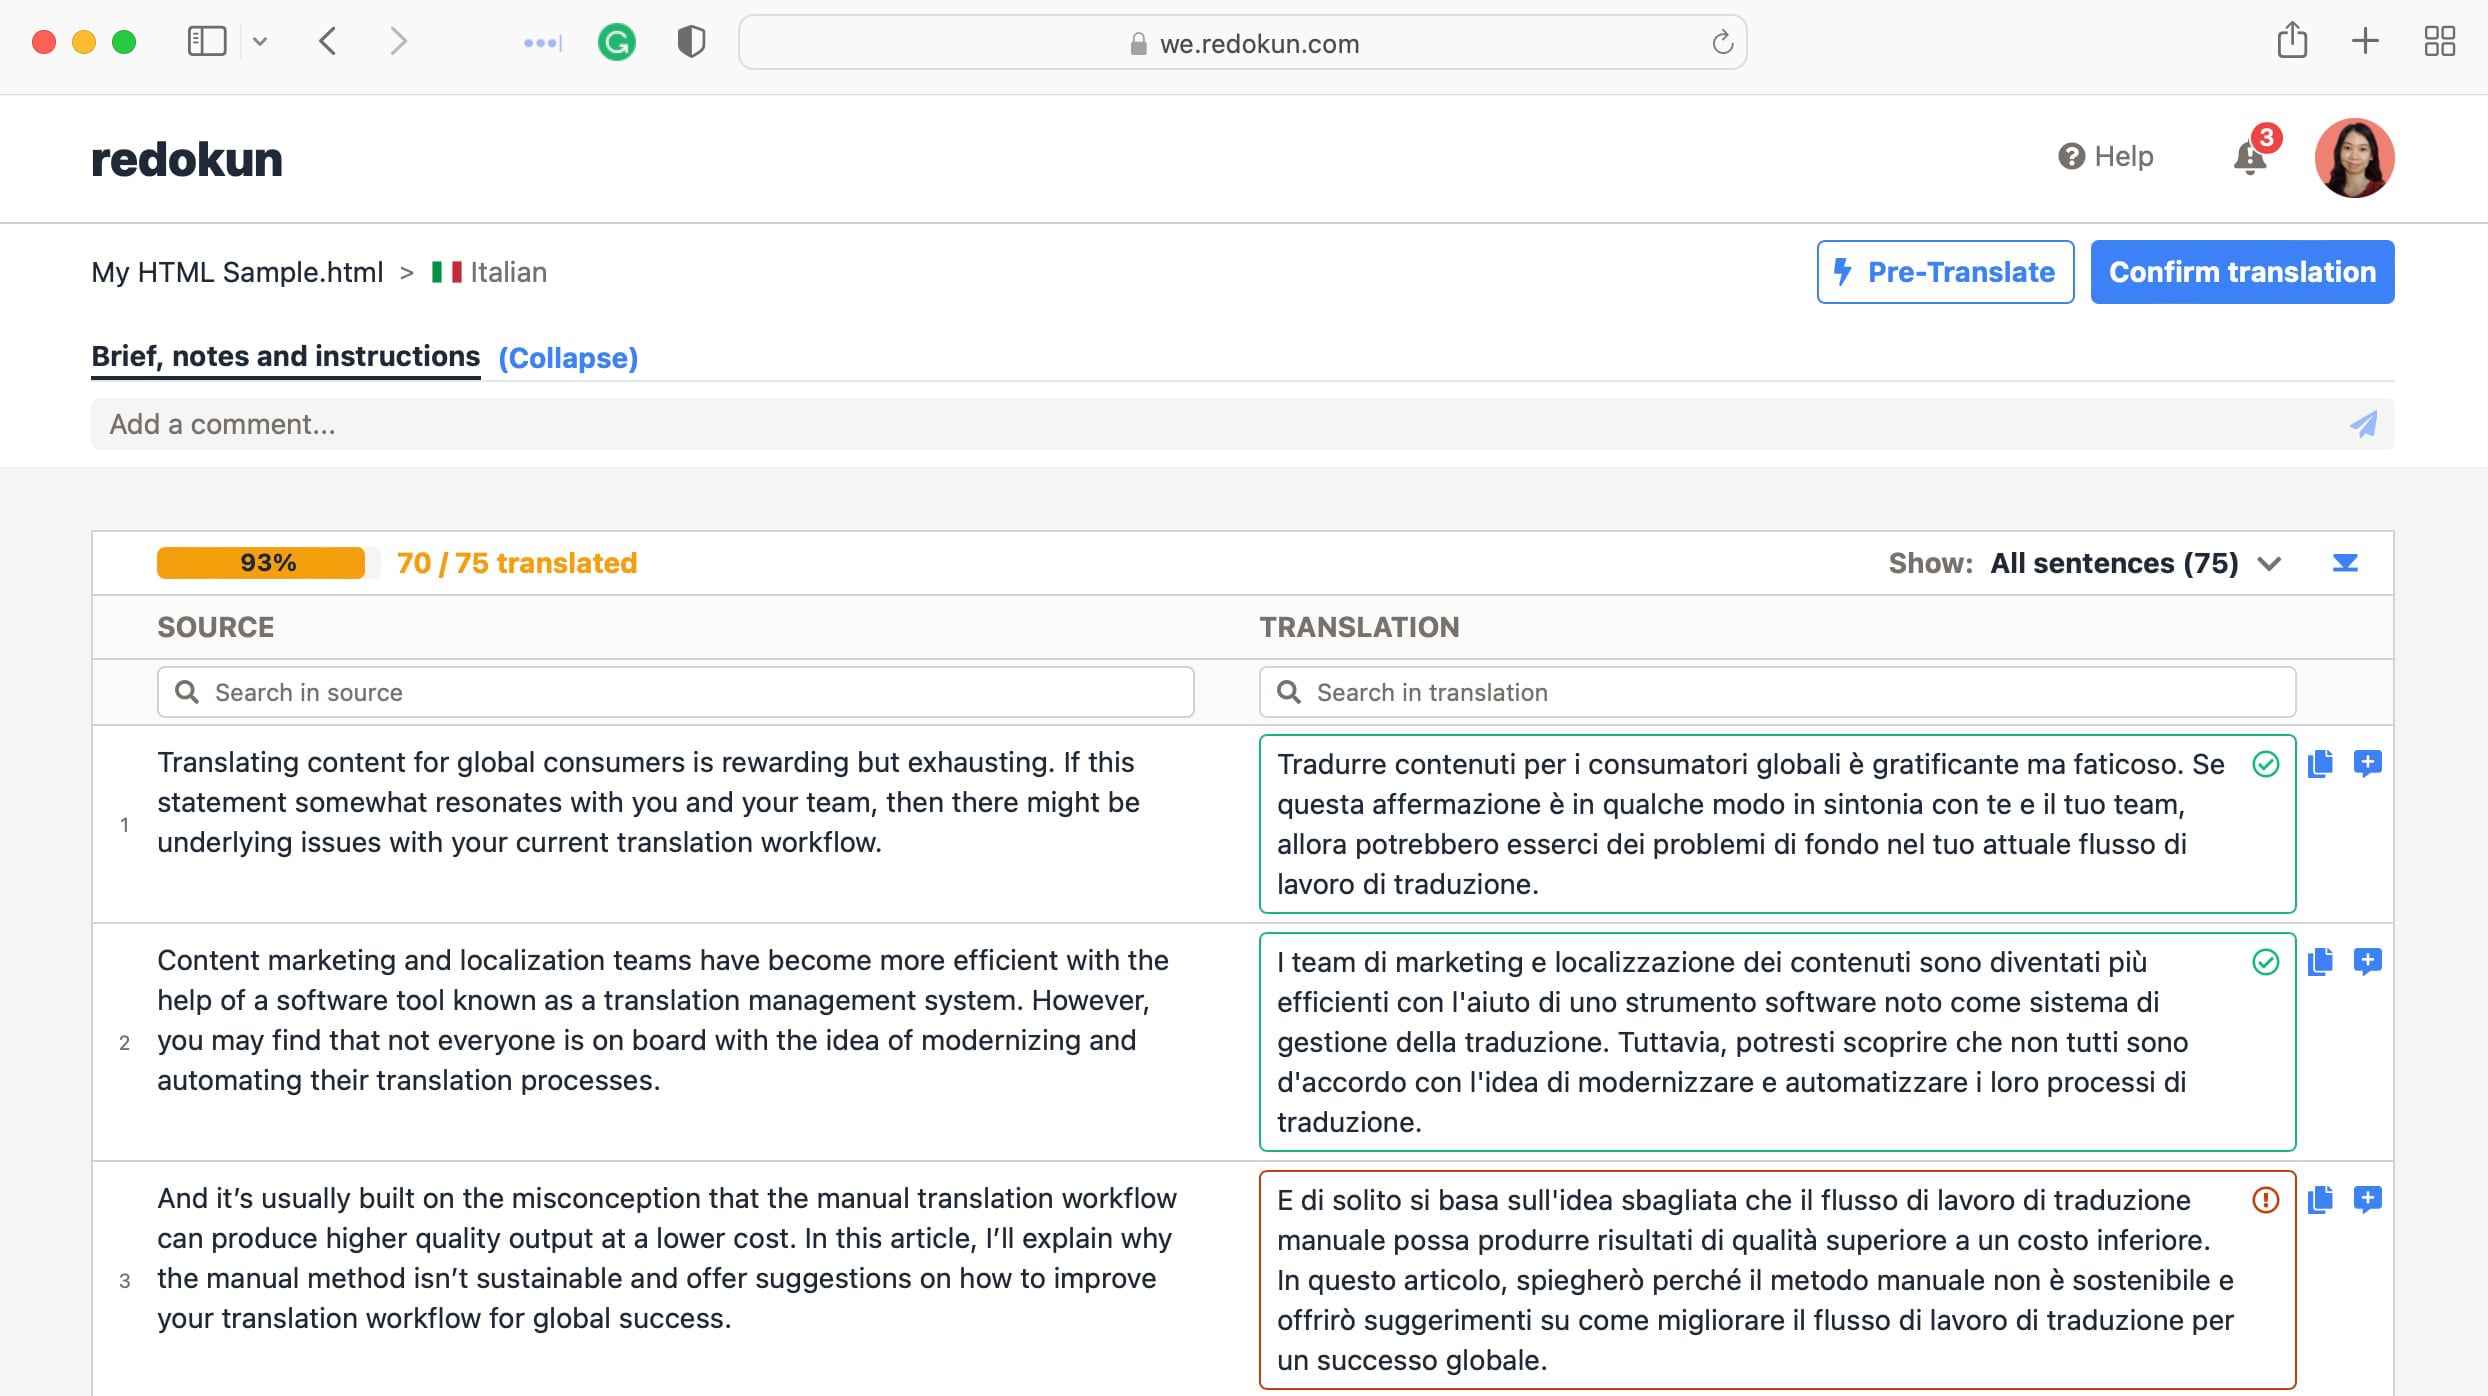
As your translators get to each segment, they’ll have the option to:
- generate translation suggestions
- leave a comment and tag another person for help
- confirm the translation for a specific segment to lock it in
Overall, it’s much easier to work within this translation interface, especially if your translator is not trained in Adobe FrameMaker. Normally, the other option in these cases is to extract the text manually into an Excel file for translation. But all of this can be automated by tools like Redokun without ever involving a heavy spreadsheet.
Downloading the translated XLIFF file
Once your translator clicks Confirms translation in the Web Editor on their end, you can download the translations in XLIFF format. To do so:
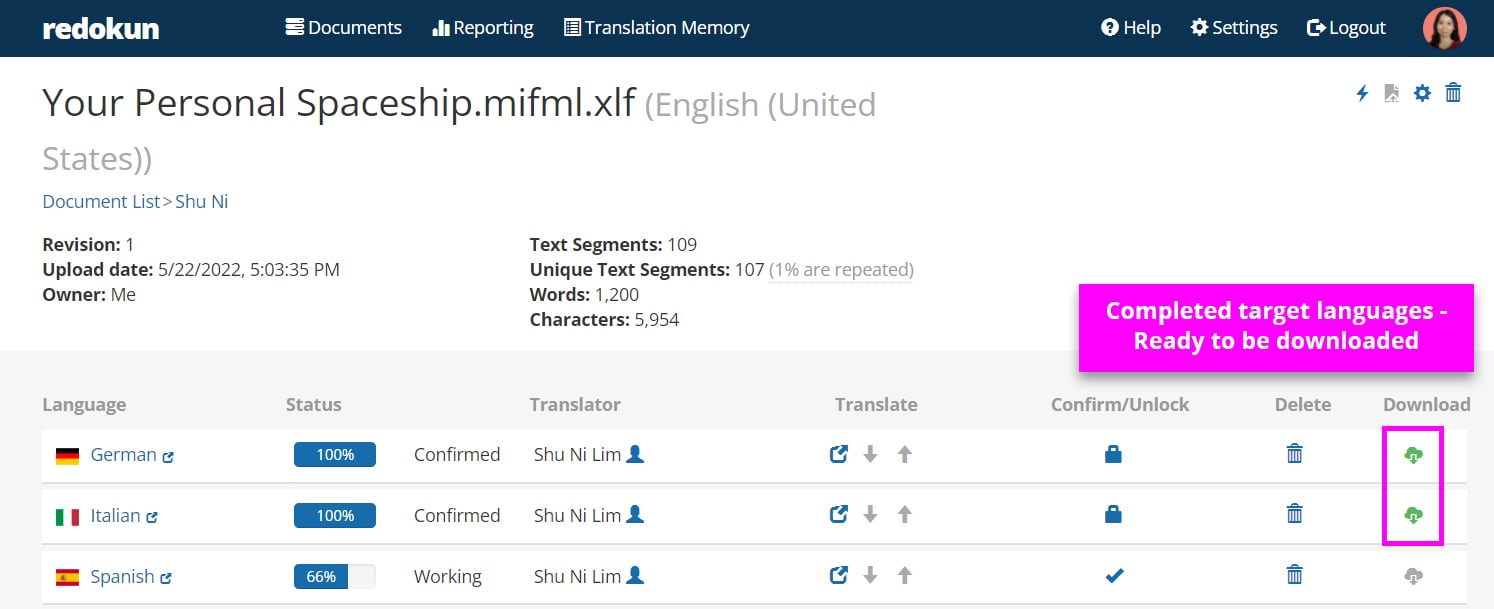
- Go to your Document Detail page where you can see the progress of all target languages.
- Click the Download icon for the target language.
Step 3: Import the translated XLIFF back to FrameMaker
The final step is to import the translated XLIFF file to Adobe FrameMaker. This will apply the styles and formatting of your original FrameMaker file to the translated version. And then you’ll have everything ready to go for market circulation.
Creating a ZIP package for the translated XLIFF
To import your XLIFF to FrameMaker, it needs to be a package file so let’s create that first.
- Duplicate the package file you exported in Step 1.
- Open the duplicated ZIP and replace the existing .xlf or .xliff file inside with the translated one you downloaded from Redokun. The XLIFF file should be nested inside the folders results → xliff.
Importing the package file to FrameMaker
- Open Adobe FrameMaker.
- Go to File → Translation → Import XLIFF and the following dialog will appear.
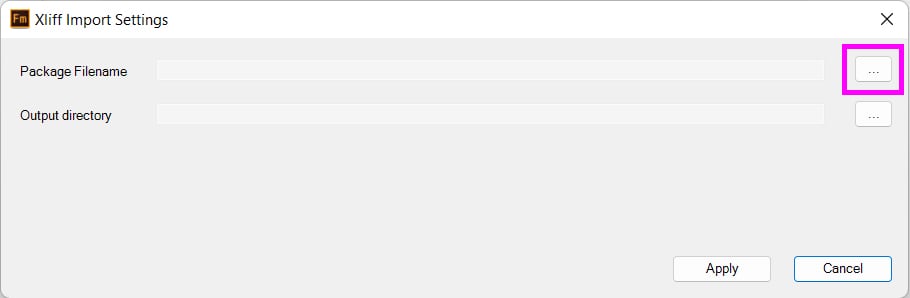
- Click on the menu at the end of Package Filename and select the package file that contains the translated .xlf or .xliff file.
- Important: For Output directory, please specify a location you can easily find. I recommend creating a new folder and use the target language somewhere in the folder name, such as My Catalog - Italian. Absolutely avoid using the same folder you started off with because FrameMaker will overwrite the original files.
- Click Apply.
If you have multiple target languages, create a new folder for each one and point to their specific folders as the Output directory when you import their respective XLIFF files.
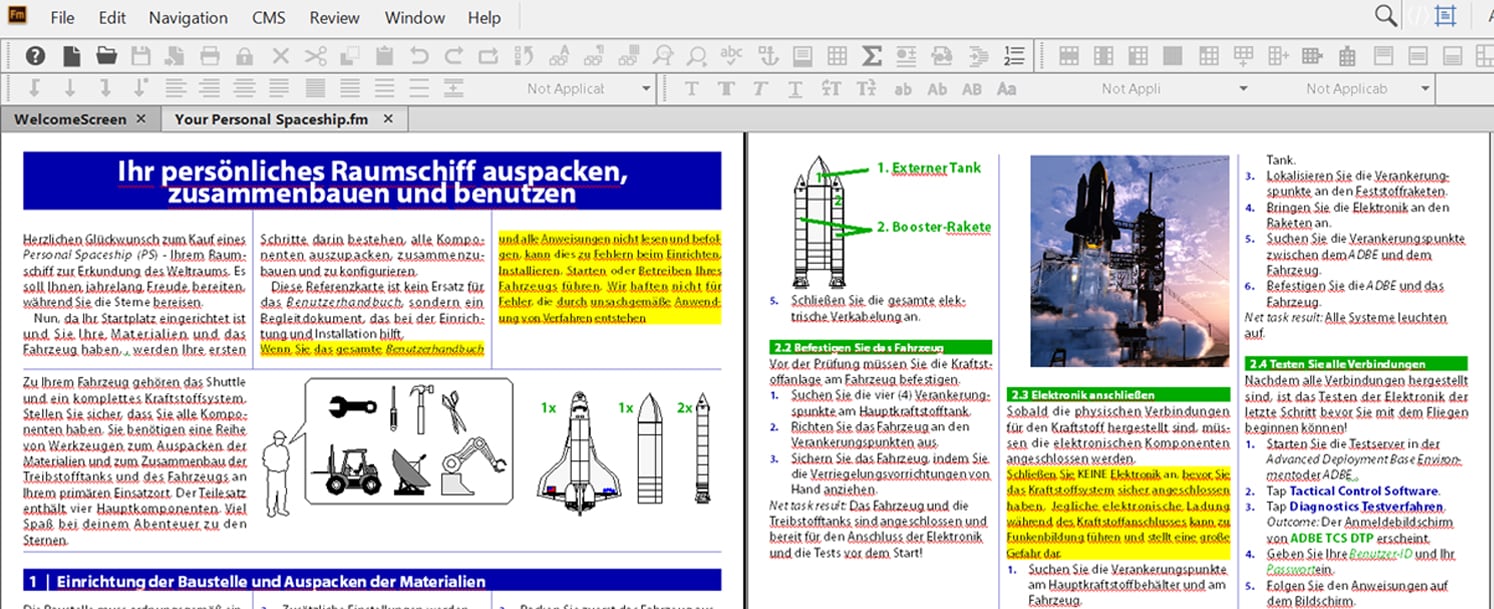
Your translated FrameMaker document should open up in the new language with all the images and styles added to them. You’re ready to roll them out for your multilingual readers.
Best Practices for Translating FrameMaker Files
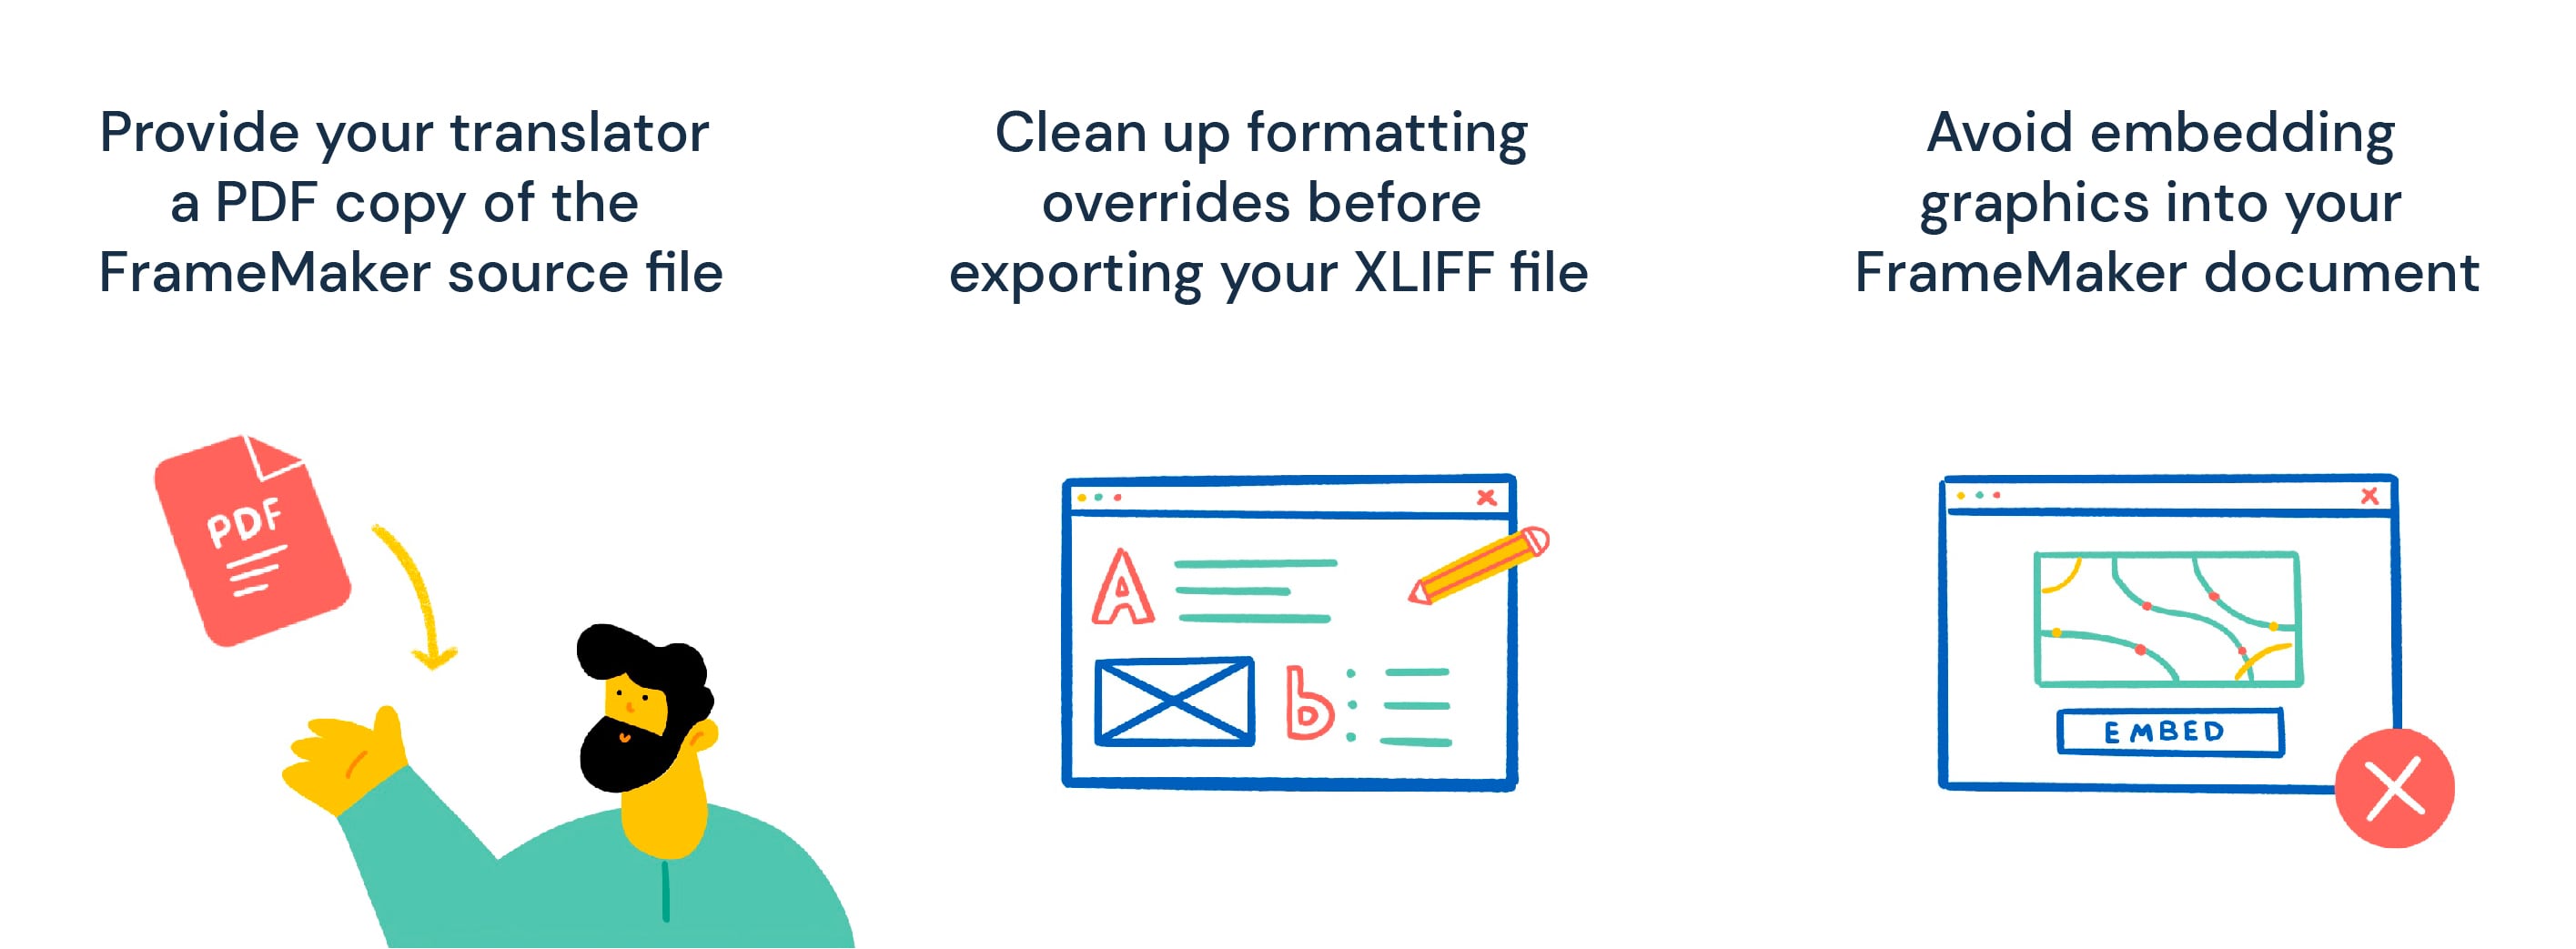
Here are a few tips that will help raise the quality and consistency of your translated FrameMaker document.
- Provide your translator a PDF copy of the FrameMaker source file: This ensures that they have the full context while translating the text. The PDF copy provides key information that cannot be seen through an XLIFF file, such as images and arrangement of text.
- Clean up formatting overrides before exporting your XLIFF file: This refers to styles that have been applied to specific paragraphs or styles individually when they should have been done globally (Apply to all rather than Apply to). Another type of override is automatic hyphenation. Learn how to handle formatting overrides in FrameMaker here.
- Avoid embedding graphics into your FrameMaker document: Instead, import your graphics by reference to keep the file size small, which minimizes the resource demand on both hardware and software.
Speaking of software, it’s important to choose the right translation tool to translate your FrameMaker document. Of course, you don’t want to add another complicated software to your plate, especially if your workflow involves multiple collaborators.
Why translate FrameMaker files with Redokun?
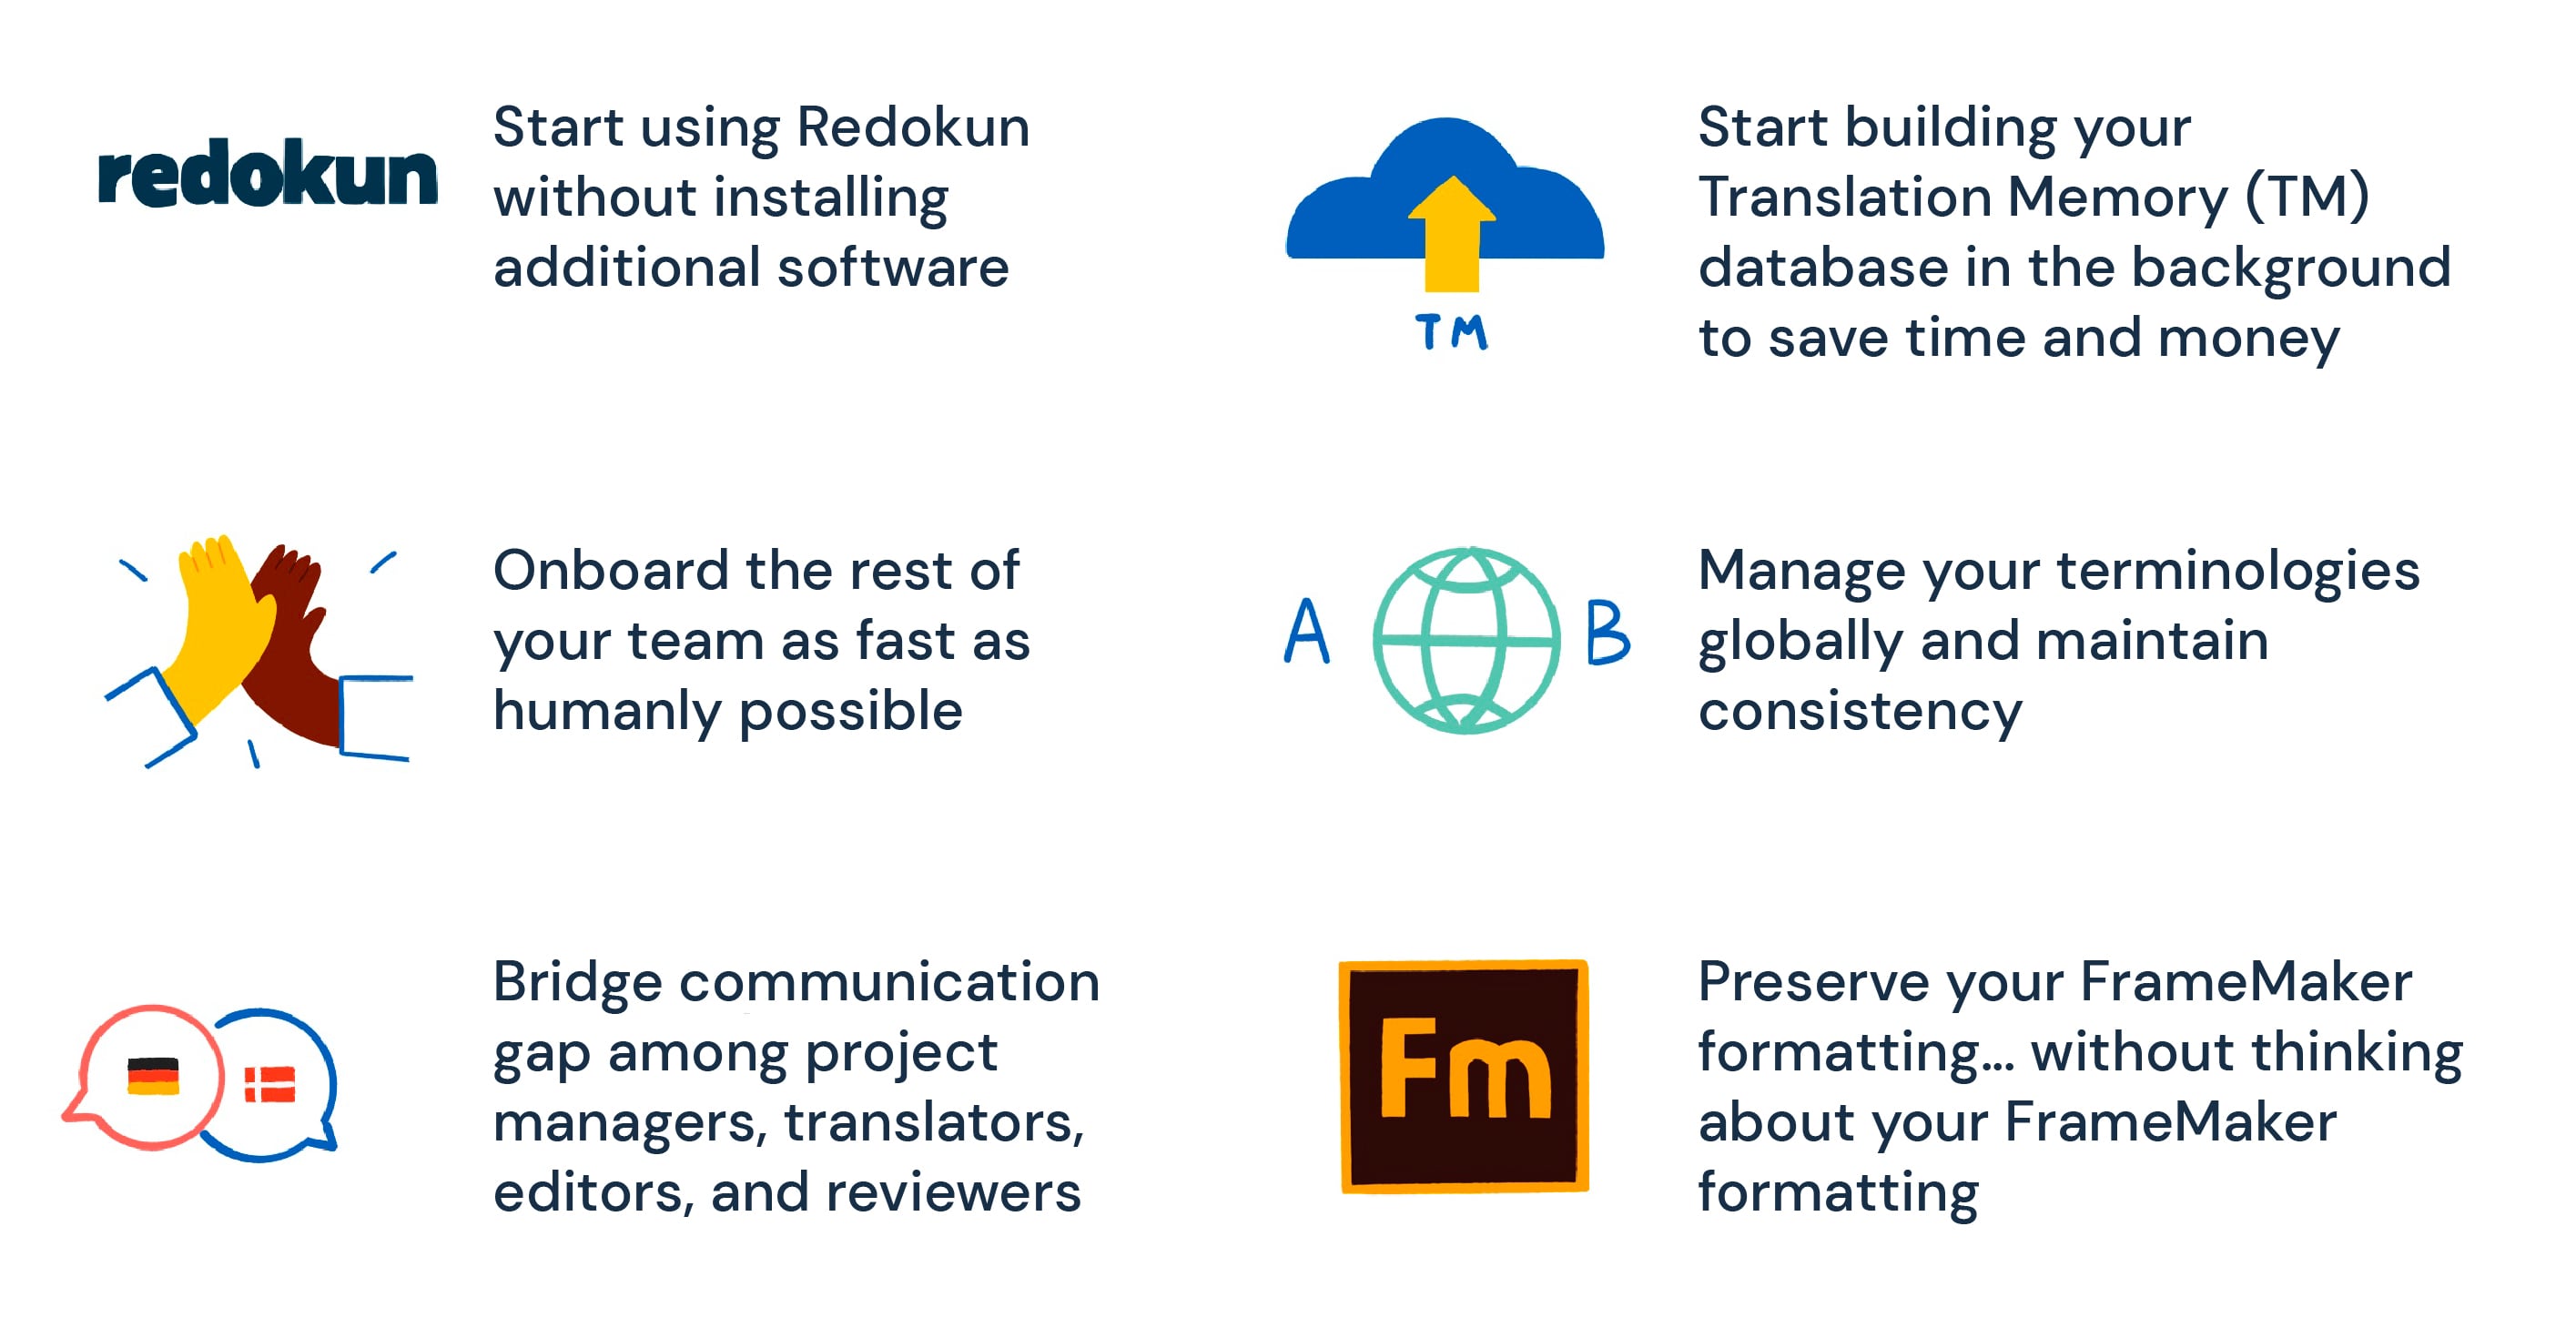
When getting a new tool to optimize your FrameMaker translation workflow, you hope to hit the ground running the moment you start using said tool. Redokun is the missing piece that supports the transition from “why is this so tedious” **to “my life is changed forever”.
Start using Redokun without installing additional software
With a cloud-based translation solution, all you need is to open a browser and log in to your account.
Onboard the rest of your team as fast as humanly possible
Redokun’s translation interface is designed to be intuitive and easy to use. The experience is completely different from translating in a spreadsheet or directly in FrameMaker.
Bridge communication gap among project managers, translators, editors, and reviewers
Redokun brings your team together on one platform, which could be your in-house colleagues or external vendors. With the tagging and comments feature, your collaborators can quickly exchange feedback when and where it is most needed - right down to the specific segment in a specific document they need help with.
Start building your Translation Memory (TM) database in the background to save time and money
Redokun routinely saves your completed translations in a private and downloadable TM database so that they can be reused. When you translate a FrameMaker file that uses the exact same words or sentences in a previous project, you can translate it in just one second. And if the match is not 100% but highly similar, you’ll have a useful translation suggestion to build on.
Manage your terminologies globally and maintain consistency
It’s important for translations of special terminology to stay consistent throughout all your technical documentation. If you need to make changes, you can simply use the Translation Memory manager to edit the segment translation and automatically apply it to matching segments across all your documents.
Preserve your FrameMaker formatting… without thinking about your FrameMaker formatting
By pairing Adobe’s XLIFF exchange feature with Redokun, you wouldn’t have to worry about how to format your translations in FrameMaker. Not all of your translators will be trained to write Adobe FrameMaker files but they can still translate them without breaking the structure.
Summary
Adobe FrameMaker certainly has a steep learning curve but your translation workflow doesn’t have to suffer, even if your translators are not familiar with the program.
With the XLIFF exchange function, your team can start translating FrameMaker files like clockwork through a 3-step process: export, translate, then import.
A translation management system improves this process by bringing automation to all the tasks where automation is possible. You know, the stuff we’d rather not do because it’s a colossal waste of time that causes translation projects to take longer than they should.
If you need to optimize your FrameMaker translation workflow, here’s a free trial of Redokun to help you get started.
Thanks for reading,
Shuni


