


In this article, I will try to answer both of these questions in a simple and swift manner.
Here's a practical overview of everything we'll mention:
Overview
- What is a GREP InDesign?
- What are GREPs for?
- How can you use GREPs?
- Getting started with GREP InDesign is simple
- What elements can you define with a GREP InDesign?
- Examples of applications of GREPs
- Learn to use GREPs
What is a GREP InDesign?
The name sounds intimidating, doesn't it?
It looks like one of those acronyms for programmers. One of those alien technologies that take weeks and months to learn.
Nothing could be farther from the truth! GREP expressions are really easy to learn. InDesign has tools that help you use this crazy technology immediately and in a really simple way.
But what are GREPs?
A GREP is a formula (an expression) made up of meta-characters that can represent text, conditions or patterns (repetitions).
Do you need an example?
In a nutshell, imagine all the text contained in a history book. Inside it there are a lot of different dates. If you are in your senior year in high school, the years of all these dates will probably be made up of 4 digits.
GREP is an expression that allows you to find all these numbers.
What are GREPs for?
Let's stay on the history book example: with a GREP (specifically this one \b\d{4}\b) you can instantly find and edit all these years and decide if you want to:
- give the dates a special format (e.g. put in bold all the years);
- add text before or after the years (e.g. add AD after the year);
- change the dates (e.g. instead of 1700, 1701, 1702 you want the dates to be 1800, 1801, 1802).
Did you catch that? I said instantly!
This means that whether you're editing a 10-page book or a 300-page book, your workload will be the exact same - virtually nonexistent!
Sounds interesting, right?
But GREPs can do much more. For example, you can also use them to rearrange text or data you have imported.
How can you use GREPs?
You can use GREPs in Find/Change or in a Paragraph style to find a specific condition.
GREP in the Paragraph Style
Paragraph Style GREPs allow you to search for a certain condition and apply formatting to the text found.
This application takes place automatically- as soon as you insert the text that presents the situation described by the GREP, and you associate the Paragraph Style in which you inserted the GREP, InDesign adds the formatting immediately.
The formatting is controlled by a Character Style that you will have to assign when you create the GREP.
Go here to learn how to create a Paragraph Style in InDesign.
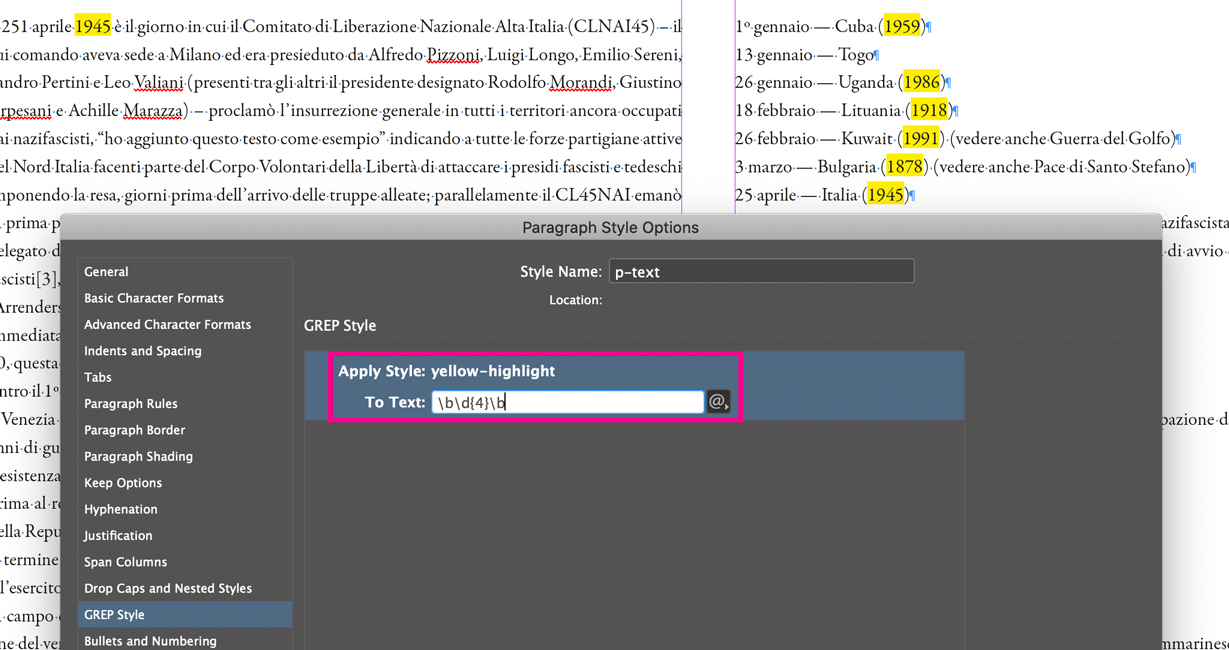
You can insert a GREP into a Paragraph Style by going to the GREP Style tab and selecting New GREP Style.
After creating the GREP Style, you will have to choose which "Character Style" to associate with the found text and then enter your GREP in the "To text" field.
GREP in Find/Change
Using GREPs in Find/Change gives you superpowers.
I'm not exaggerating!
You can open the Find/Change panel, go into the GREP tab and in the Find field you can write your GREP.
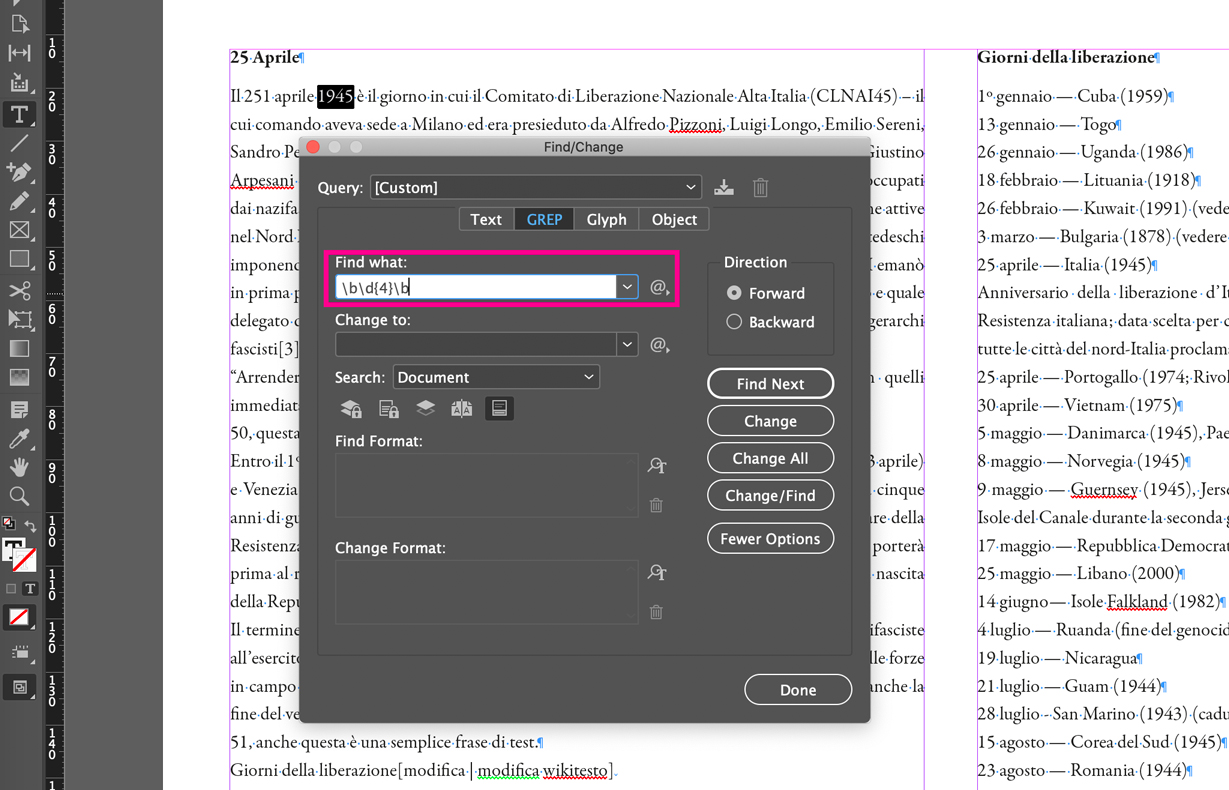
Then by clicking on "Find next", "Change" or "Change all" you can use your GREP to change the formatting or add/remove/edit text.
Check out what the Adobe InDesign User Guide has to say on this specific topic.
What you can do with GREPs in Find/Change or Paragraph Style
In the table below you can see what you can do when using GREPs in Find/Change or in Paragraph Styles.
Getting started with GREP InDesign is simple
To write GREP, InDesign uses representations of the elements you are looking for. We can call these representations "meta-characters".
In the table below you can find some examples of meta-characters.
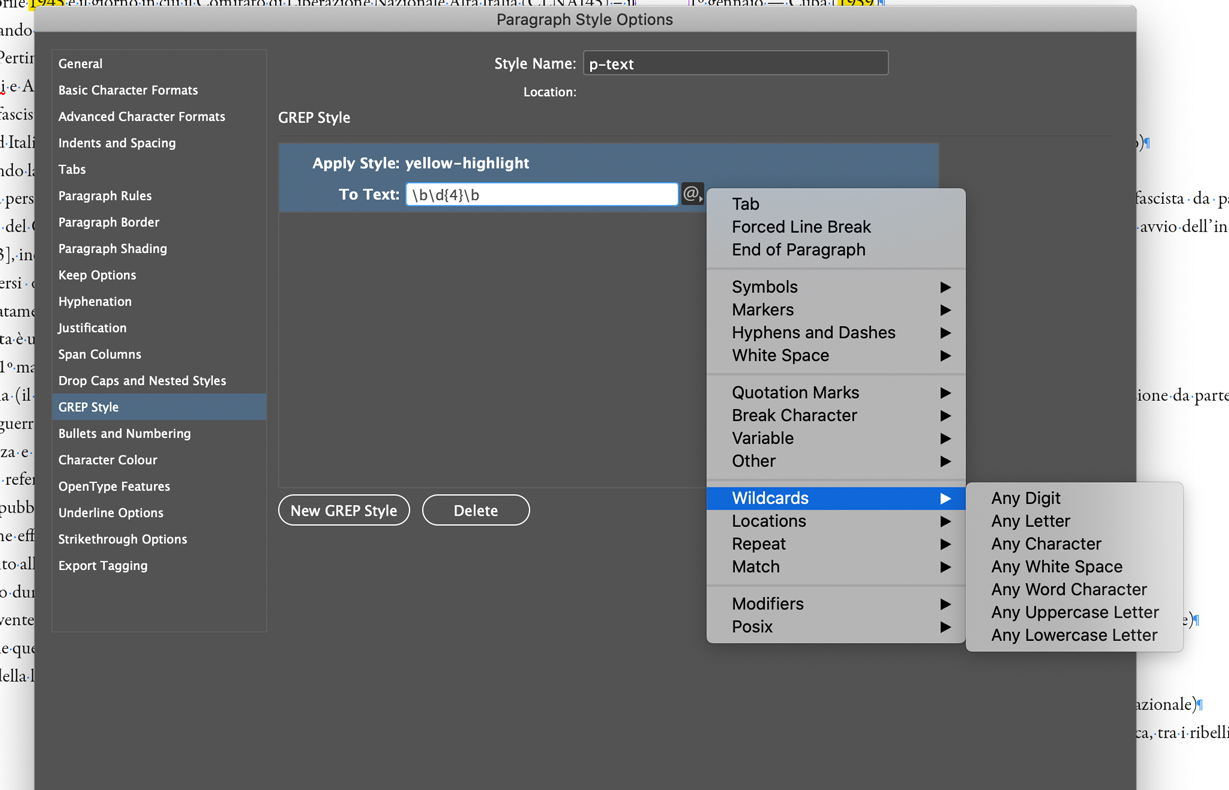
Once you have learned the logic with which to write a GREP InDesign, you can use the @ icon you find:
- next to the To text field when you enter a GREP in a Paragraph Style;
- or in the fields Find and Change to inside the Find/Change (in the GREP tab);
to insert meta-characters and start writing your GREP.
There is also an amazing tool, an online Regex tester and debugger, that helps you write/understand GREP InDesign. Check it out, and thank me later!
What elements can you define with a GREP InDesign?
In a GREP you can define:
- The type of font you are looking for (digit, letter, punctuation, glyph, etc.)
- The position (beginning of paragraph, end of paragraph, word limit, etc.)
- The number of repetitions (one or more than one, zero or one, zero or more than one, etc.)
- the conditions
Once you have learned the various elements, writing a GREP becomes an exercise in combining the various meta-characters and, with practice, you will be able to write functions that will allow you to automate a lot of processes.
Do you want an example?
The GREP I wrote above: \b\d{4}\b decomposed means:
- \b - word limit, in this case it indicates the beginning of the word
- \d - indicates any digit
- {4} - indicates a repetition of 4 times
- \b - word limit, in this case it indicates the end of the word
All this translated means: find four digits in a row and make sure there is no other text before and after the four digits.
Examples of applications of GREPs
GREPs can be used to format text. At the beginning of this post we talked about how to find 4-digit years and turn them into bold text.
But other applications could be:
- automatically correct "text widows” (a widow is a word that remains alone in a line at the end of the paragraph - (?<=\w)\s(?=\w+[[:punct:]]+$) );
- automatically set a particular style to all the email addresses inserted in the text to make sure that they won't be split up in two different lines of text (here an IDML with this GREP already set up - [-_.\w]+@[-_\w]+\.[\u\l]{2,3}(\.[\u\l]{2})? );
- set a particular style to all references to figures (e.g. "see figure 1", "see figures 1 and 2", etc.);
- automatically give a particular style to the prices included in a brochure;
- rearrange imported data (e.g. in a list of last names + names, exchange the position to names + last names);
There are many other tasks that you can automate with GREP, the ones I listed above are just a few.
Learn to use GREPs
In this article I have tried to explain to you in as much detail as possible what a GREP is and what you can do with it.
If, you want to learn everything there is to know on GREP from an amazing source, I recommend this online course.
And if you prefer learning from books, a shout-out should definitely go to Peter Kahrel and his "GREP in InDesign: An InDesignSecrets Guide”. Peter is a friend of InDesign users as he has always contributed extensively to the community with amazing scripts and resources (like this book).
In my opinion GREPs are the most powerful and useful tool you can learn to use (after learning the basics of InDesign).
If this post has got you craving more helpful tips on GREP, check out this wonderful Facebook group for a community of like-minded GREP-enthusiasts.
Until next time,
Stefano


