Adobe InDesign is without doubt my favorite DTP software. It’s powerful, reliable, and easy to use once you understand how it works and what it can do.
However, InDesign is not shipped with any translation feature.
A designer most of the time has to rely on other software (here are 4 you should avoid) to be able to create a translated version of a file (and spend a lot of time on edits and checks).
If you have dealt with InDesign files that had to be translated into many languages, as I did, you’ll most likely have struggled with at least one of these issues:
- Spending hours just copying and pasting from InDesign to Word and vice-versa;
- Preserving styles and layout during the translation;
- Being sure that everything is translated (also text inside images);
- Keeping each language updated when there is any content change.
What’s in this post?
In this post, you’ll find a couple of suggestions that you can apply to your documents right away and that will help you to improve the way you create InDesign documents for future translation.
These practices helped me to:
- Reduce the time spent creating translated files;
- Reduce the number of edits (to paragraphs, text-boxes, etc);
- Be faster at applying major edits (e.i. changing the font when importing Chinese language);
- Help the translators avoid mistakes.
Want to become more aware of similar issues? It's why I created this content with the 10 most common mistakes made when producing InDesign documents in many languages.
And if you want to dig deeper into the problem, and understand how to create "translation friendly" InDesign documents read our ebook on this topic.
To my knowledge, it's the most complete resource you can find online. You can download it for free by clicking on the banner below.
This is really a good work! I'm amazed by the attention you put on details and procedures you seem to know deeply – Serge Pauls (LinkedIn Learning, InDesign CC : La mise en page multilingue)
TIP 1: Check the hidden characters setting
When you are going to replace one text with a text in a different language, you want the general layout of your new file to be identical to the source document. In order to achieve that, with few edits (or no edits at all) and avoiding mistakes, you should have complete control over your document’s text and spot any control character that you missed or that you might not want to use (more on this later).
InDesign uses special characters that are invisible to the eye and the printed version of your document. These characters are called control characters. They are used, for example, to wrap lines, break paragraphs, space words in a specific way, etc. While creating or editing your file you want to see them, and have control over them.
To do so you should check the hidden characters setting by selecting Type > Show Hidden Characters.
If you turned Show Hidden Characters on, but you still can’t show any hidden characters, or to learn more about hidden characters, visit this blog post on Hidden Characters.
TIP 2: Try to avoid inline styles
It’s important to get the document styles right before starting the translation (more on this later).
Inline styles are great when you have to apply the properties of a single element. But as the number of elements inside the file grows, you might end up applying many properties each time for each element or using the Gradient Swatch tool to copy the style from an element to another.
This is quite time-consuming, and if you are going to replace your entire text or part of it with a new language it might turn into a very stressful and very imprecise exercise.
TIP 3: Use character styles and paragraph styles
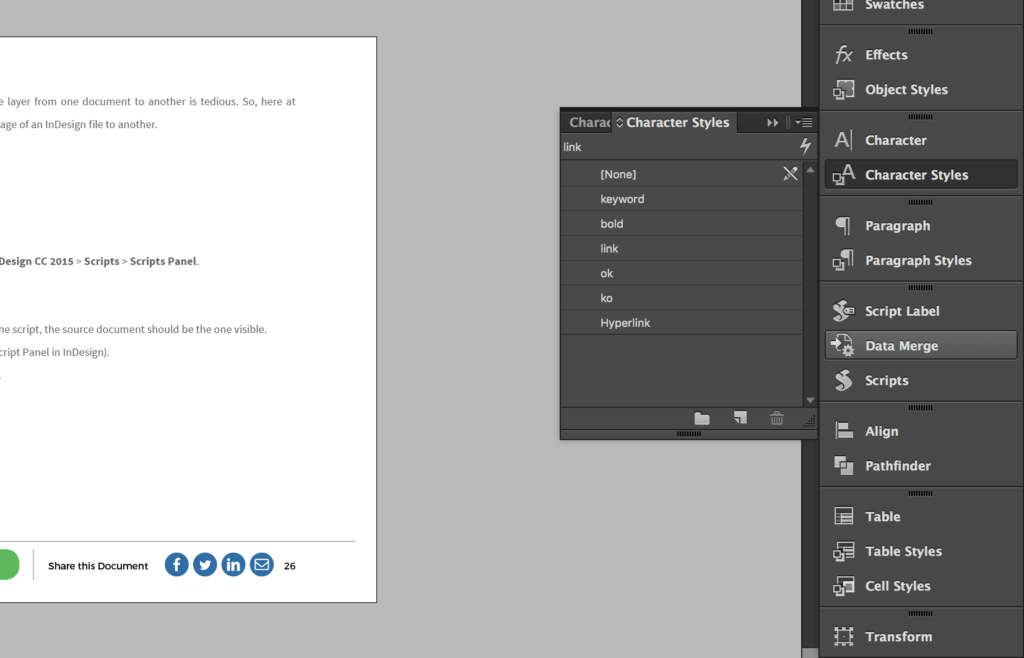
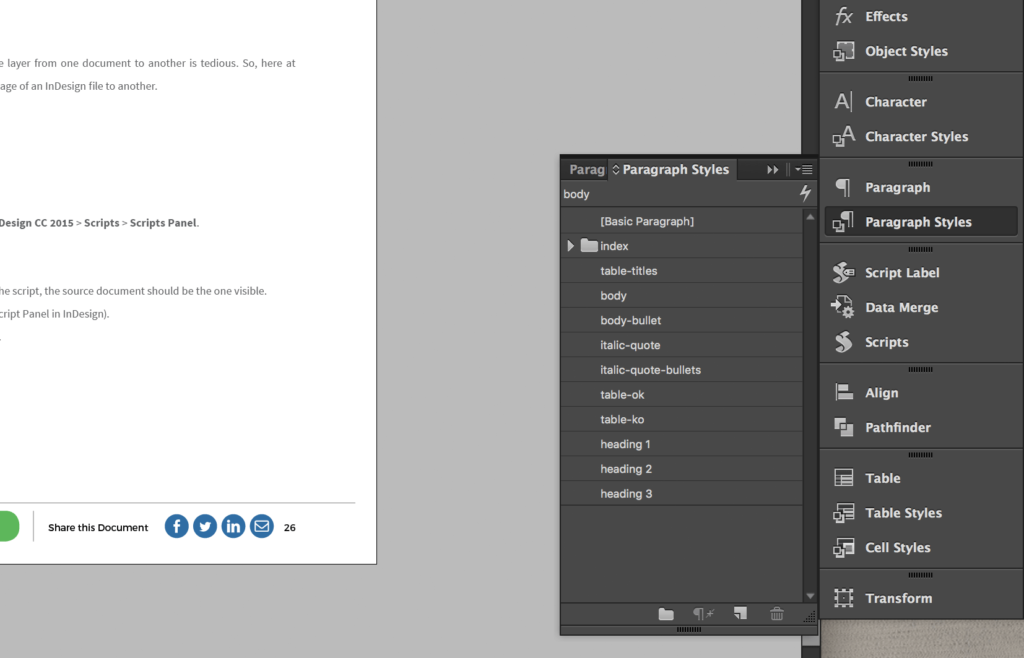
InDesign offers a super effective system of styles: Character styles and Paragraph styles that you can use to apply specific properties to the text in a single step.
A character style is a set of formatting character attributes (font family, font style, dimension, language, etc). While a paragraph style includes both character and paragraph formatting attributes (Indent, spacing, tabulations, etc. - here you can read and learn all about how to use InDesign paragraph styles).
You have two separate panels in InDesign where you can set character and paragraph styles.
Characters styles
Paragraph styles
If you don’t generally use them, start using them now! Using them properly will give you complete control over any file you prepare, and with time you’ll get way faster at creating your drafts and documents in InDesign.
See more about character and paragraph styles here: https://helpx.adobe.com/indesign/using/paragraph-character-styles.html.
Besides, if you are using a piece of software to translate your document, it will keep the styles structure unaltered.
And remember; languages such as German and English differ more than 30% in length. So, if you translate from a language like English to a more bulky one like German, you might want to change the font size of your translated version in order to accommodate that difference. With proper styles you’ll be able to do that in a few seconds.
Paragraph styles can also be helpful when the Fonts you use don’t have all the glyphs in the translated language.
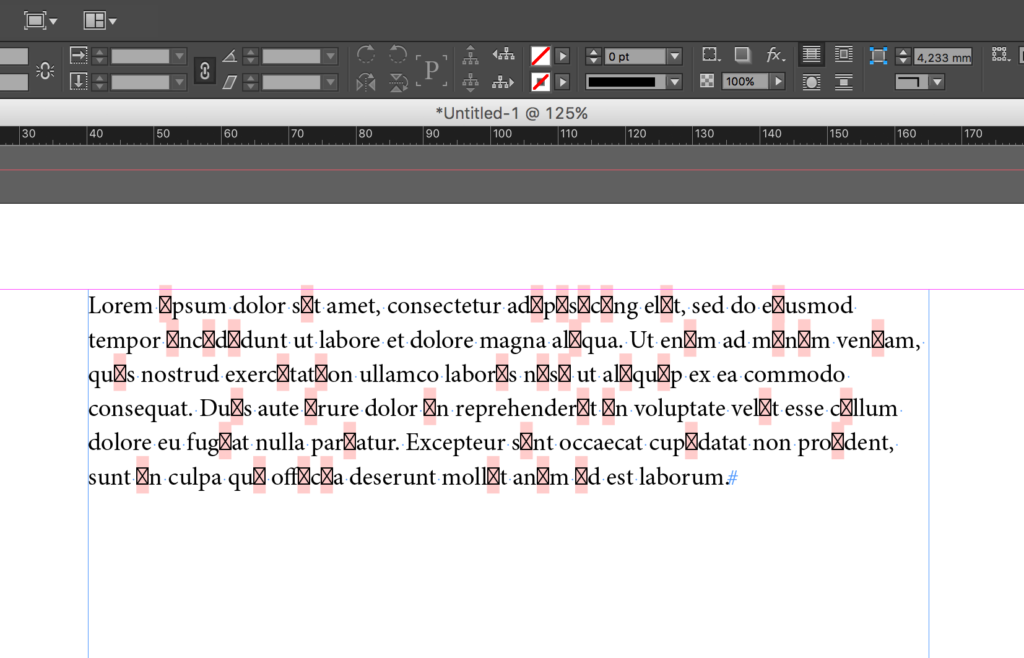
When a font is missing a specific glyph InDesign replaces it with a red square inside your document’s text where the glyph is missing. So, if your font doesn’t contain a letter with a specific accent, InDesign will replace that letter with a red square in the entire document, and that glyph won’t be visible in your text.
To fix that you will need to replace your font and with a style that is instant.
What is a glyph?
A glyph is a specific form of a character. For example, usually, in a font, the capital letter A is available in several forms, such as capitalized, small cap, with an accent, etc. Each of these versions is a glyph.
Also, if you use Paragraph and Character styles you will make your translator’s life way easier because the information into the document will be better structured and cleaner then using inline styles.
{{banner-component}}
TIP 4: Choose a font with all the Glyphs
Every language might contain a huge array of different Glyphs. So how do we find the fonts that contain all the characters we need?
Sadly InDesign has no integrated feature that can help us to search for a particular glyph. You can only visualize all the glyphs contained in a specific font.
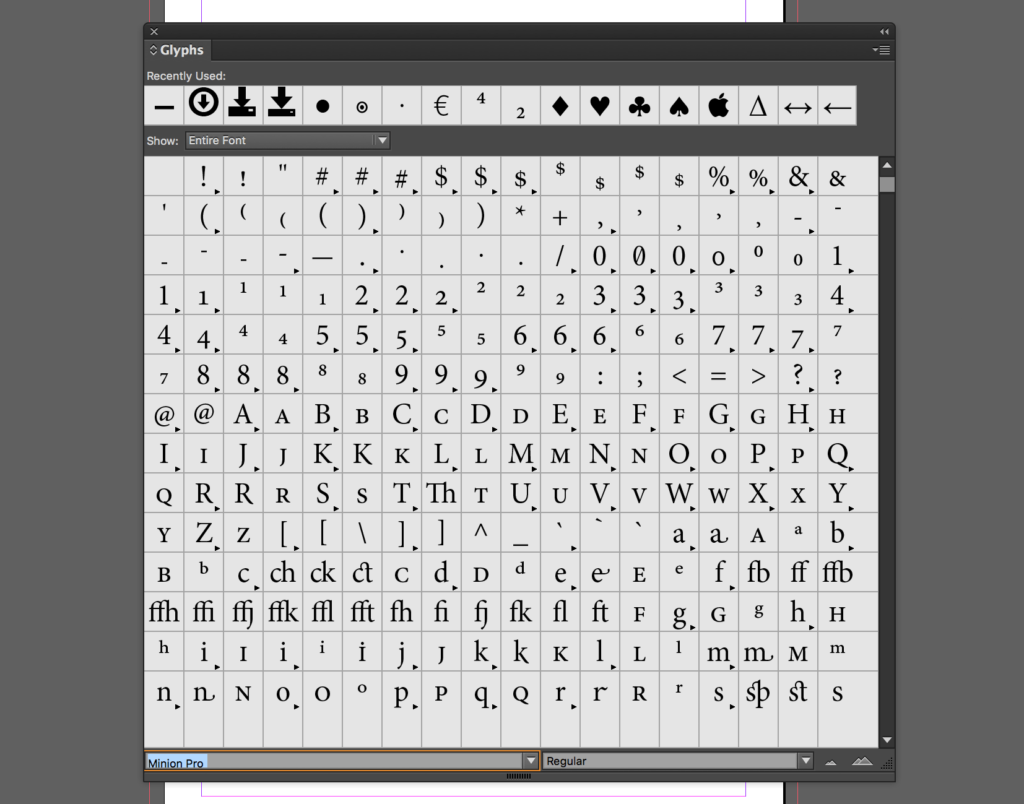
A helpful tool to choose the right font before starting a project is the Wikipedia page about Unicode fonts: https://en.wikipedia.org/wiki/Unicode_font. There you can find a table that lists which fonts contain the Glyphs you need. Unfortunately, that table only contains some of the most used fonts.
So, what if you want to use a different font from the ones specified in that table?
To check if a specific Glyphs is contained in the font of your choice, or to see which fonts contain a specific Glyphs, you can try the procedure described here: http://indesignsecrets.com/find-font-glyph.php.
TIP 5: Set the language attribute
Language is a character-level attribute used for both spelling and hyphenation rules. Being a character attribute allows you to assign a language to specific words so you can assign the right dictionary to words in “foreign” languages.
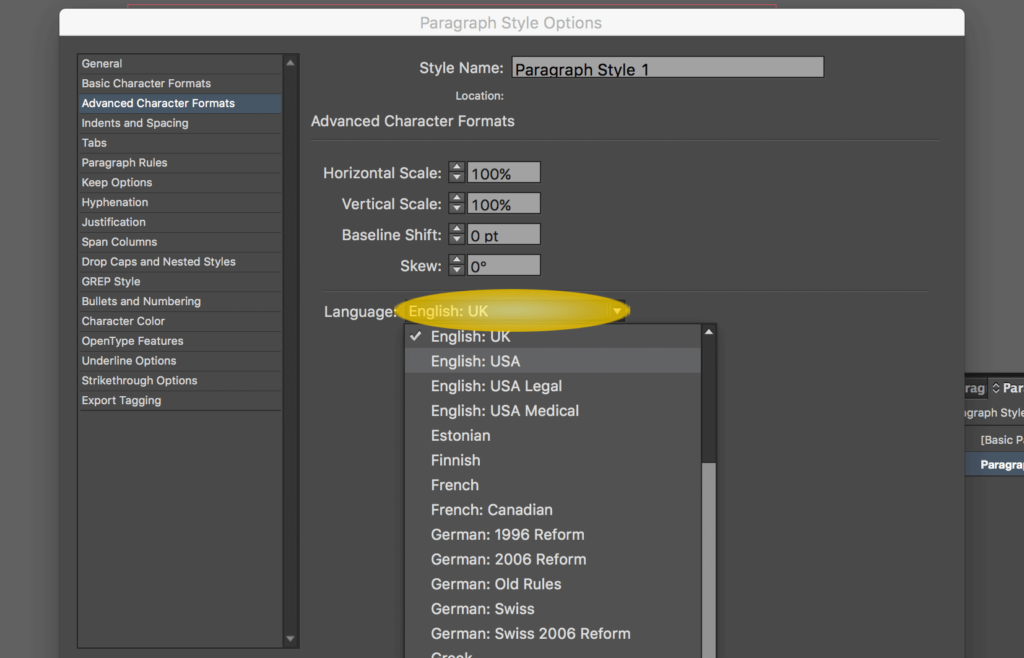
Any time you work with InDesign you should set the right language to your paragraph styles, that way you make sure that hyphenation rules are applied to your text and InDesign will help you to check the spelling.
TIP 6: Use paragraph indent instead of spaces and tabulations
Using several spaces and tabulations to align the text might create issues for you and the translators.
Keep in mind that CAT tools sometimes strips non-visible characters like spaces and tabulations, so if you’re abusing them, you might find yourself doing a lot of work in order to re-indent the text after the translation is done.
This practice also creates incorrect segmentation and is hard for the translator to replicate in the translation.
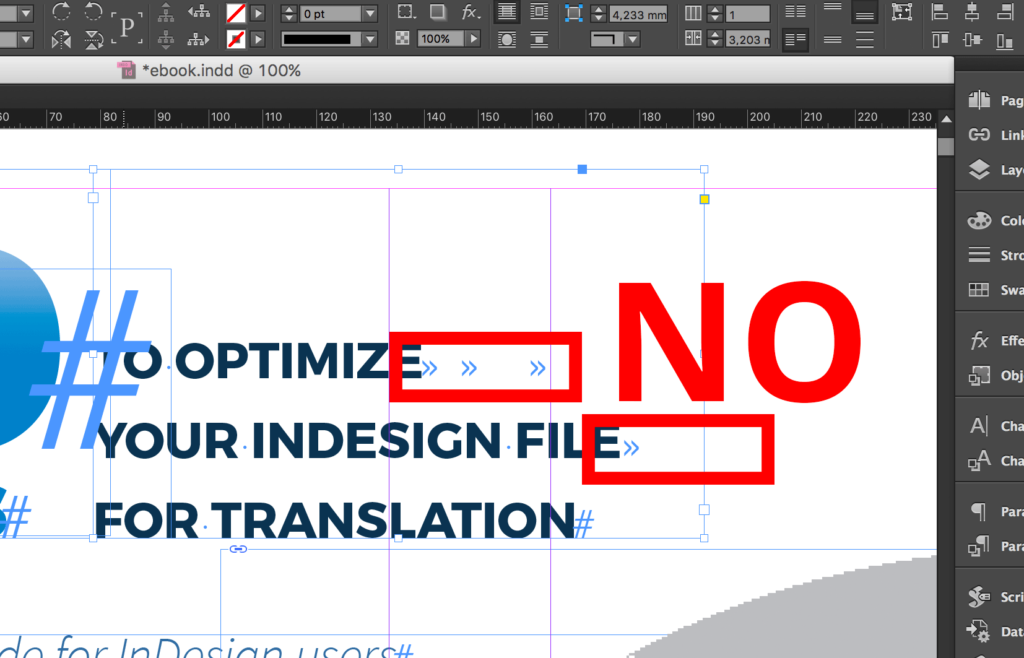
Bad segmentation won’t allow the translator to leverage any possible TM, and so your translation costs (or your client’s) will probably be higher and there might be consistency issues to be fixed later.
If the target language is longer or shorter, spaces and tabulations might create a different visual result that the one you designed.
Instead, a proper indent set allows you to automatically maintain your layout during the translation process.
What is a CAT tool? And a Translation Memory (TM)?
Often translators use tools to assist their job (technically Computer-assisted translation tools - the short form is CAT tools).
One of the biggest advantages you get using these tools is that they store the translation pairs for later reuse (Translation Memories). That helps translators to fasten the translation of your files (because they won’t need to translate one same sentence more than once) and to keep consistency throughout the document and each document you will translate in the future.
From a designer’s point of view, more copy consistency means fewer edits to be made after the process is finished.
TIP 7: Use bulleted lists and numbered lists properly
As for indenting with spaces and tabulations, using bullet lists or numbered lists incorrectly might damage the consistency of your translation and increase translation costs.
The best way to use them is by setting the bullet/numbered list paragraph attribute or creating a paragraph style.
Learn how to properly create and use them with the help of these two guides: InDesign numbered lists and InDesign bullet points.
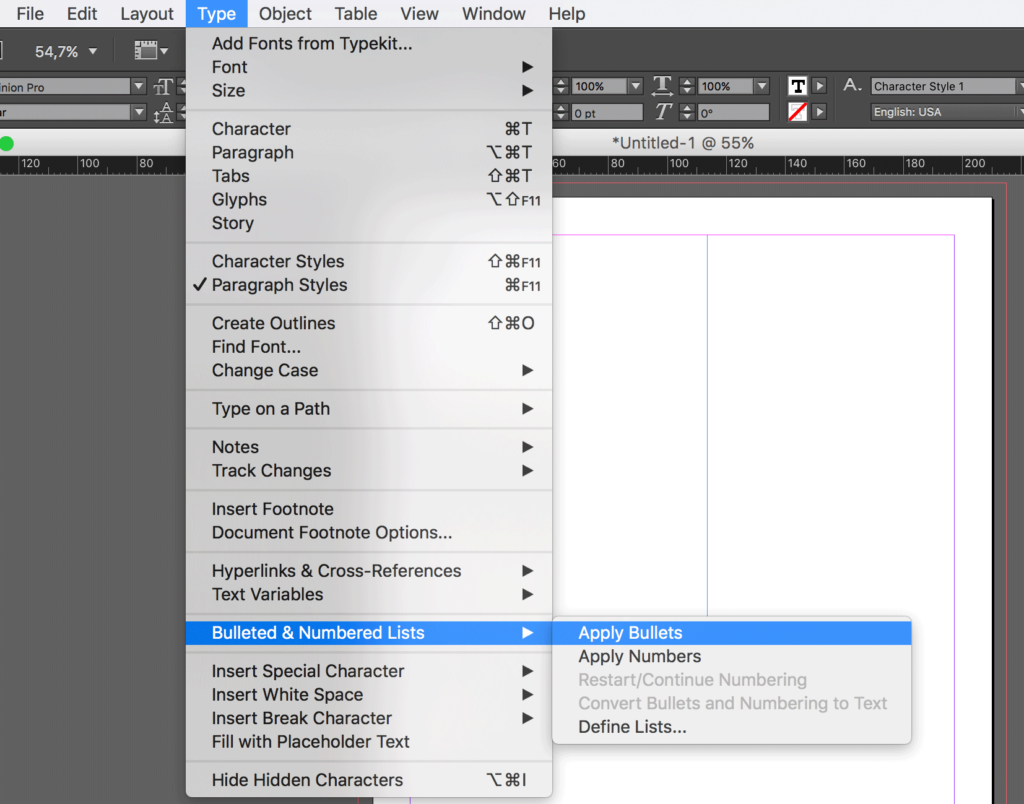
Proper bulleted lists and numbered lists allow you to automatically maintain your layout during the translation process. Why? You may ask.
Because they allow you to have a clean text segment without formatting characters and, like we said before, this will result in cleaner text extracted from your file.
TIP 8: Wrap your text with soft-returns rather than hard-returns
Avoid the use of hard-returns (also known simply as returns) in a sentence. If you need to wrap the text inside a paragraph, use soft-returns. Hard-returns should only be used to mark the end of a paragraph.
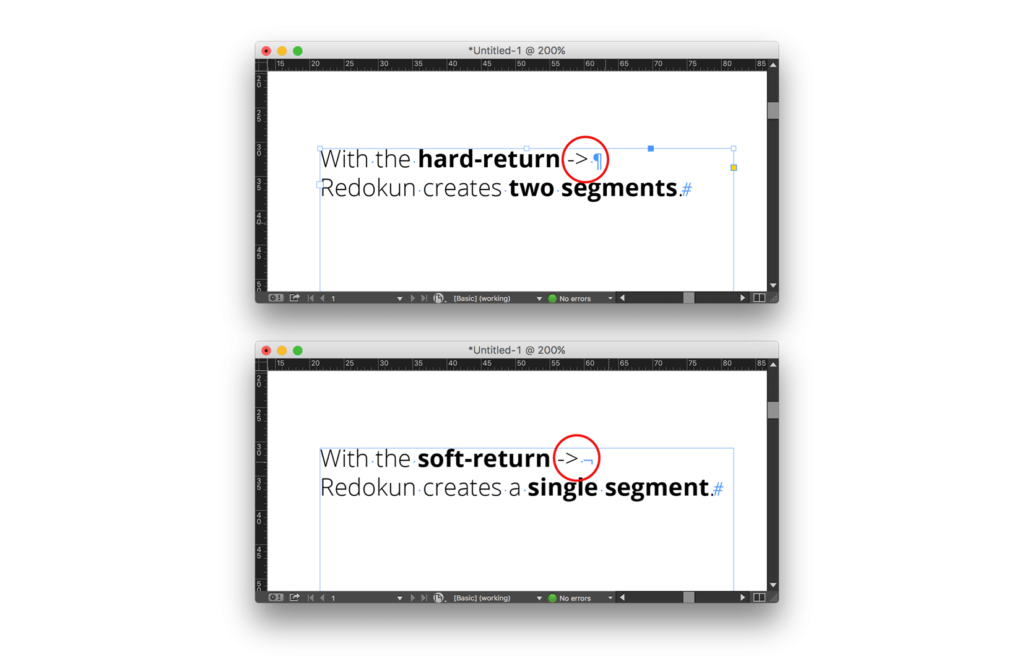
While editing your InDesign file each time you use a hard-return (paragraph mark) you are breaking the sentence and the CAT tool will interpret that as the end of the segment. So if, for example, you wrap a title to fit a specific design using a hard-return, you are creating two different segments (see picture) and the translator will hardly be able to manage the translation correctly. In fact, s/he will be left working on incomplete and unordered lines of text. Of course, this adversely affects the database of Translation Memories since it creates bad segmentation.
The right solution to wrap your text in InDesign is by using soft-returns (line break). The soft-return will allow you to get the same layout result and will be imported correctly in a Translation tool. You can place a soft-return in InDesign by pressing Shift + Return.
The image shows an example of the use of soft-return inside Redokun. Let’s consider these examples. The sentence on the top is wrapped using a hard-return, so a CAT tool would split it into two segments “With the hard-return”, “Redokun creates two segments”.
Instead the sentence on the bottom is wrapped using a soft-return, so a CAT tool would consider it as a single sentence “With the soft-return Redokun creates two segments”.
Bonus: use a tool for cutting down the time spent on copy/pasting text
After the "master" document is ready, you have to extract all the text from the file and send it over to the translators. Later, you'll have to import the translated text back into the document in the new language.
Most designers do this by copying and pasting the text in each single text frame from InDesign to Word. Others may prefer to adopt rather complex solutions involving XML and possibly home-made scripts. Both solutions are reasonable, but it's a slow and error-prone process.
There is, however, a tool which helps you with this, it's called Redokun. Redokun is an online software which can extract all the text and import it back inside the original file, without changing the document styles.
You can try Redokun for free for 14 days following this link.
Conclusion
If you apply these suggestions you will probably experience an immediate improvement in your productivity when working with InDesign documents in general. Also, if you are a Redokun user, the translated document downloaded from Redokun probably won’t require many edits, sometimes no edits at all.
Read more
Create or Insert a table in InDesign (Master InDesign Tables - Part 1/3)
InDesign: Copy an entire layer from one file to another
Show hidden characters — InDesign step by step guide


