If you want to distribute your eLearning content globally, you'll need a simple workflow for Easygenerator translation.
By the time you’ve finished reading this guide, your team will be equipped with a quick and reliable eLearning localization workflow. You can also apply it to your other ongoing and future translation efforts.
Overview
- Important Notes on Easygenerator Translation
- How to Translate Easygenerator Courses with Redokun
- Why Choose Redokun for Easygenerator eLearning Translation
- Best Practices for Easygenerator Translation
Important Notes on Easygenerator Translation
Easygenerator has certain restrictions that may affect your translation process. To avoid potential issues with your multilingual courses, you should keep in mind these two peculiarities in the Easygenerator translation process:
- The system sets a limit of 255 characters for the course title, learning objectives, the titles of content pages, and question items. This means that you need to make sure the translated text units fit within this limit before you upload a translated file back to Easygenerator. If the character volume exceeds the limit, the file import will fail. Let your translation team know that they should stay within the 255-character limit when they translate the units mentioned above.
- You should translate the course interface labels separately on Easygenerator. Check out Practice 1 in the Best Practices for Easygenerator Translation section of this guide to learn how to do it.
How to Translate Easygenerator Courses with Redokun (5 Steps)
The most efficient way to translate your courses in Easygenerator is to use the XLIFF export feature. It allows you to extract the textual content from your Easygenerator course as an XLIFF file.
You can then translate the course using translation software (such as Redokun). Once you're done translating, you can import the XLIFF file back to Easygenerator, and your translation will have the same design and layout.
- XLIFF is a translation-friendly file format that facilitates data exchange between different kinds of software. It's widely used in the localization industry. Learn more about in our detailed XLIFF translation guide.
Important: the XLIFF export/import feature is only available for Easygenerator users with the Enterprise plan subscription.
In this translation method, we will use XLIFF to exchange course content between Easygenerator and Redokun. The entire Easygenerator translation process takes 5 easy steps.
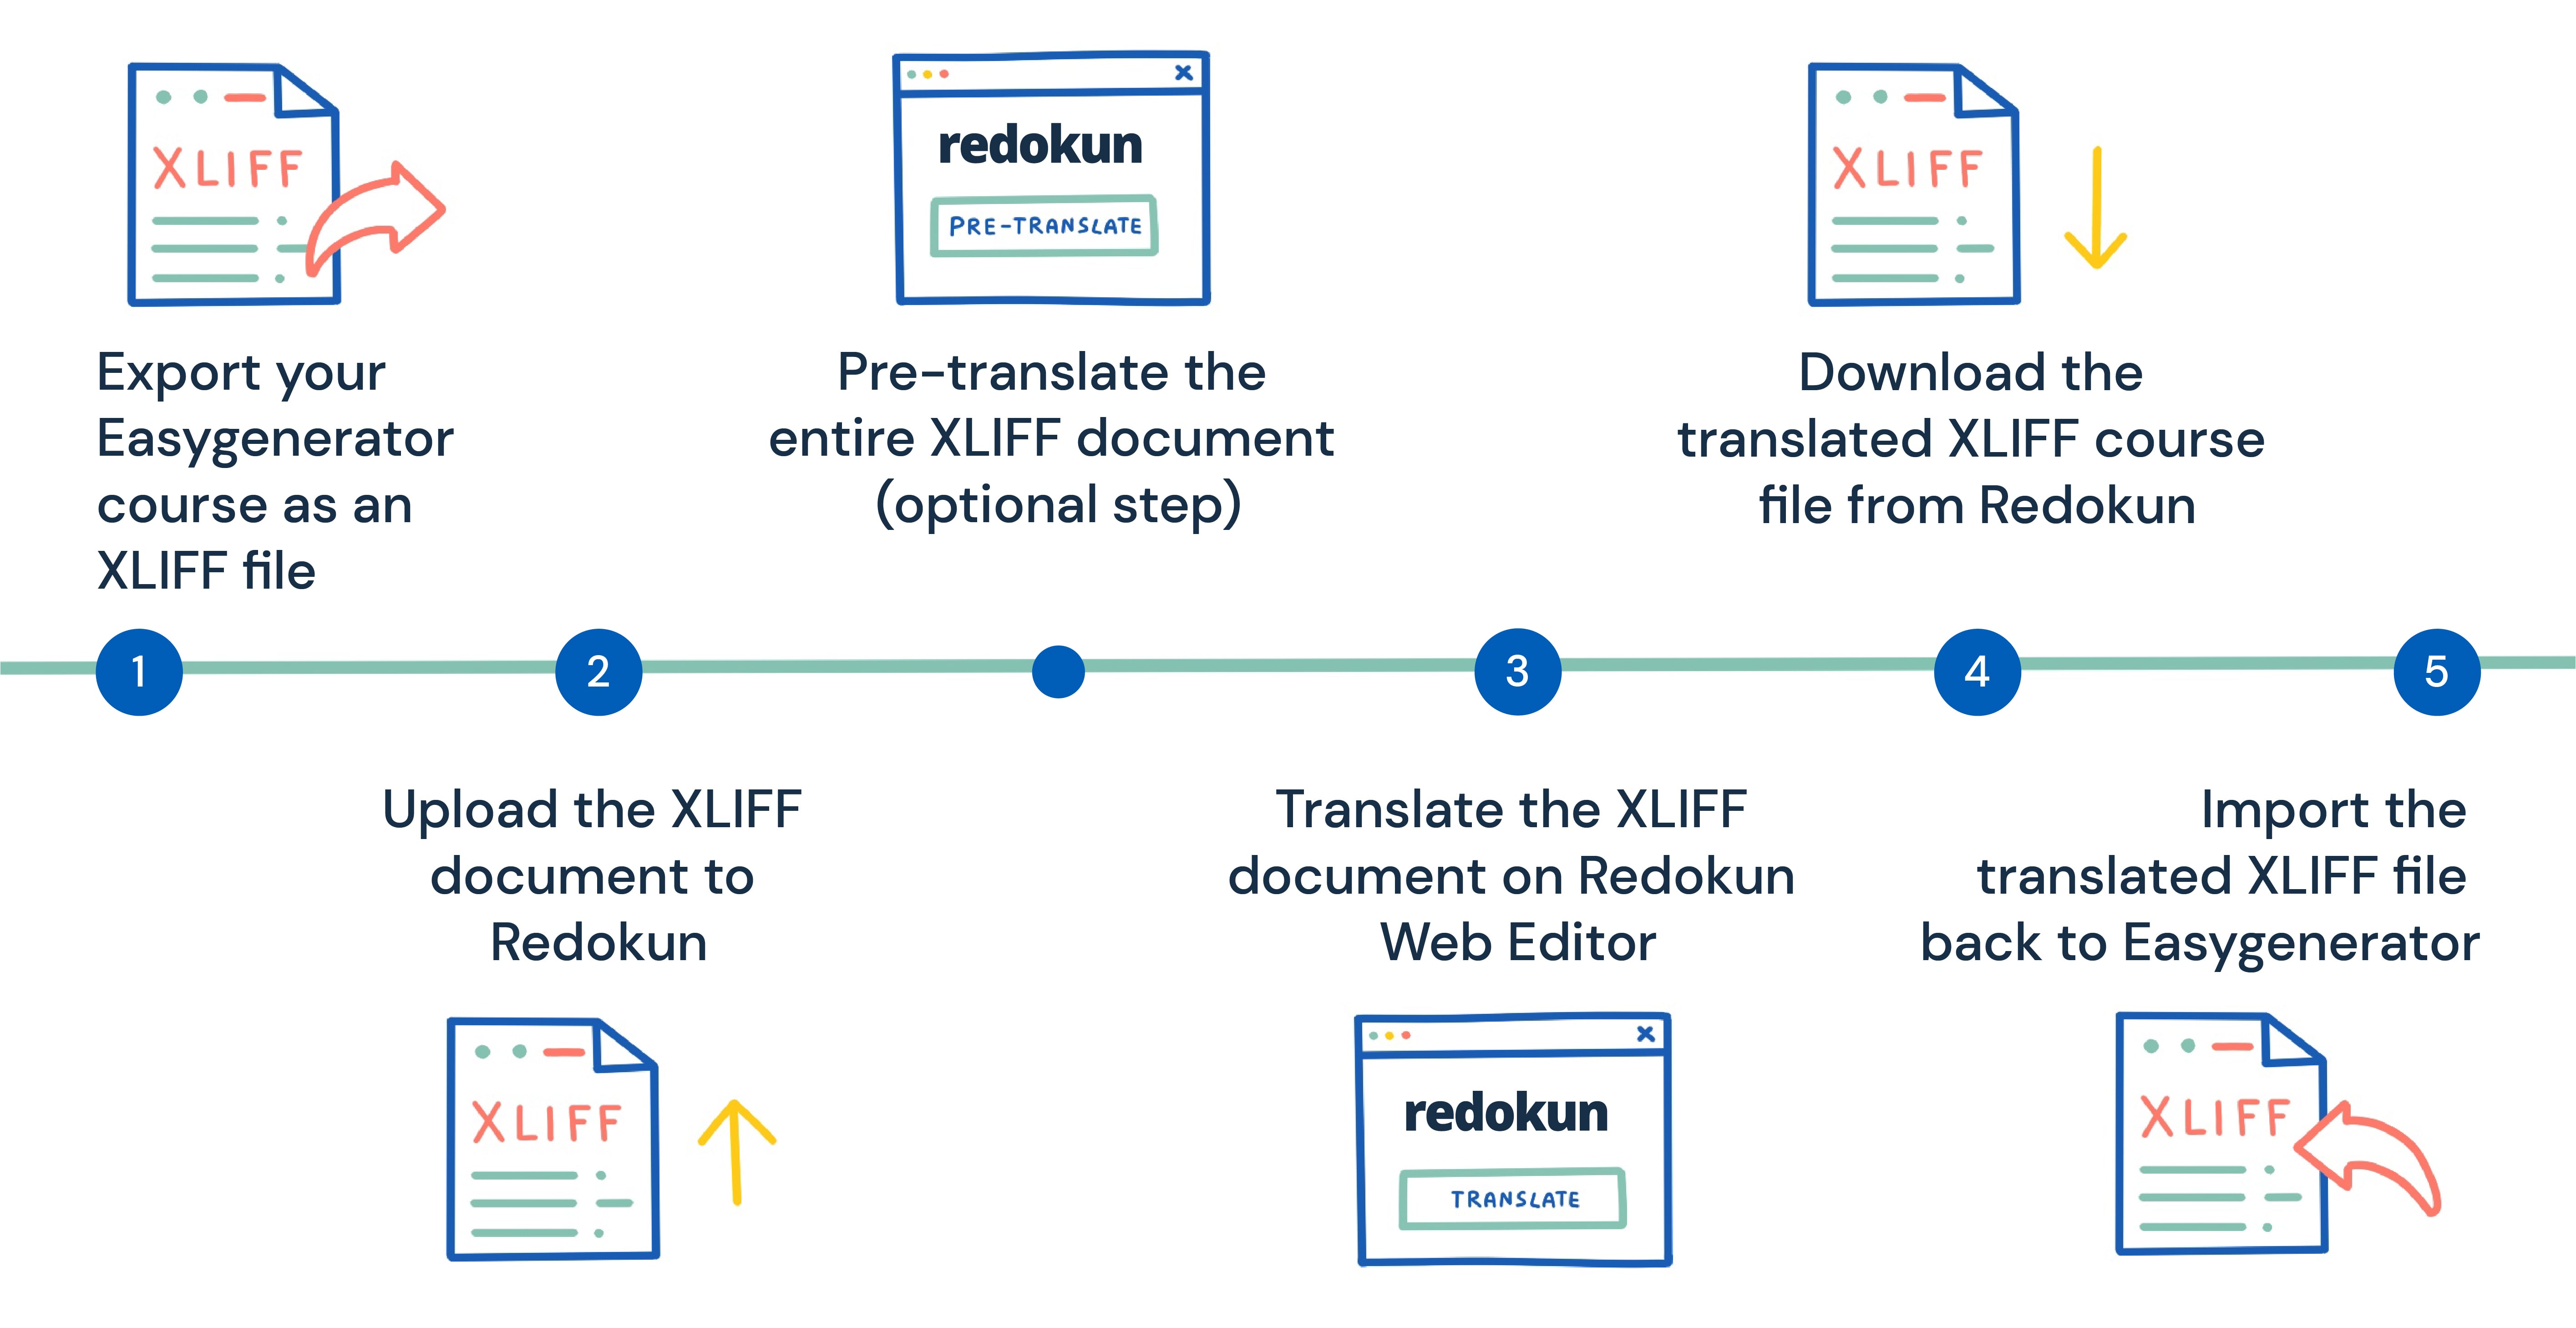
Step 1: Export your Easygenerator course as an XLIFF file
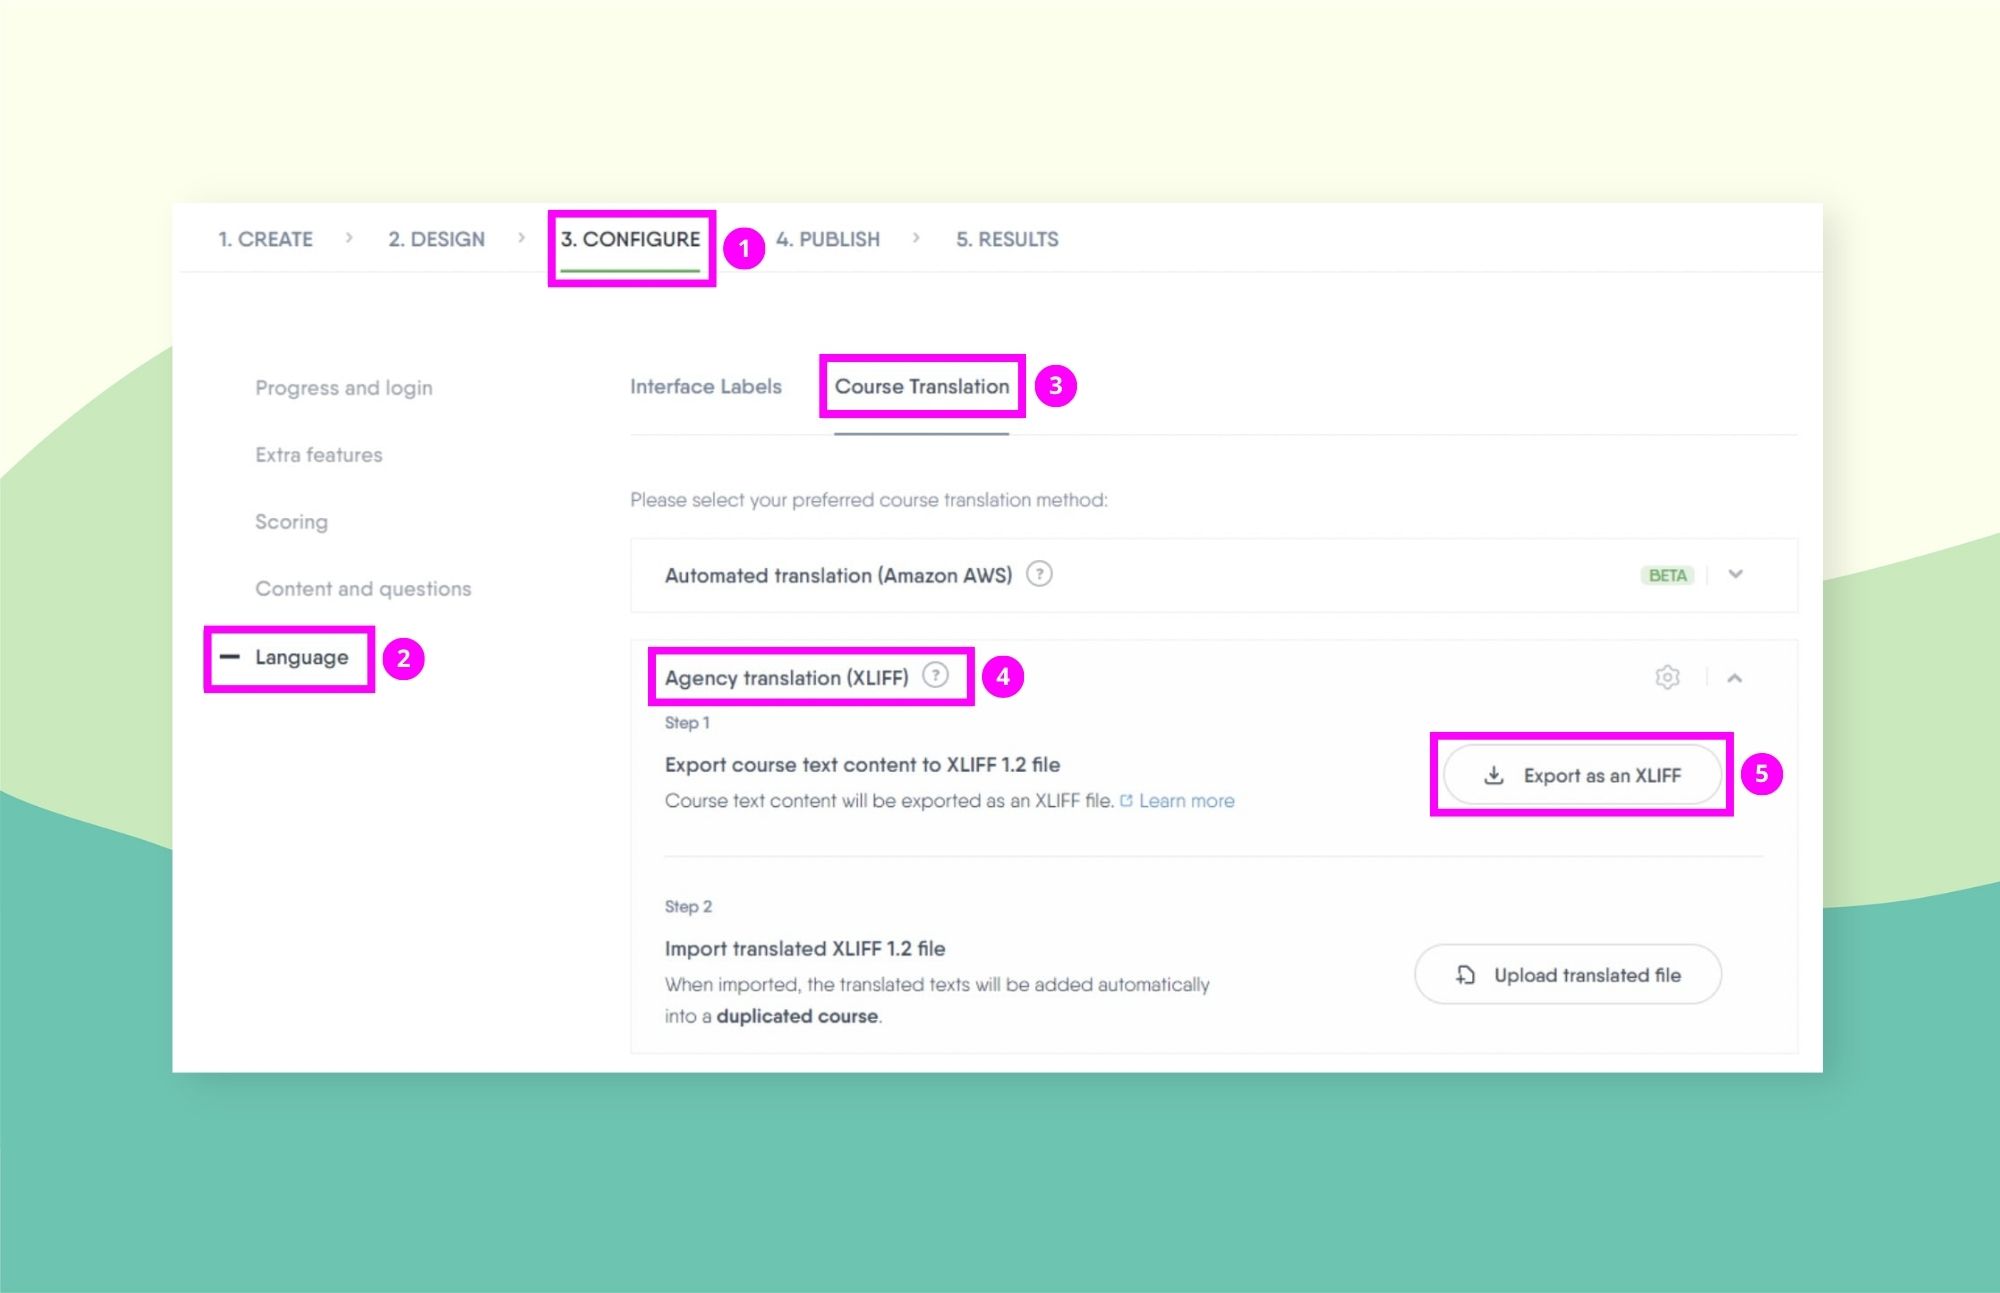
- Open your original course.
- Go to Configure —> Language —> Course Translation
- Scroll down until you see Agency translation (XLIFF).
- Click Export as an XLIFF.
- Save the XLIFF document to your computer.
Note: You don’t need to duplicate your course before exporting an XLIFF file. Easygenerator will automatically create a duplicate course when you import the translation later.
Step 2: Upload the XLIFF file to Redokun
- Create a free Redokun account to start a 14-day trial right away (no credit card info required).
- Click on Upload Document.
- Upload the XLIFF file you just downloaded from Easygenerator.
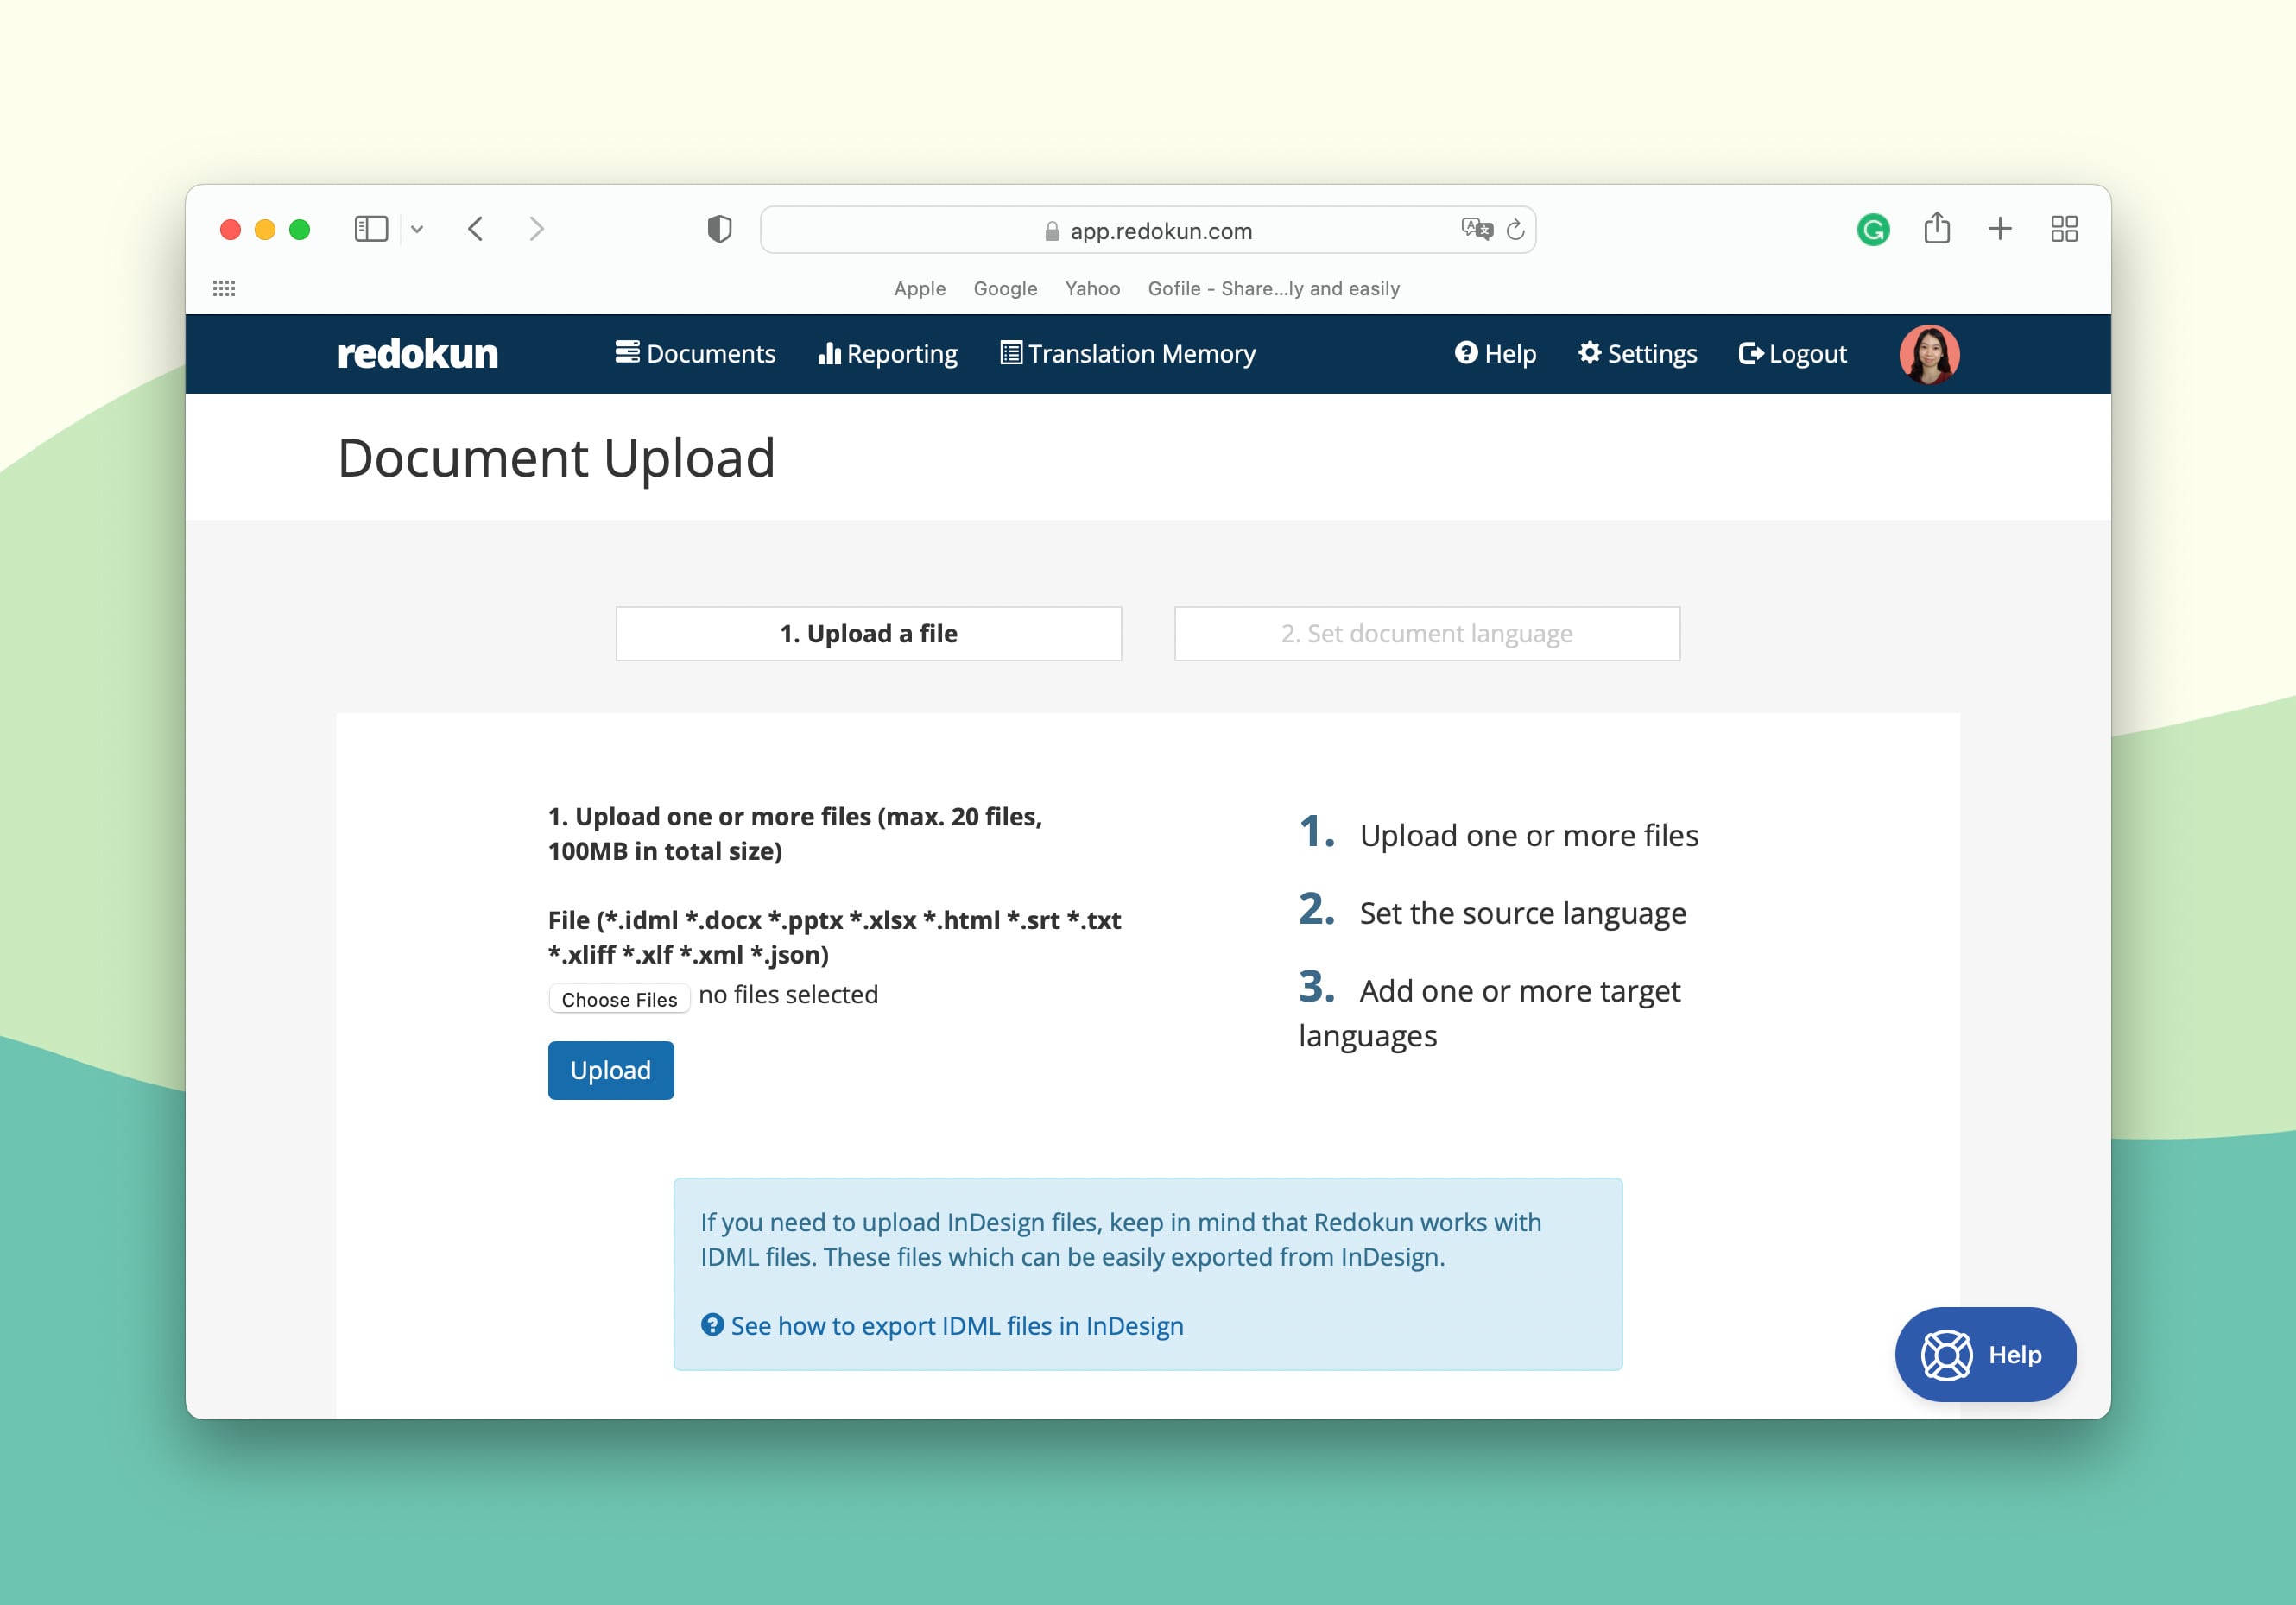
- Next, you can select the source and target language(s) for your course.
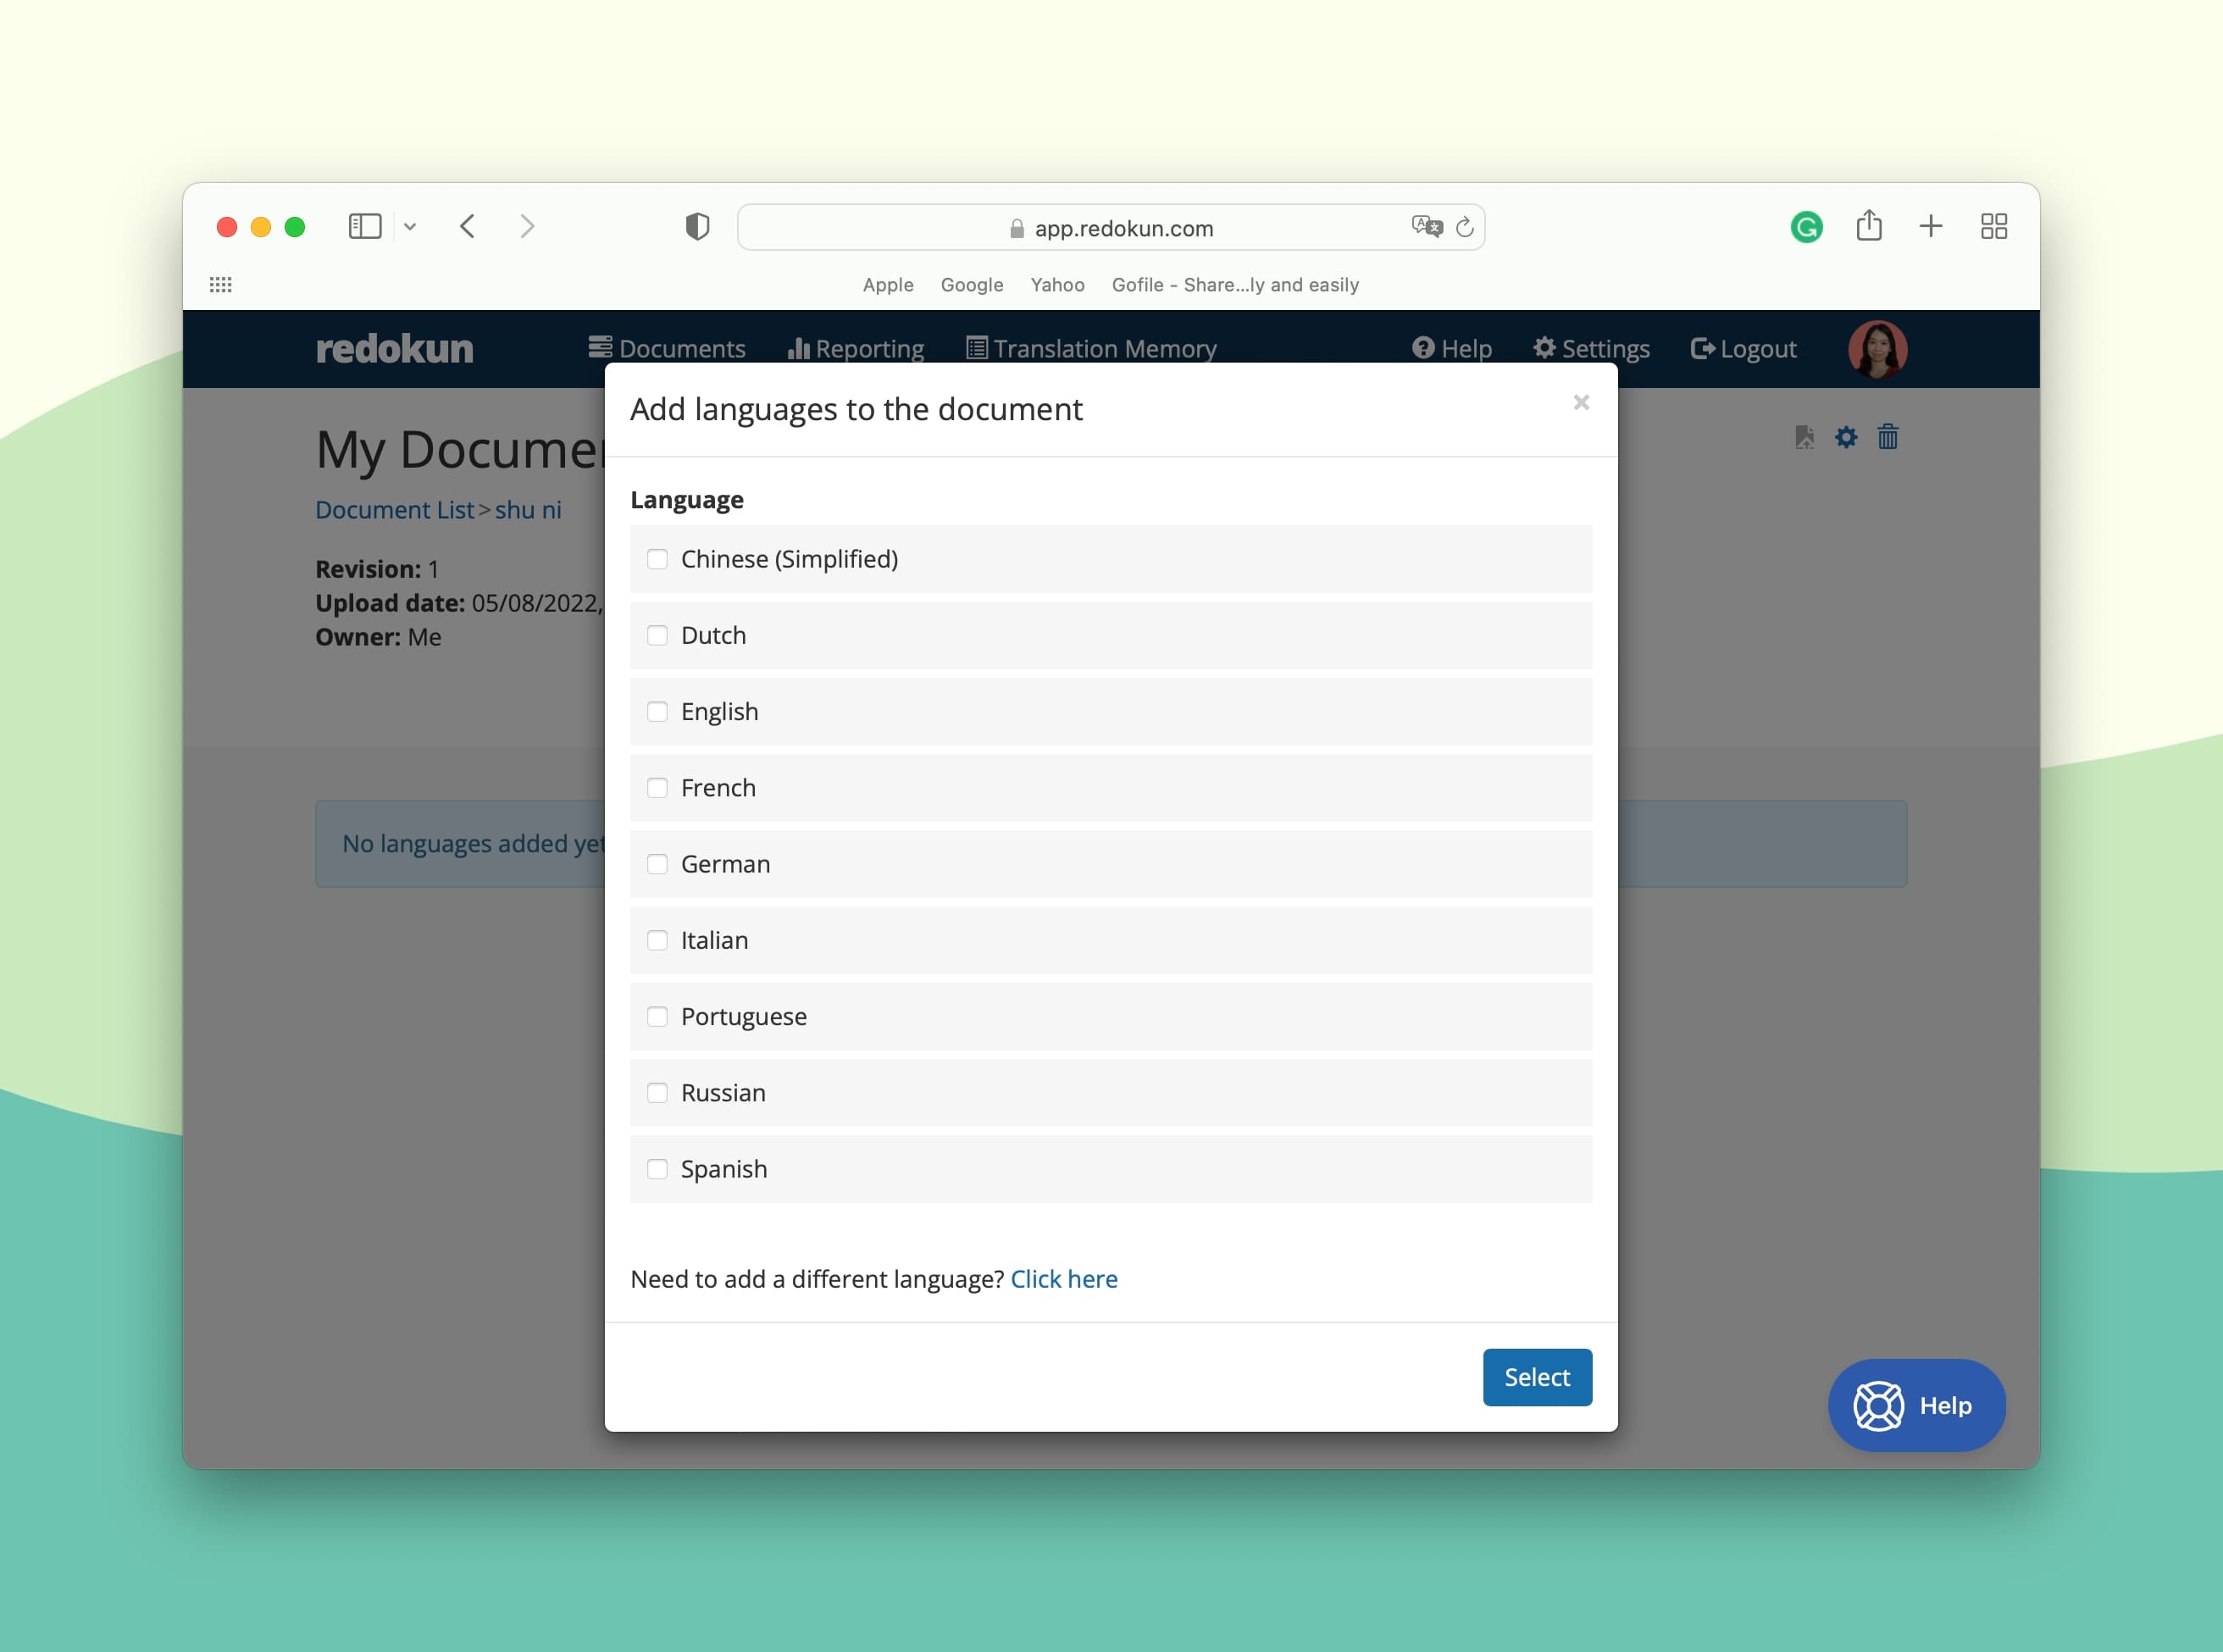
- Then, invite your preferred translators to work on the target languages you've selected. To do so, enter your translator's email for the language. You can also set yourself as the translator.
Your translators will receive an instant email notification, and they can start translating your XLIFF file on Redokun immediately. Doing so will give them access to useful tools like translation suggestions and glossaries.
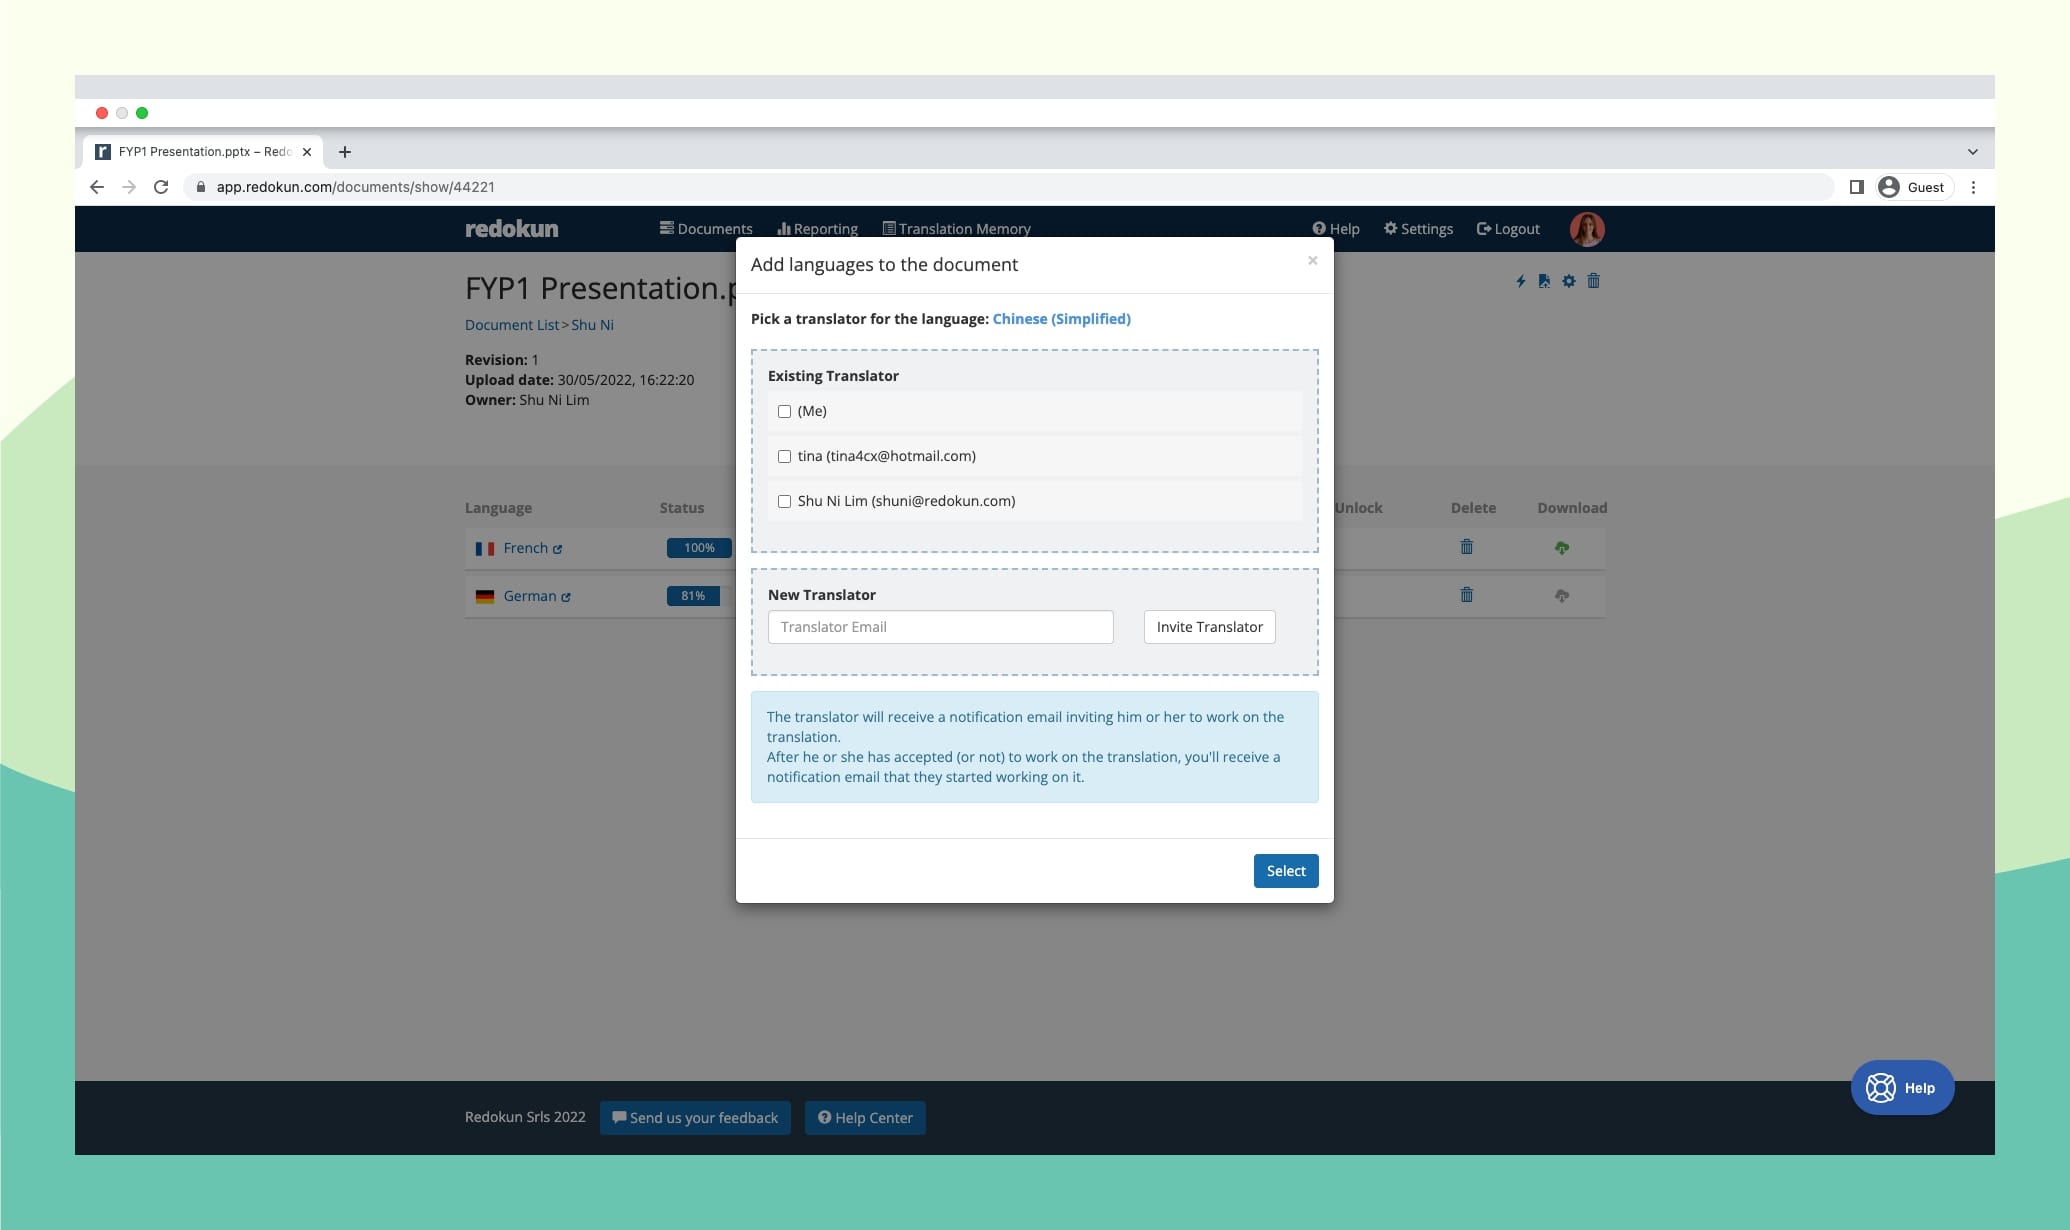
Whether you have an in-house translation team or work with translation vendors, Redokun supports your workflow by only providing them access to the projects you assign them.
Optional Step: Pre-translate the entire XLIFF document
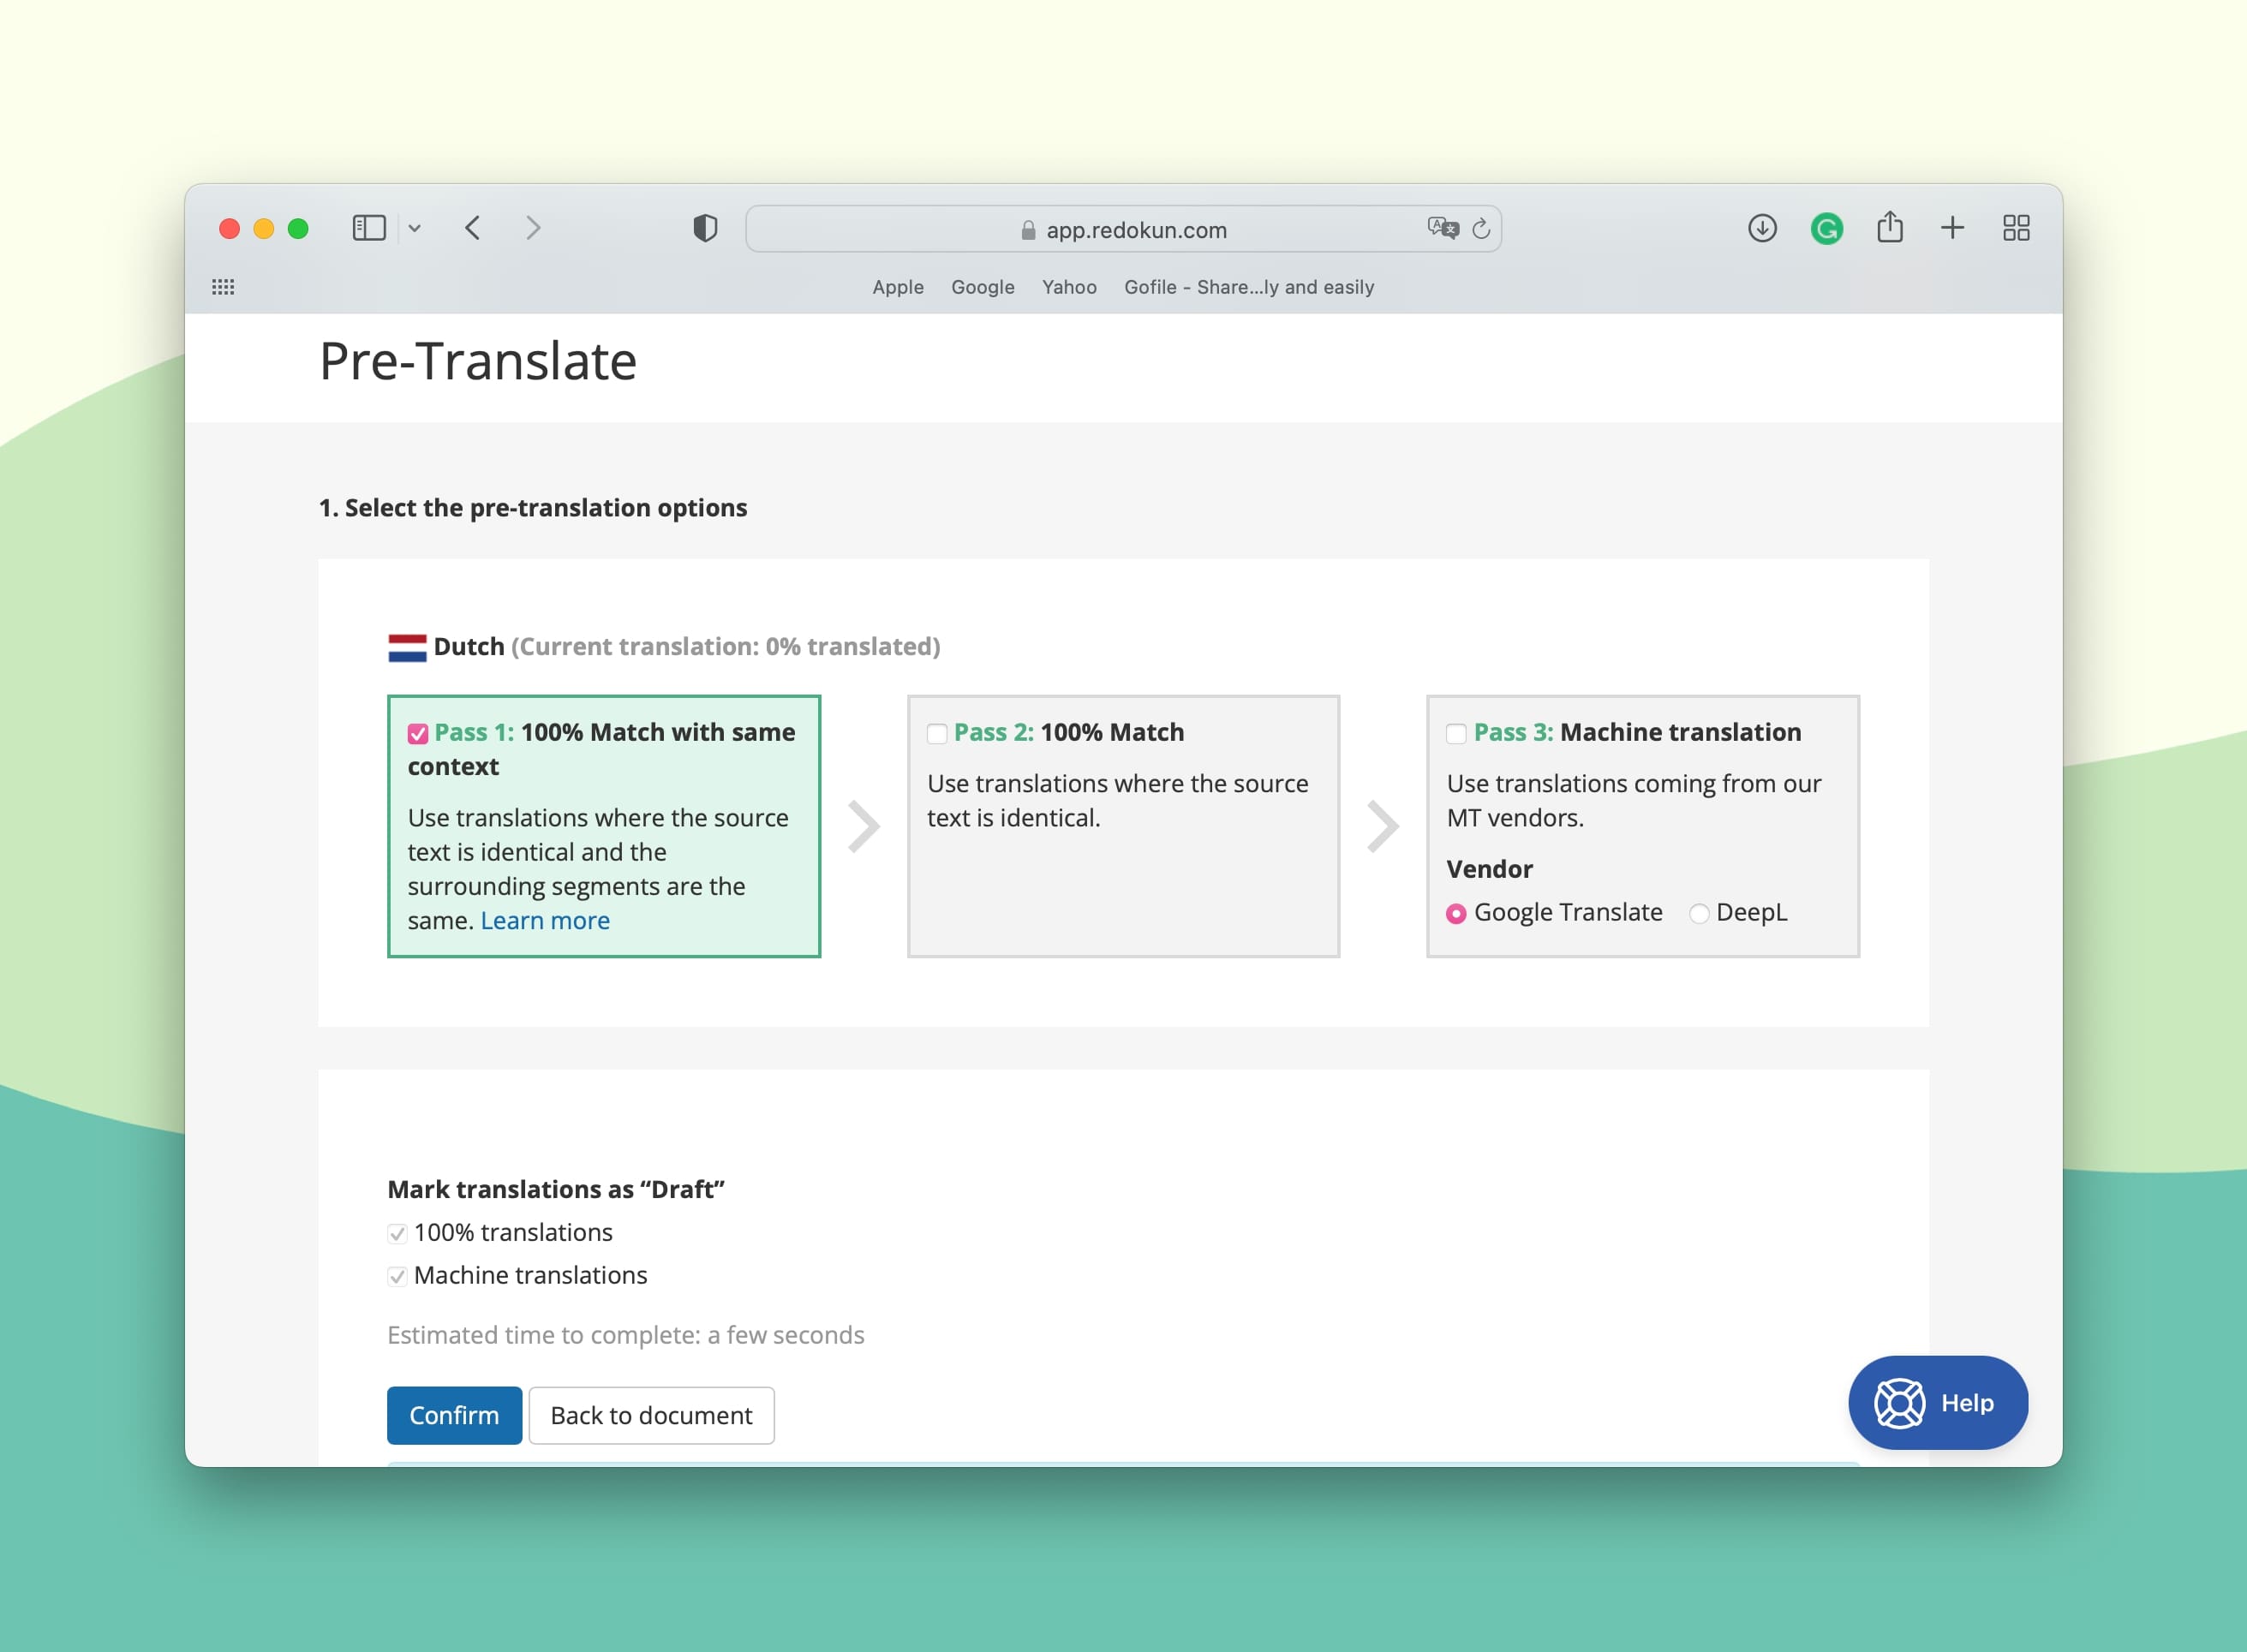
The Pre-translate tool automatically generates translation output for your course content before your team begins to work on the project.
This feature uses two technologies: Translation Memory (TM) and Machine Translation.
- TM is a database of all translations you've approved in the past projects. If selected in the pre-translation stage, Redokun will automatically translate your entire XLIFF file from the content based on matching content you've translated.
- For text segments you've never translated before, you can select to pre-translate with Machine Translation to ensure that they get automatically translated too.
- Now, your translation team will only need to review and polish the generated output.
Step 3: Translate the XLIFF document on Redokun's online Web Editor
In this step, your team starts translating the exported Easygenerator course using Redokun's Web Editor.
The Web Editor is Redokun's online translation interface that provides translators a clean and focused view of all the text segments they need to translate.
When you uploaded your XLIFF file just now, Redokun automatically extracts the contents within and divide them into short, easy-to-digest segments. Your translators can focus on concise text elements and translate more accurately.
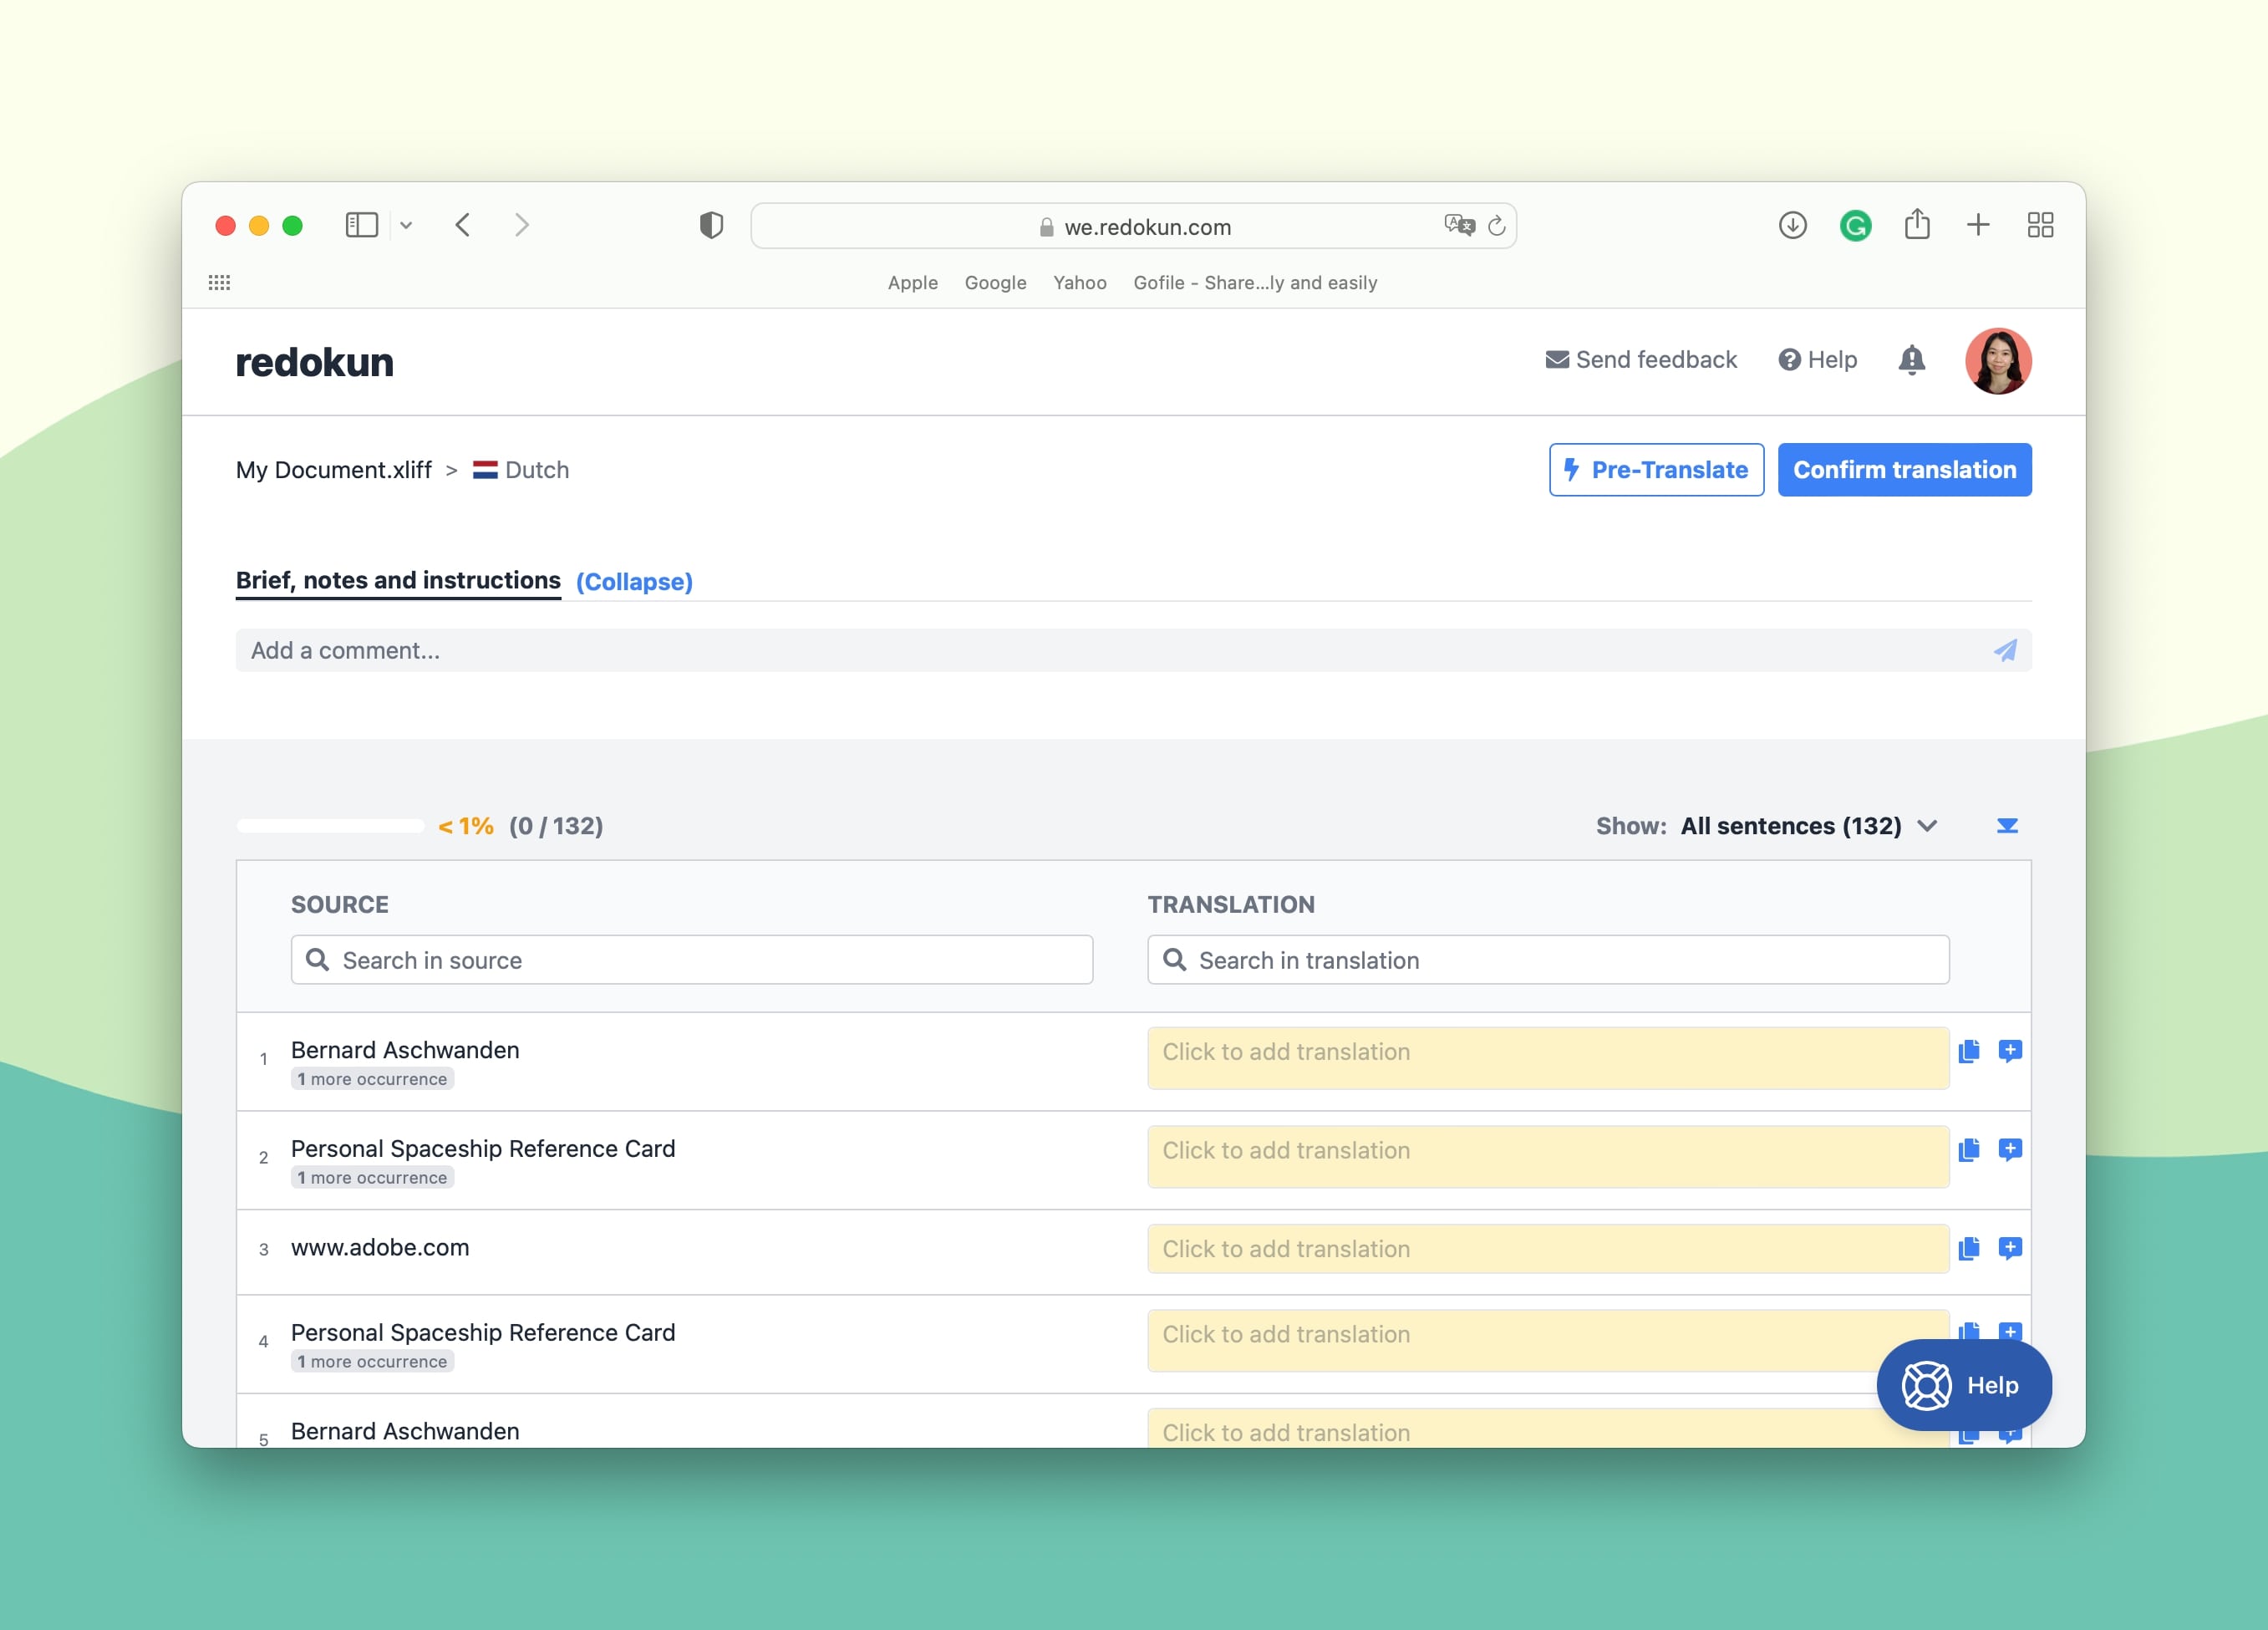
- As seen in the screenshot above, the left column contains the source text segments, whereas the right column is where the translations should be entered.
- For a faster translation process, your team can also instantly generate machine translation suggestions from Google Translate and DeepL directly in the Web Editor. These suggestions will pop up automatically when you click on a text box to add a translation.

Pro-tip: If you applied the optional Pre-Translate feature, the right column would already be filled out with computer-generated translations.
Furthermore, you can use Redokun's Web Editor as a communication platform. Use the Comments section to tag translators, share feedback, and discuss project updates. You can also leave comments on specific text segments by clicking on the Add Comment symbol on the right-hand side of the text box.
Step 4: Download the translated XLIFF file from Redokun
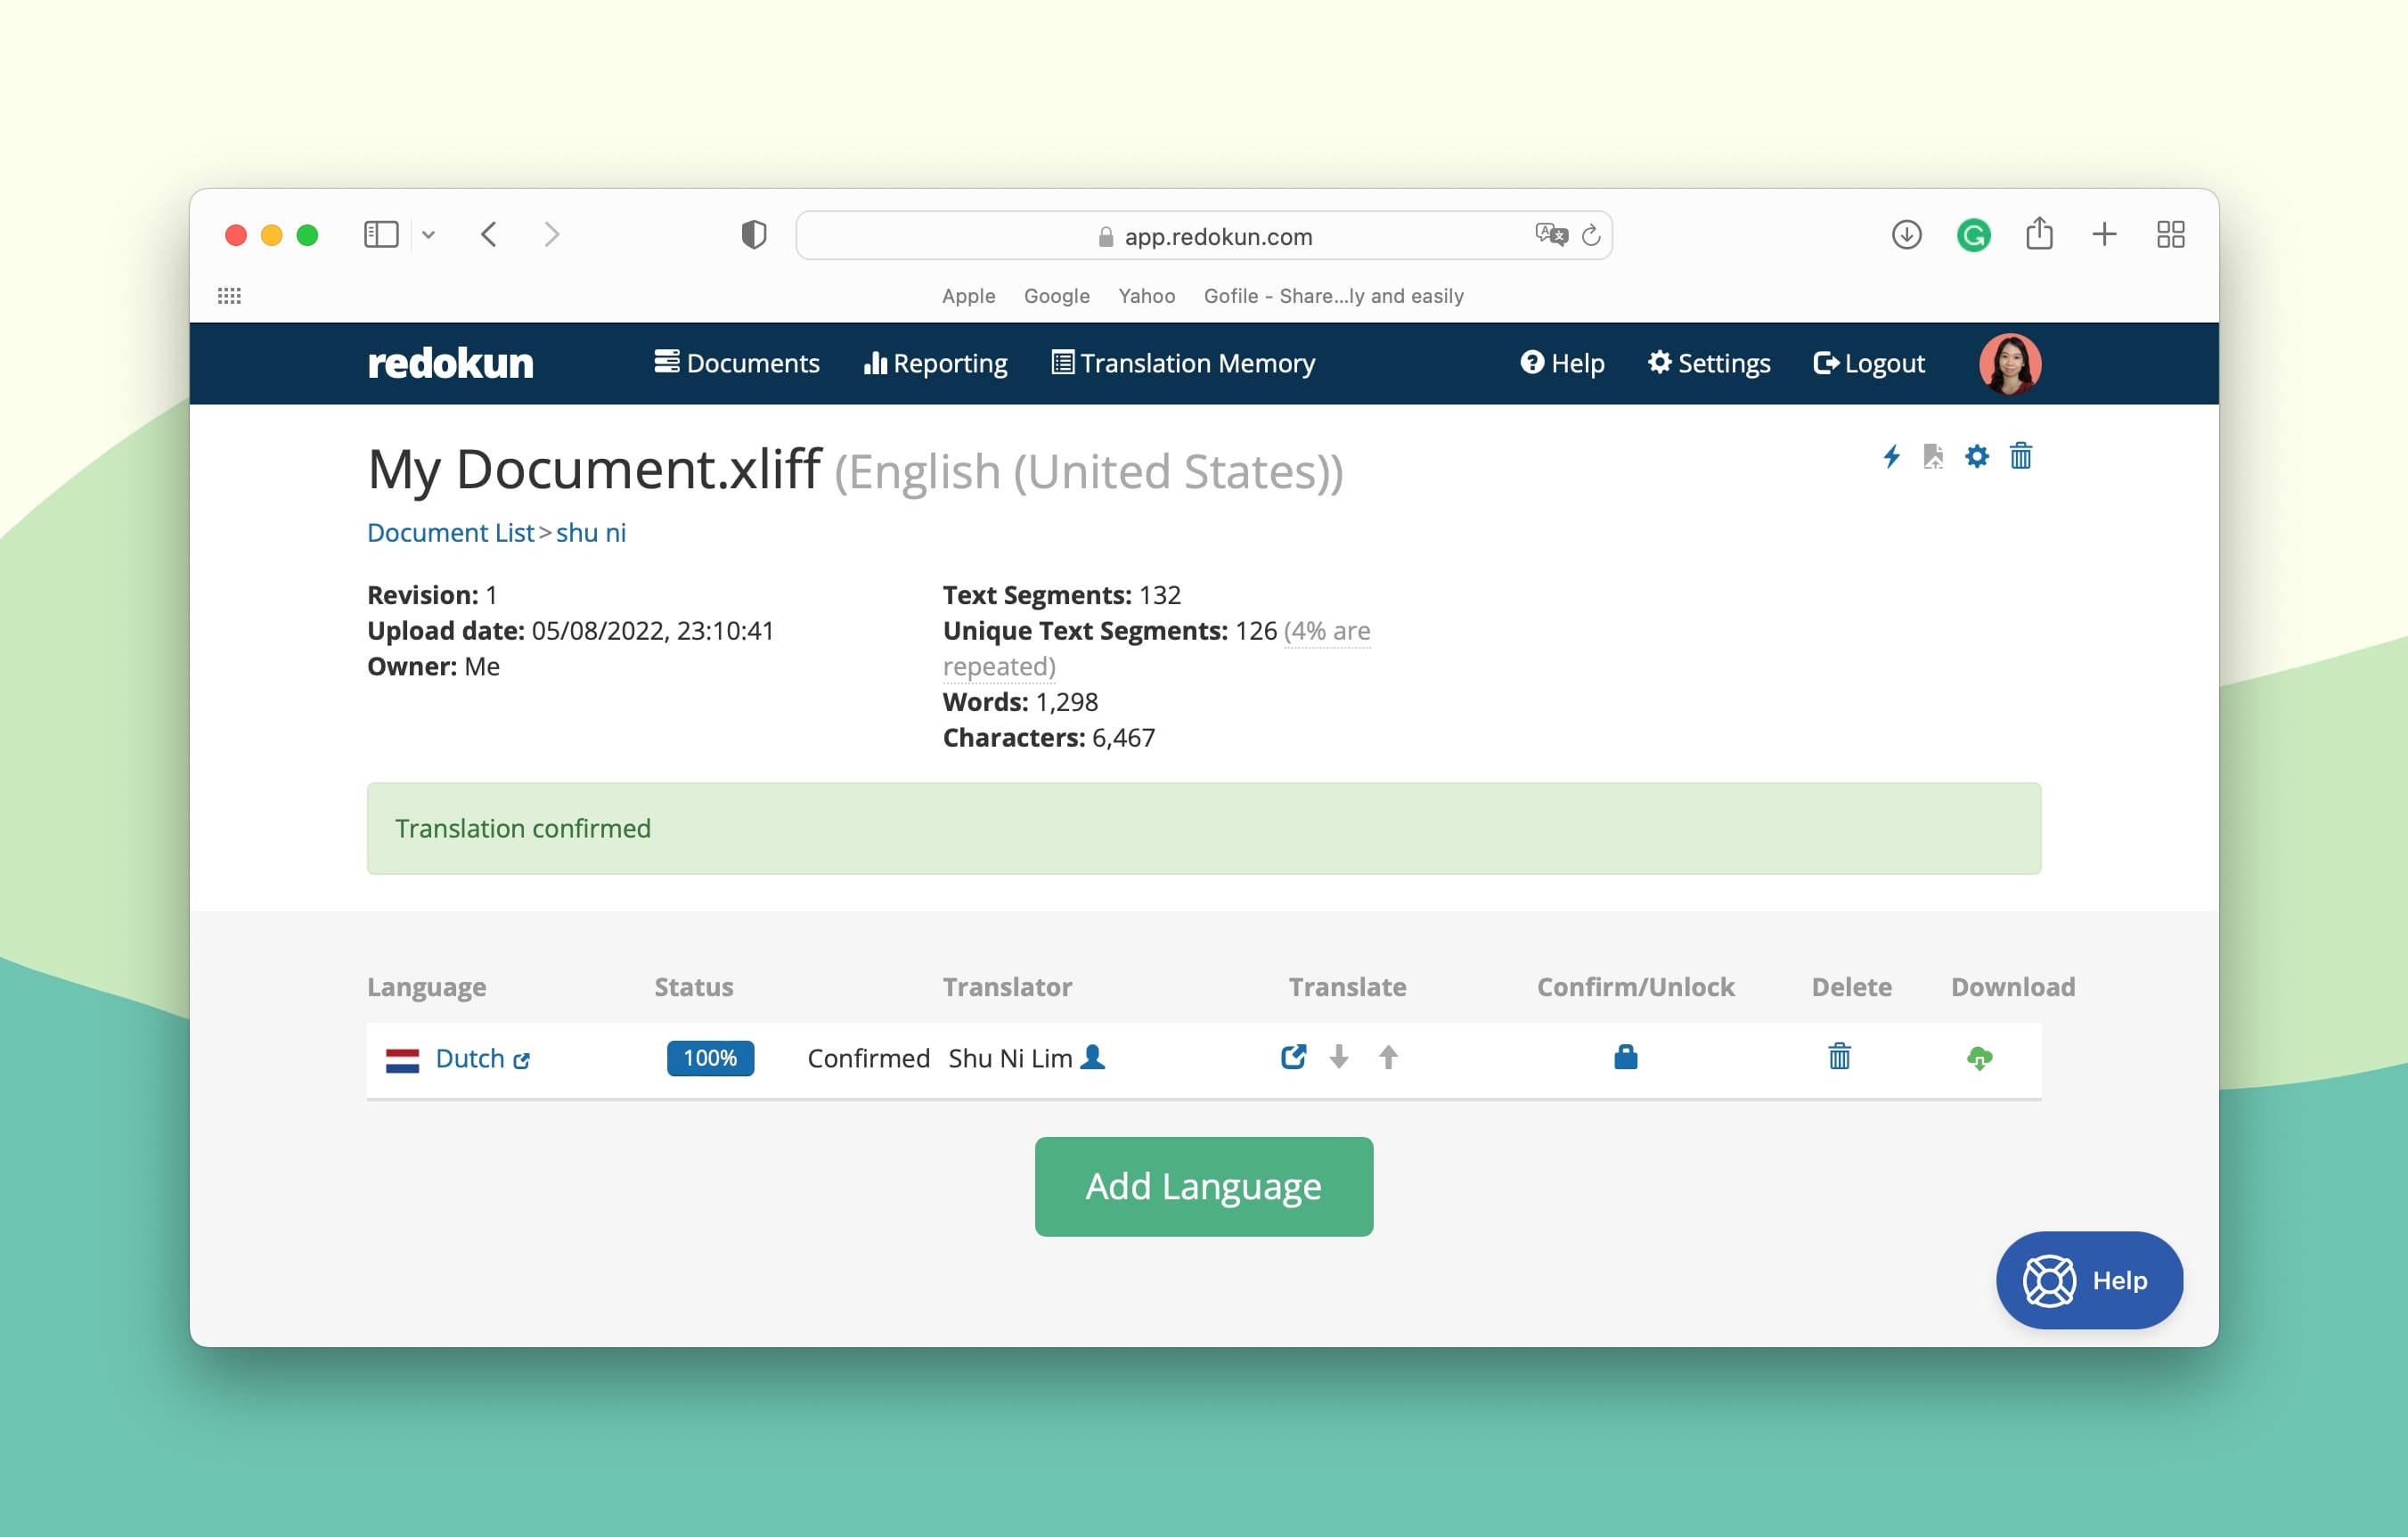
- When your Easygenerator course translation is ready, click on Confirm Translation at the top right corner of the Web Editor. This will lock the translation to prevent unwanted changes.
- Go to the Document Detail page for this project and click the green Download icon in the rightmost column for the completed target language.
- Save the translated XLIFF file on your computer.
Step 5: Import the translated XLIFF file back to Easygenerator
With the translated XLIFF file saved to your computer, you're ready to import the content back to Easygenerator.
- Open your original course on Easygenerator.
- Go to Configure —> Language —> Course Translation
- Scroll down until you see Agency translation (XLIFF).
- Click Upload translated file.
- Upload the XLIFF translation you just downloaded from Redokun.
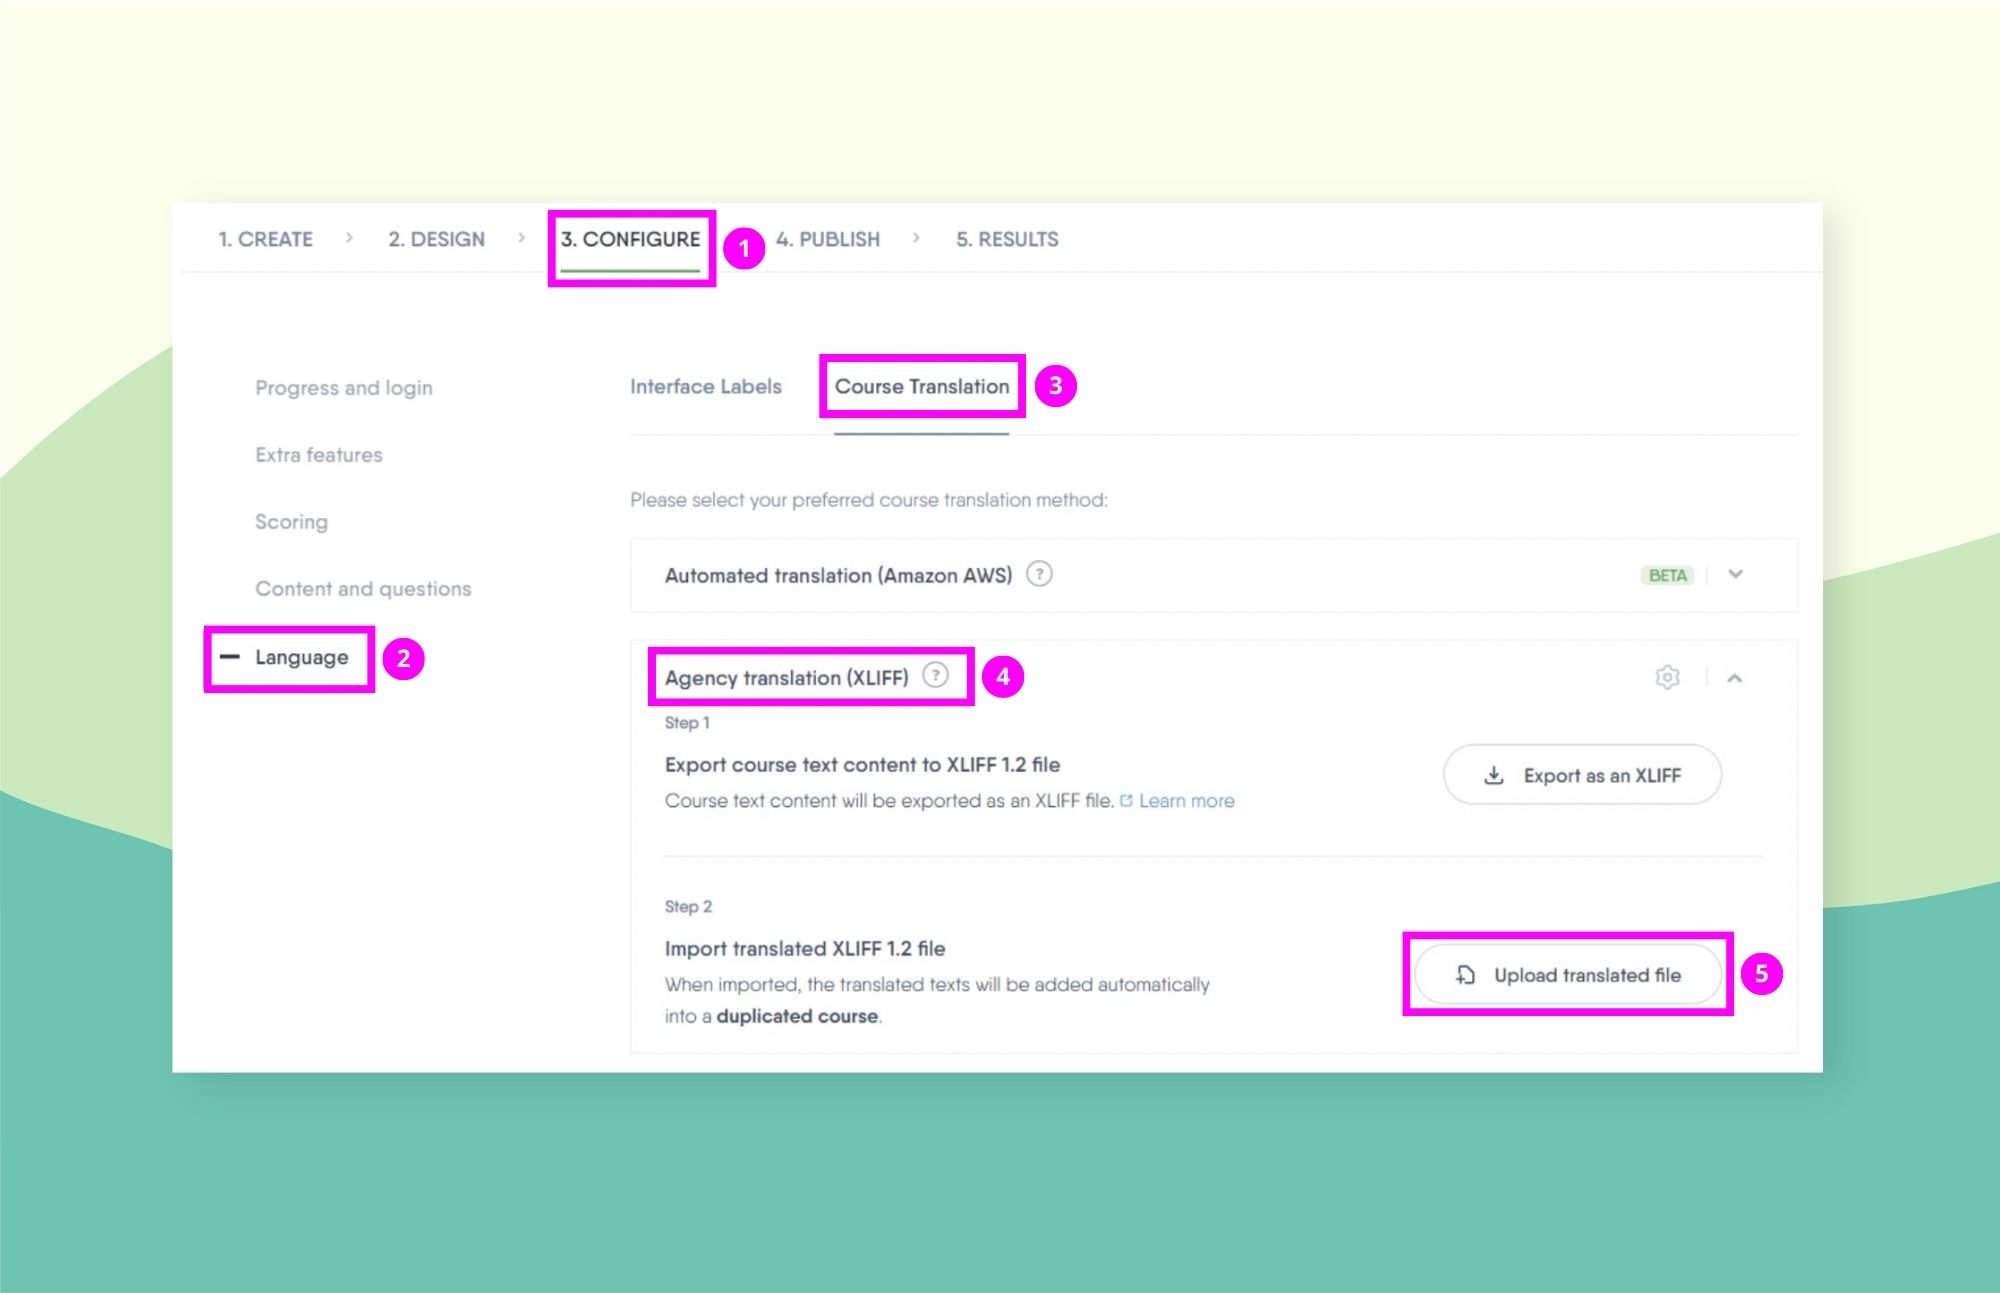
And it’s done! You can now publish your Easygenerator course in a new language - ready to distribute to learners in other countries and regions.
Why Choose Redokun for Easygenerator eLearning Translation
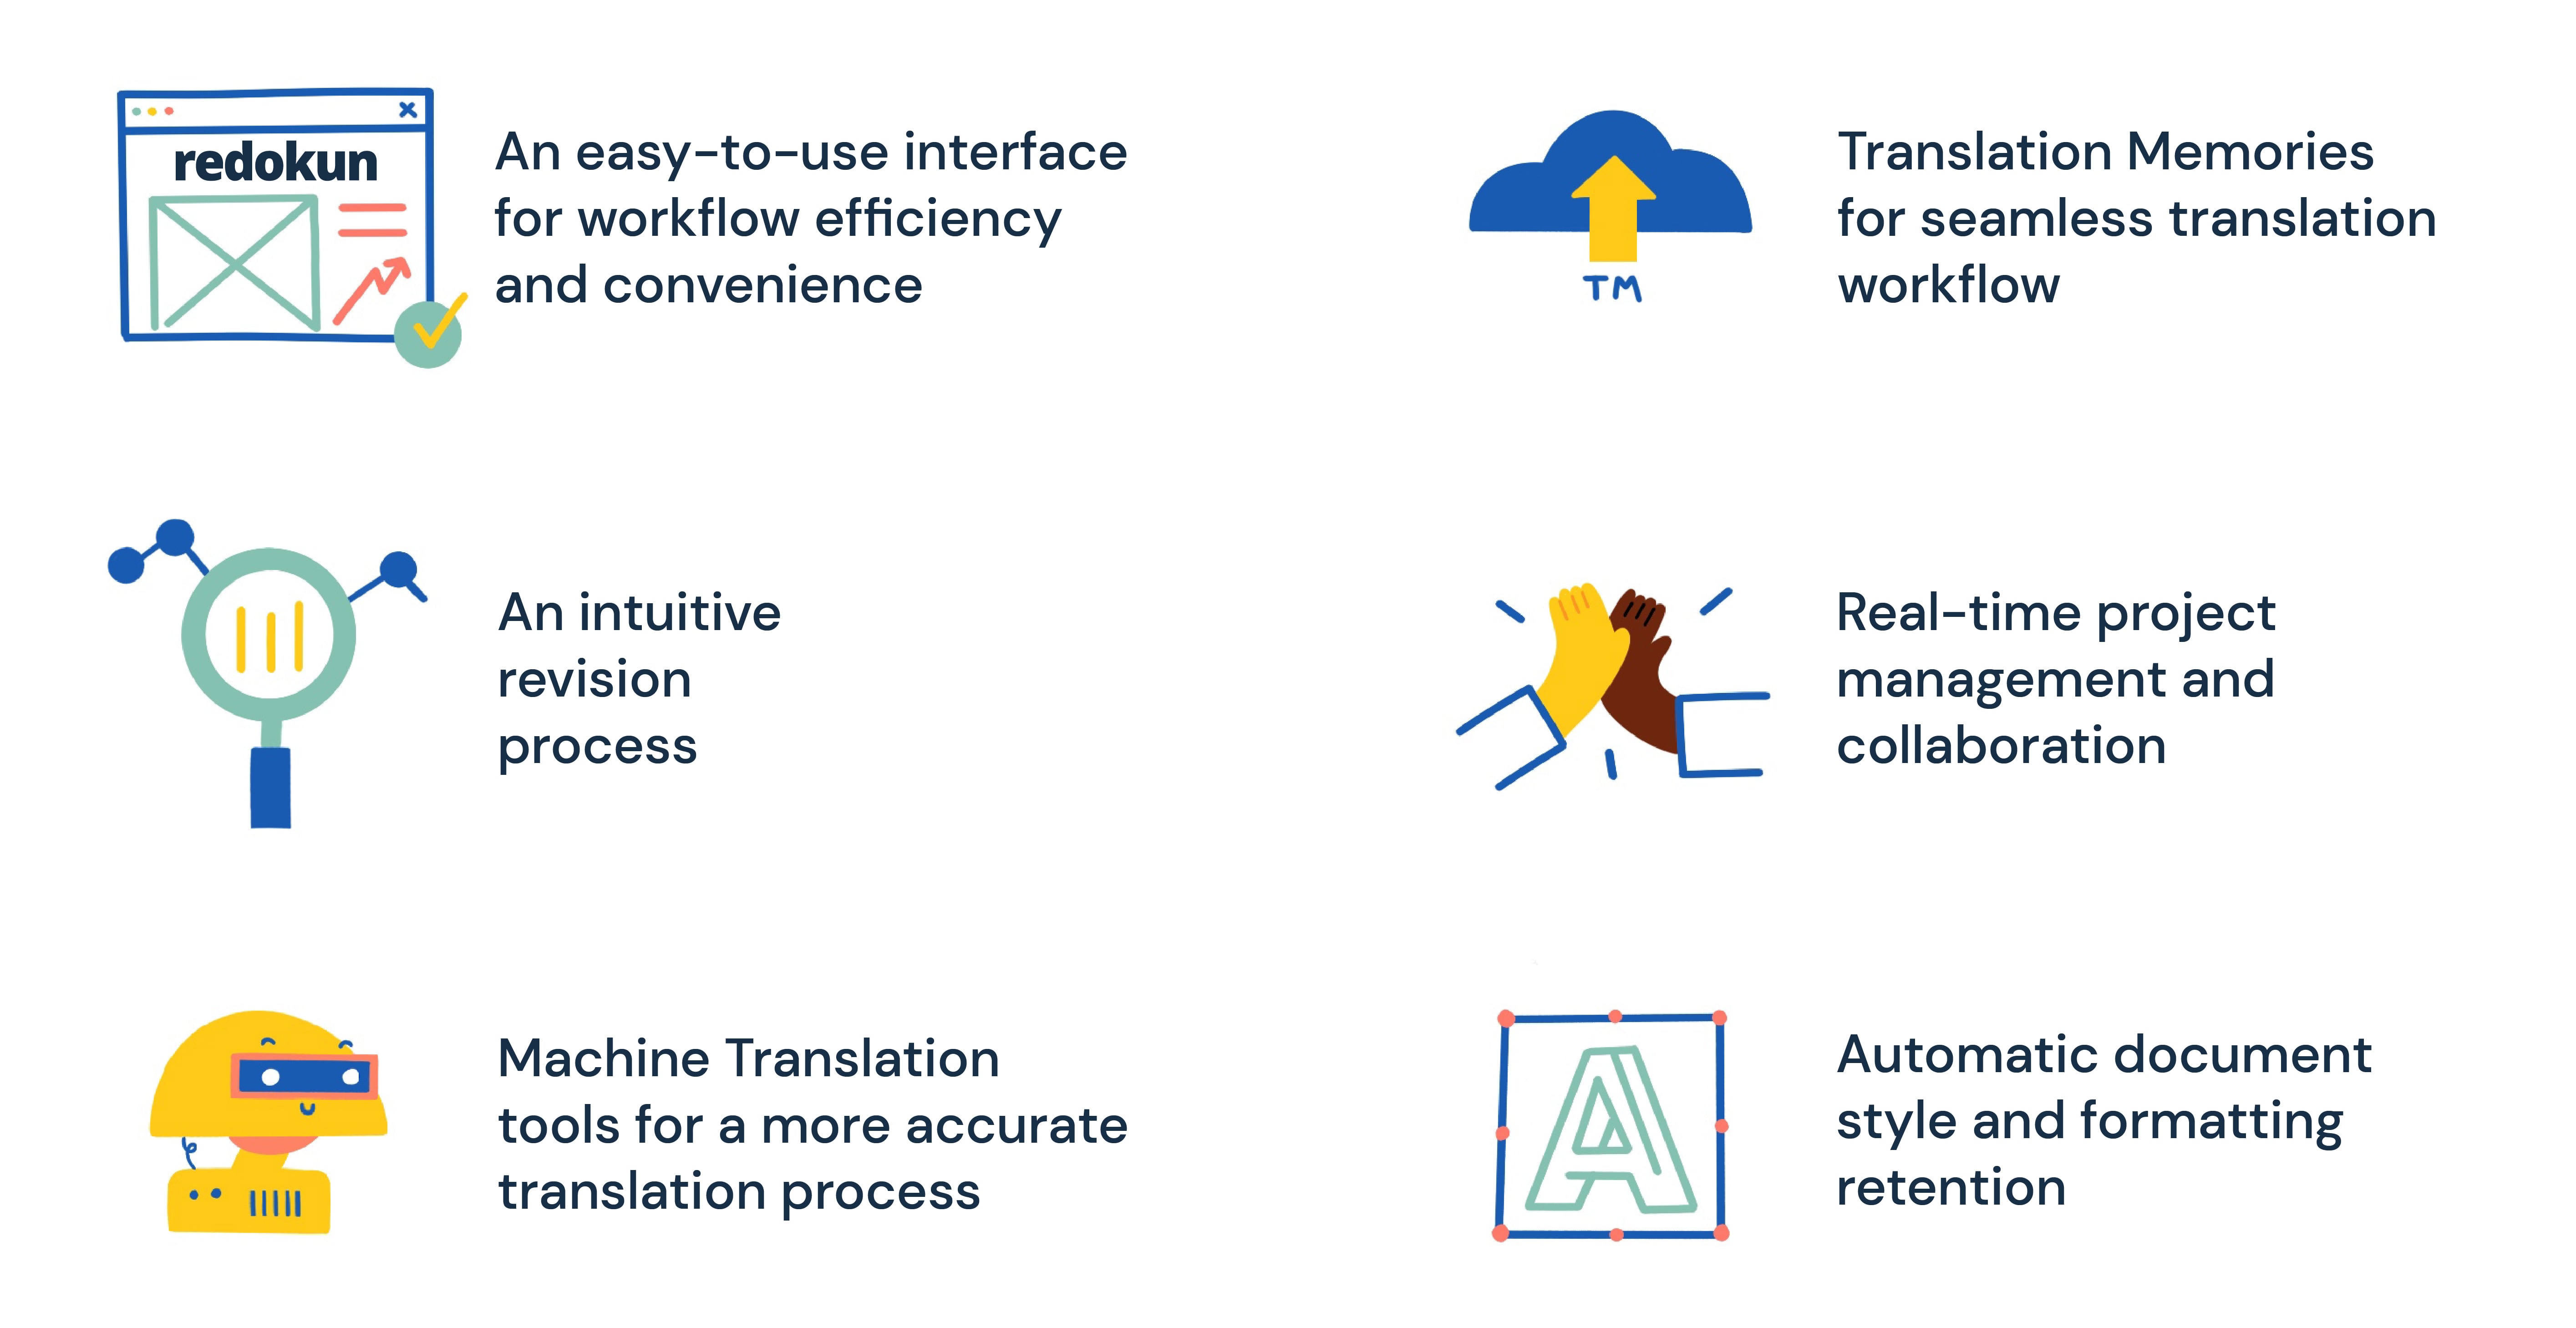
- Start translating right away with a simple tool that requires no training. Redokun has an intuitive, beginner-friendly interface you and your team can master in less than an hour. Enjoy an efficient and convenient translation workflow without the need for onboarding or professional tool training.
- Maintain your publication schedule despite last-minute revisions. Do you need to update your Easygenerator course in the source language? Even if it’s a last-minute change, it doesn't need to disrupt your schedule. Simply upload the updated XLIFF document on Redokun and it will highlight all the new text segments your team needs to translate. Your linguists won’t have to waste time reviewing the whole document, and the previous translation progress will be kept intact.
- Translate faster with Machine Translation tools. Two integrated MT tools — Google Translate and DeepL — act like two extra translators in your team. Enjoy instant translation suggestions for each text segment of your course content.
- Reuse your past translations in your current projects to save time and costs. The translation memory (TM) technology builds a bilingual glossary for all your translation projects. You can reuse your past translations in your current and future localization efforts — TM will effectively translate content even before your team gets to work. If you’re a first-time Redokun user, this is your opportunity to start building a unique translation database for your business projects.
- Stay in control with real-time project management and collaboration. With Redokun, you can be in full control of all the translation project assets, stay in touch with your team, and track the translation progress at any given point. Whether you work in-house or outsource your translation tasks, Redokun effectively centralizes project efforts.
- Keep the formatting and styles of your source documents. Redokun keeps the formatting of your original Easygenerator course intact across the translated versions. You don’t have to spend time copy-pasting, adjusting layouts, fixing fonts, or reworking page design.
Best Practices for Easygenerator Translation
Boost your Easygenerator translation process even further with these four best practices.
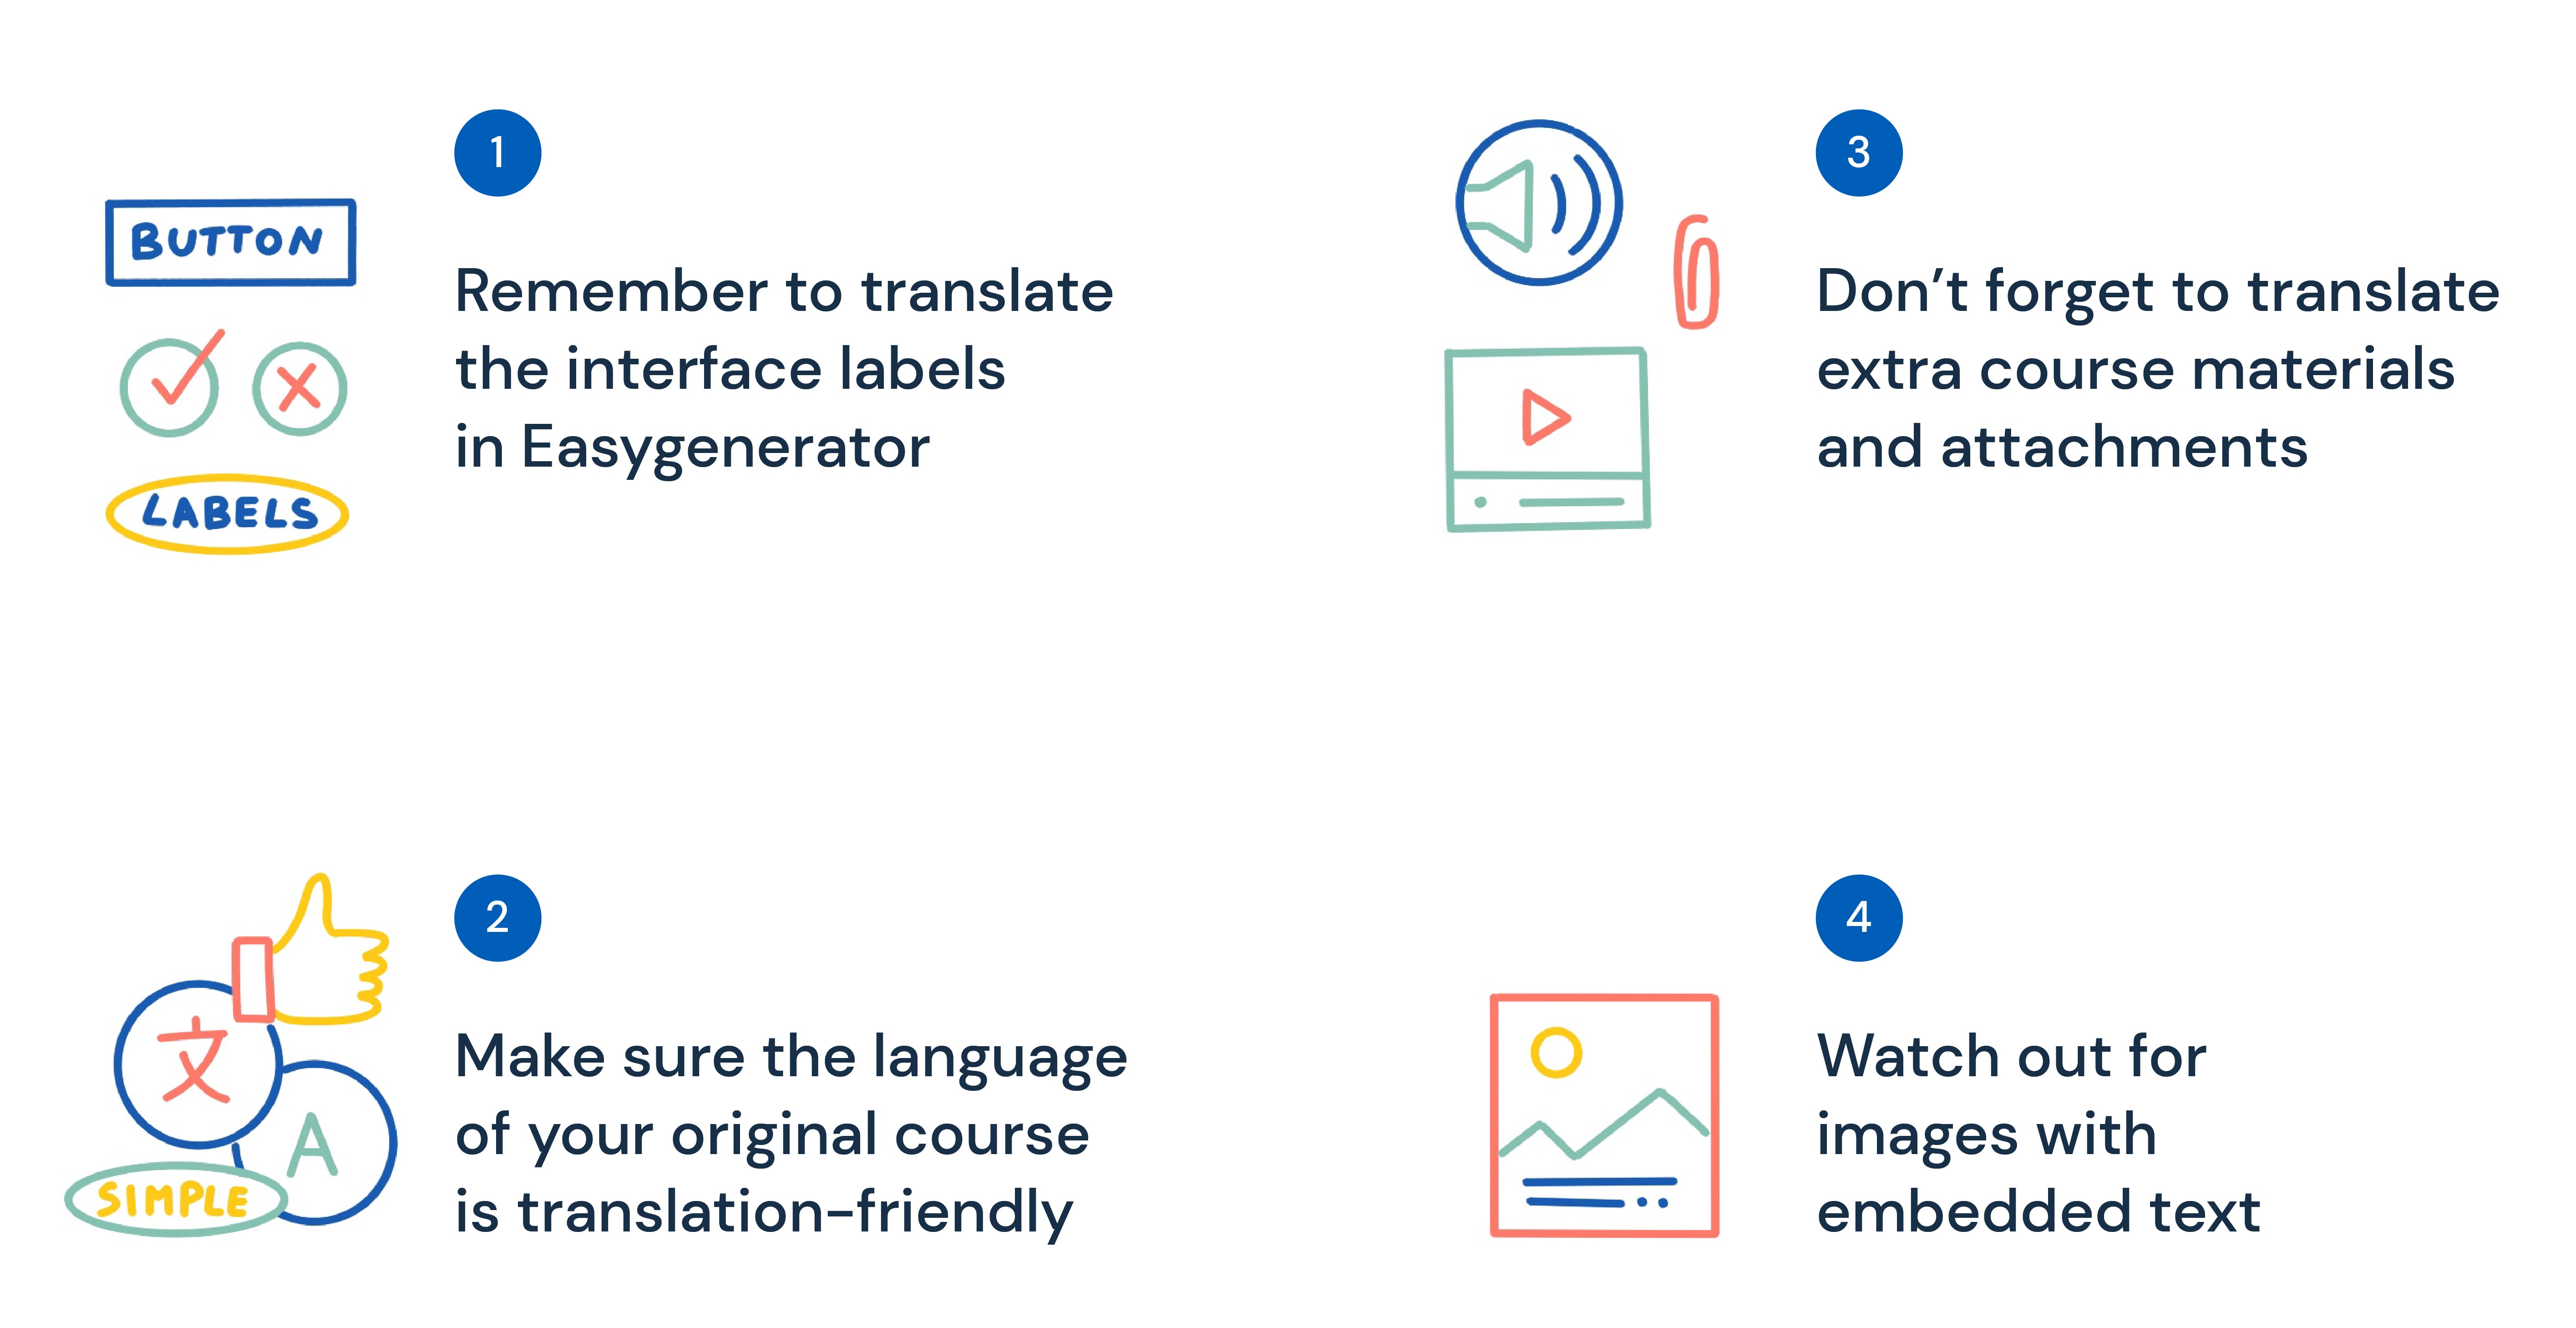
Practice 1: Remember to translate the interface labels in Easygenerator
To provide learners with a fully localized Easygenerator course, be sure to translate the course interface in each target language. The course interface label text includes:
- Button text.
- Headings and titles.
- Rrror and confirmation messages.
- Field names, etc.
You can automatically translate them directly in Easygenerator with preset labels in nearly 40 languages. To do so:
- Open your course.
- Go to Configure tab —> Language.
- Click Interface labels.
- Pick the language for your course from the drop-down menu.
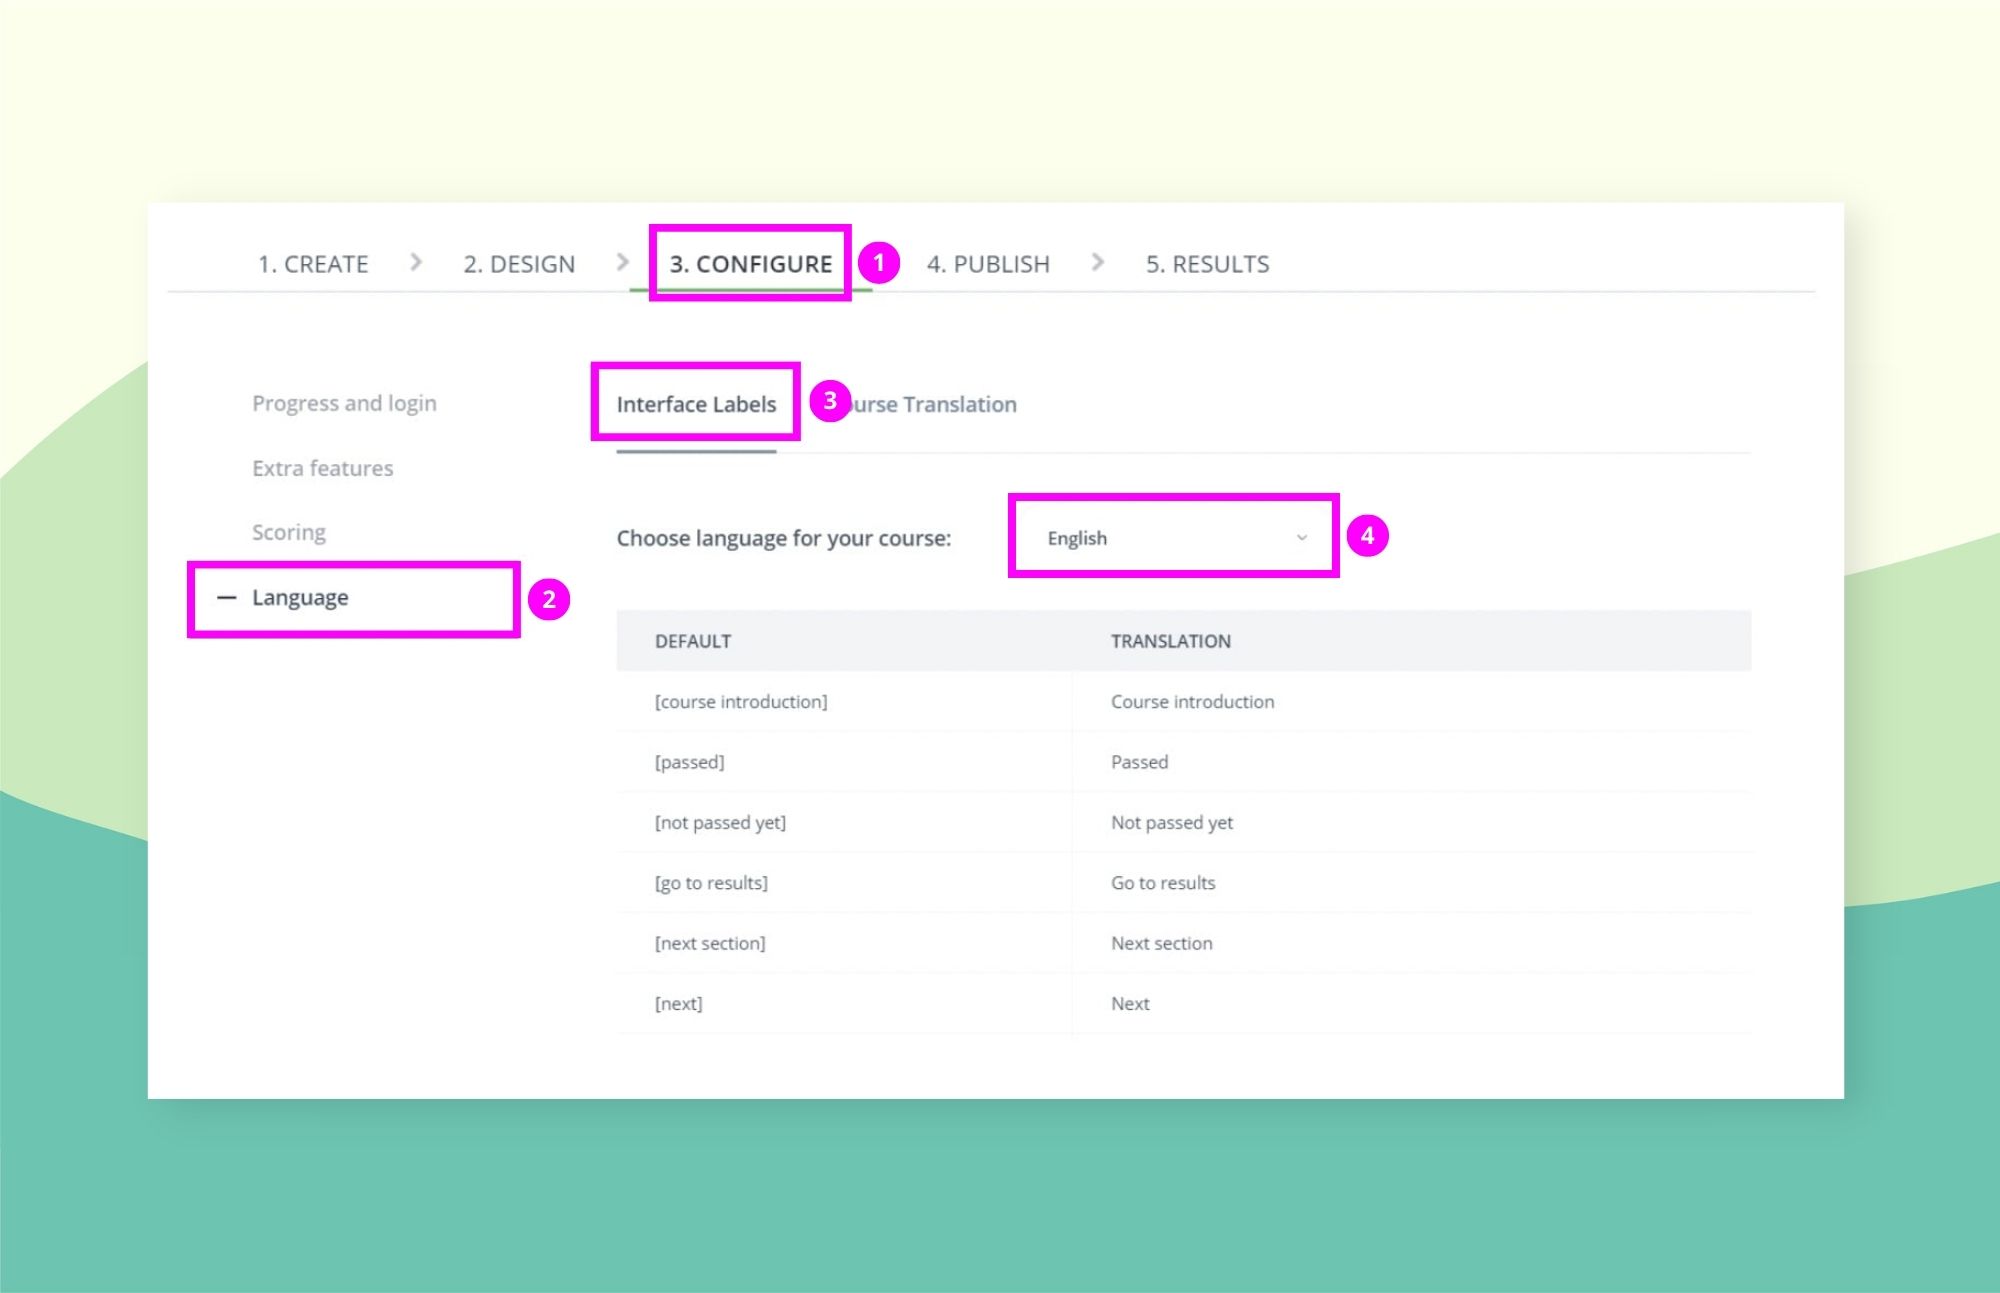
To add a custom translation, pick Custom in the Language drop-down menu. In the Translation column, replace the original English text segments with the translations in the target language.
Practice 2: Make sure your original course is translation-friendly
You can save your translator's time by ensuring that the language and contents of your original course is translation-friendly. Here’s how you can do it:
- Avoid slang, jargon, and idioms. Use neutral, unambiguous language in your course. Slang, jargonisms, and idioms are typically harder to translate, and some of them simply don’t have equivalents in other languages. Besides, if translated incorrectly, they can create misunderstanding among your learners.
- Use simple syntax. Overly complex and bulky sentence structures lead to content that is hard to understand and even harder to translate. Be concise whenever possible — less is more in this case.
- Use terms consistently throughout the course. Words that are synonymic in one language can have very different meanings in another. It can lead to confusion and interfere with learners’ understanding of your course. Avoid synonyms and stay consistent with your word choice.
- Be careful with imagery and visual symbols. If you use images in your course, bear in mind various cultural differences that can affect learners’ interpretation of what they see. The rule of thumb is to avoid religious imagery or political symbols. These are always potential sources of controversy. Besides, if your course features images of people, try to find pictures with persons that represent the ethnicity/core population of your target locale.
Practice 3: Don’t forget to translate extra course materials and attachments
Easygenerator courses can contain much more than pages filled with text. You might also add to your course:
- Audio and video commentary.
- Handouts and worksheets, etc.
To ensure that your course is fully translated for the learner's benefit, you should translate these additional course materials as well.
The best way to do it while avoiding additional translation costs is to use translation software that supports various file formats.
For example, Redokun allows you to translate a variety of file formats, including PDF, InDesign, SRT, Word, XLIFF, and many more. You can efficiently translate multiple content types in one place. And more importantly, you won’t have to pay extra just to have a separate tool to translate other assets.
Practice 4: Watch out for images with embedded text
Take another look at your Easygenerator course content. Does it feature images with embedded text? If this is the case, be aware that this text is not automatically exported in the XLIFF document you generate for translation.
To avoid publishing a translated course with images that still contain the original language, try one of the following solutions:
- Remove or replace the images with embedded text. Instead, go for separate captions under the image. They will be exported in the XLIFF translation file.
- Extract the texts from all the images, collect them in an Excel file, and translate it with Redokun. Then, replace the text in the images with the translation generated. You will need the help of a graphic designer for this, depending on how the original images were created.
- Use image translation software. It can capture, recognize, and translate text in images. However, secure and reputable tools will require a separate paid subscription.
Summary
Easygenerator courses are an excellent way to share your valuable knowledge with wide audiences. And if your business wants to reach learners around the globe, having a scalable Easygenerator translation workflow is a must.
Use the XLIFF export feature to translate Easygenerator eLearning courses with Redokun. Our translation software provides a simple and affordable solution if you're looking to speed up your translation workflow.
Do give it a try today. You can start your 14-day free trial today - no credit card necessary.
Till next time,
Anastasia


