


Creating a table of contents in InDesign is a little bit tricky. For years, I've been designing my documents without using this very handy feature.
I used to layout my entire document, and only at the end of the process, I would generate a PDF of the document and manually write the Table of Contents (TOC) of my InDesign file, chapter by chapter (or product by product, if I designed a product catalog).
If you are also familiar with this tedious job, and you want to stop doing it manually and forget about it right now, follow this quick tutorial and learn how to automate the creation and update of your table of contents in InDesign.
This tutorial consists of two main parts. The first covers the basic functionalities of the feature. The second covers every aspect and personalization of the TOC feature. If you have an issue, or are trying to achieve a specific result, you can probably find what you are looking for in the second part.
Overview
- Advantages of using the TOC feature
- Create the Table Of Contents
- Update the Table Of Contents
- Make sure that the page numeration starts after the TOC
- Put dots between the entries and their page numbers
- Listing more than a single Paragraph Style – and work with the indentation
- Add entries from a hidden level
- How to set the TOC to list the entries in alphanumerical order
- Show entries without page number
- List Numbered Paragraphs
- Save the TOC Style
- Import a TOC Style
- Multiple TOCs in a document
- Download the Templates
When should I use this feature?
You should use the TOC with:
- books or magazines
- user manuals, technical documents, brochures, etc.
- product catalogs, pricing lists, etc.
Actually, you can use it with any list of elements which you can set to a specific Paragraph Style. InDesign doesn't force you to show the page numbers of the listed entries, so you can use the TOC feature to create any kind of list. Also, you can sort the TOC in alphanumerical order which is great when you have to create an ordered index.
Introduction
The first time I learned how to use this feature I was designing a product catalog.
In this tutorial I’ll use that as an example, and at each step I'll also give you the instructions you need in case you are designing a book or a magazine.
Also, I'll highlight possible issues/solutions you might encounter with creating the TOC of your document.
In short, what you need to do to is:
- create and apply the Paragraph Styles for each entry you want in the TOC (chapters, subchapters – product types, product names)
- create the Paragraph Styles for the Table of Contents (the title of the TOC, and the body - learn how to properly use InDesign paragraph styles here)
- create the Table of Contents
If you want to try it out – or you just want a ready-to-use template – here you can find two example files (in IDML format). Inside, I also created a Table of Content Style that you can import in your InDesign documents. Download the InDesign Table of Contents Template.
Advantages of using the InDesign Table of Contents feature
Using this feature gives you many benefits:
- it saves a lot of time when creating the TOC (the creation is automatic)
- it helps you update the TOC automatically
- it avoids mistakes and typos while manually editing the TOC
- it creates hyperlinks to the chapters or the products listed
- it creates a Navigation Table of Contents for your ePub
- with a few clicks you can add or remove levels to the TOC (add/remove subchapters)
- you can create an ordered list of elements automatically
Seeking for more ways to add structure to your documents? If so, make sure you read our guides on How to create Numbered Lists and Bullet lists in InDesign.
Creating a Table of Contents in InDesign: the basics
Apply the Paragraph styles to the document
Creating a TOC requires the use of Paragraph Styles. If you don't know how to use them, please check the Adobe guide or watch this great video by LinkedIn Learning.
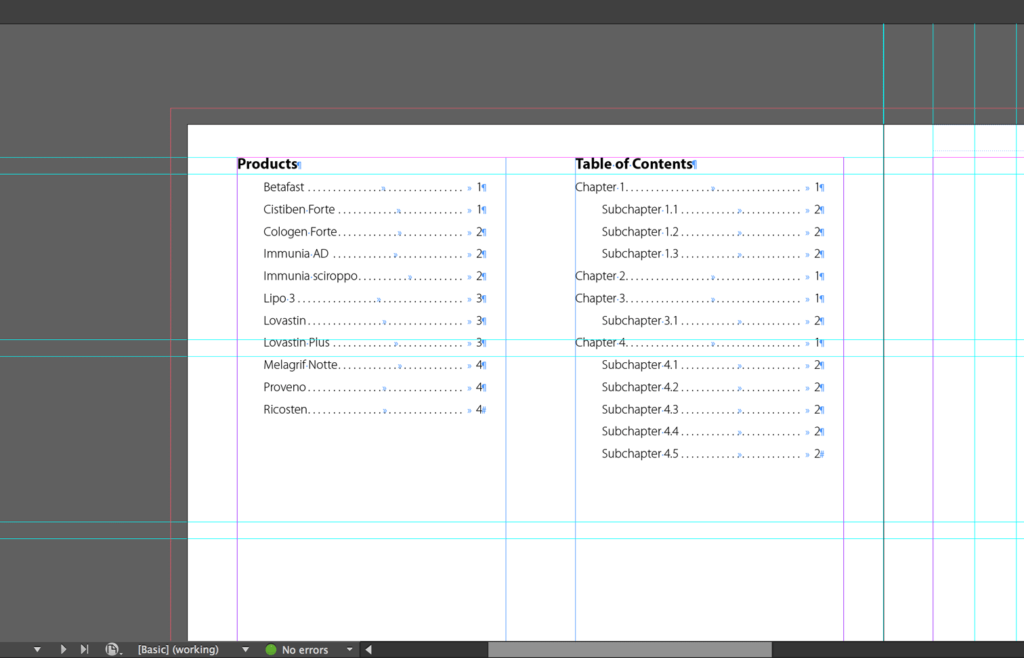
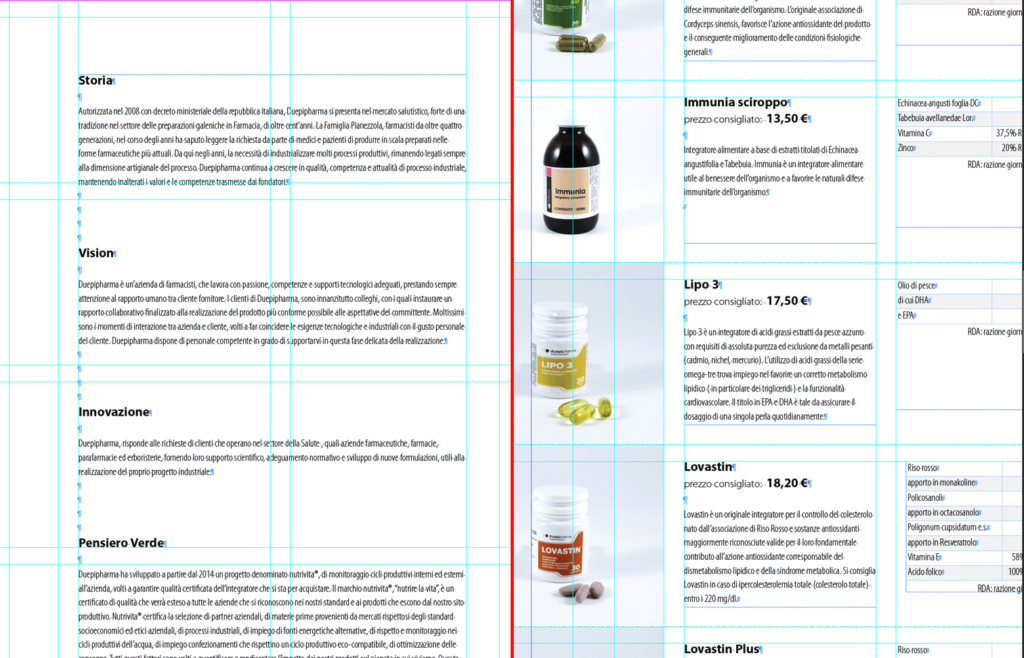
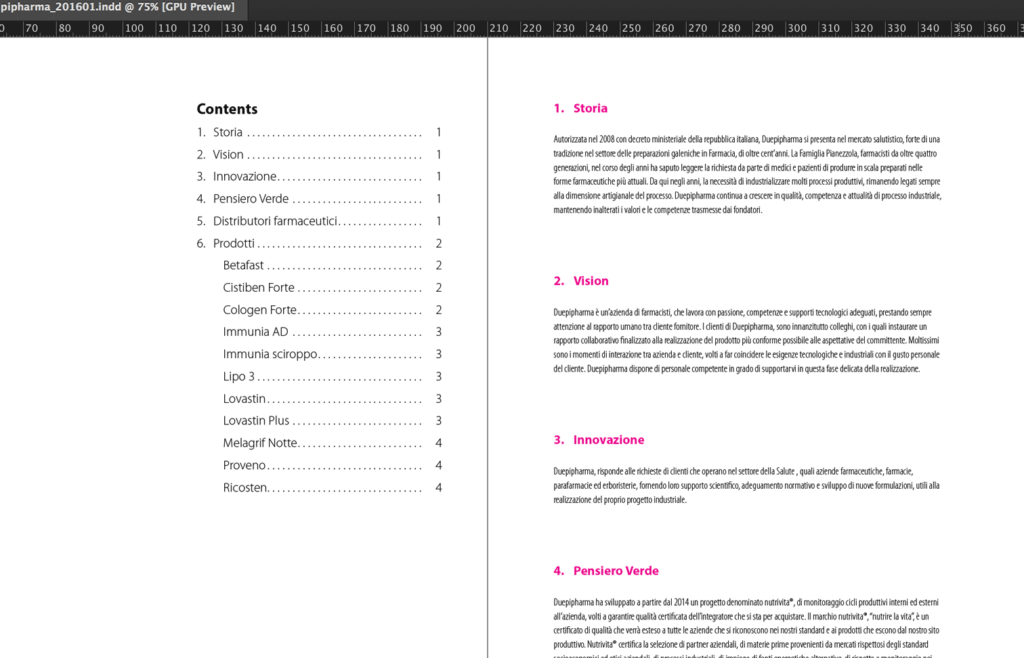
To show you how to use the TOC feature, in this tutorial, I am going to use a product catalog I designed for an Italian company as an example.
Luckily, this is a great example because it has everything I need for showing you how to create a TOC in InDesign whether you are working on a book/magazine or a product catalogue/price list (as this one).
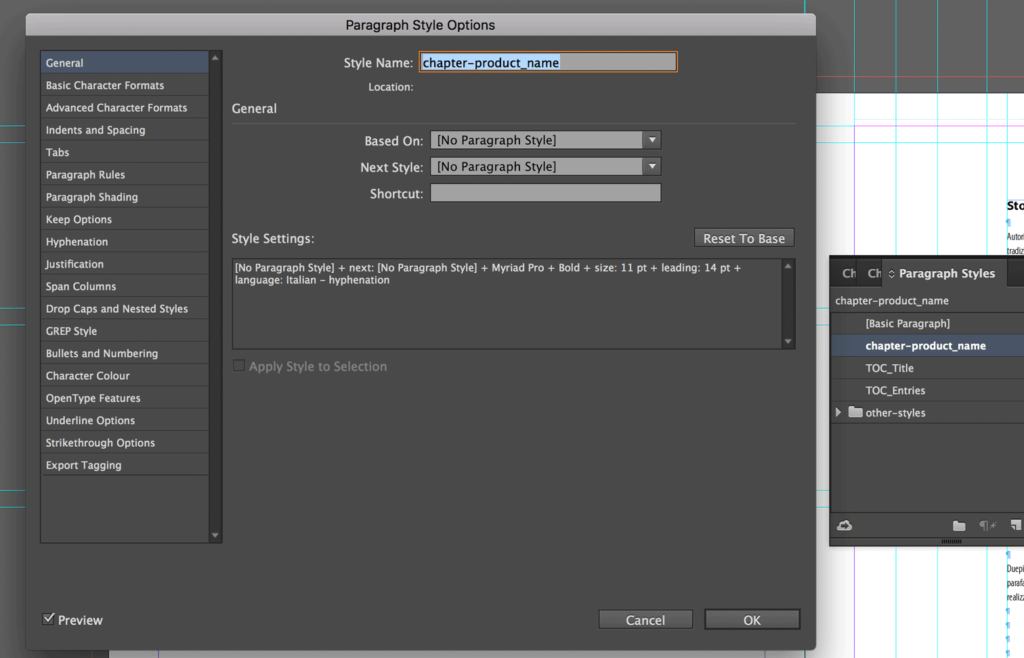
I created a Paragraph Style called "chapter-or-product_name". This Paragraph Style is the one we will use later to set the anchor to the elements (paragraphs) we want to add to the TOC.
It indicates to InDesign which entries the TOC should have. They are your chapter names (see page to the left) or your product names (see page to the right).
We have to apply the "chapter-or-product_name" style to the entries we want to be listed in the TOC (the chapters and the product names).
Create the Paragraph Styles for the Table of Contents
When you create a TOC InDesign you need to indicate to the software which style it should give to the references it'll lists.
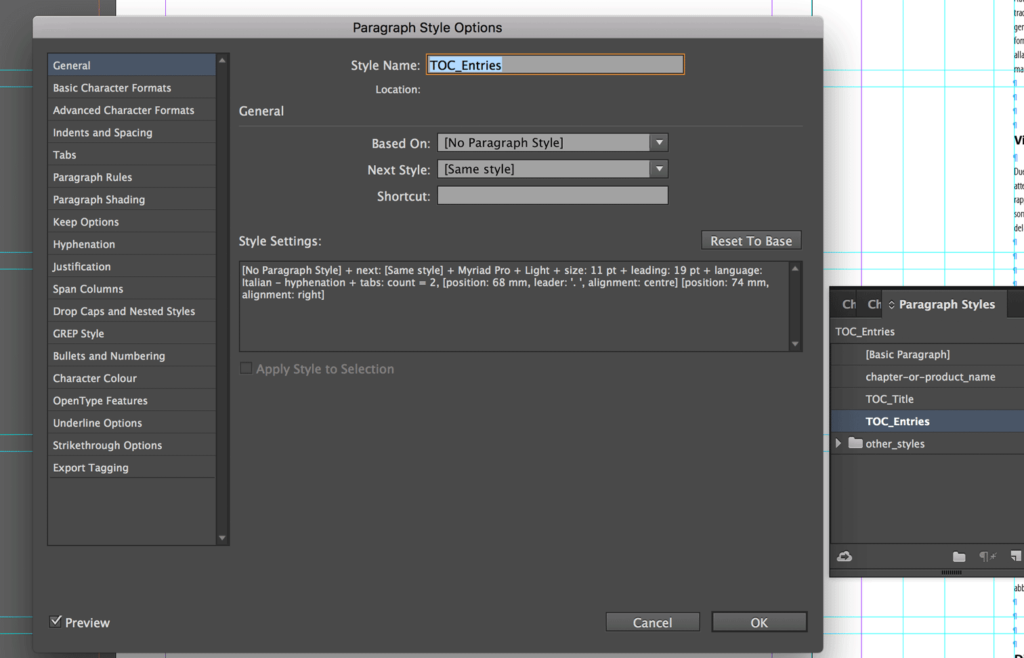
I created two paragraph styles for this purpose. One TOC_Title is for the title of the Table of Contents, the other TOC_Entries is for the references the Table of Contents feature will add while listing the elements to which I set the Paragraph Style "chapter-or-product_name".
Create the Table of Contents
Right now we have:
- created the Paragraph Style "chapter-or-product_name"
- set the Paragraph Style "chapter-or-product_name" to the references that we want to list (chapter titles, product names)
- created two Paragraph Styles for the TOC Title and body
Let's see how simple creating a table of contents is and how helpful it can be.
Later in the post I'll go through the main issues you may face while creating a TOC. If you are facing an issue that is not listed in the post, please drop a comment below so that I can help you and therefore add the solution to this post.
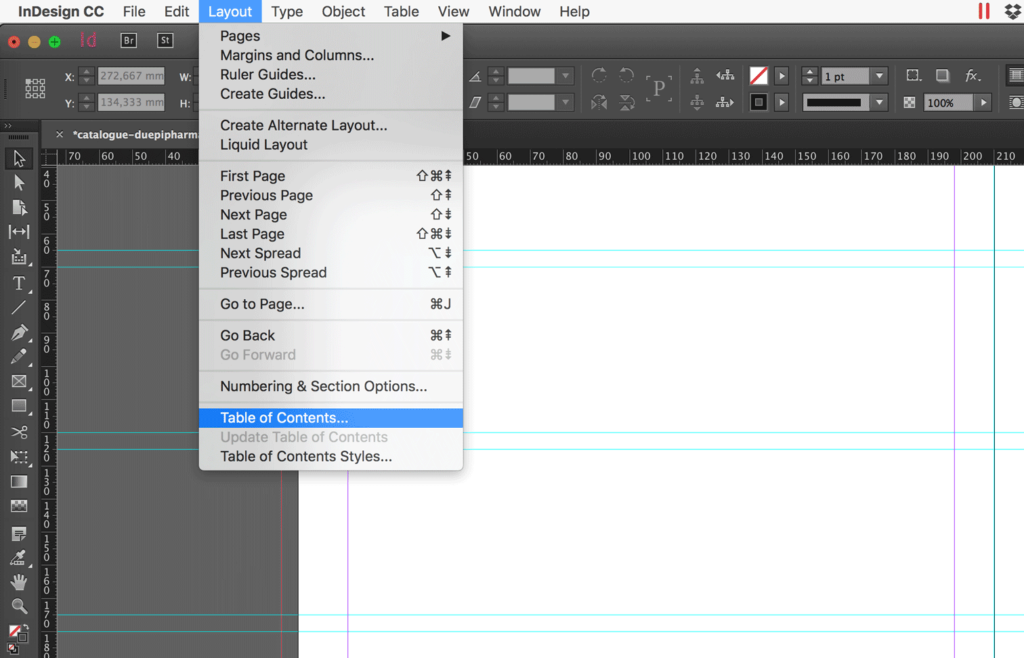
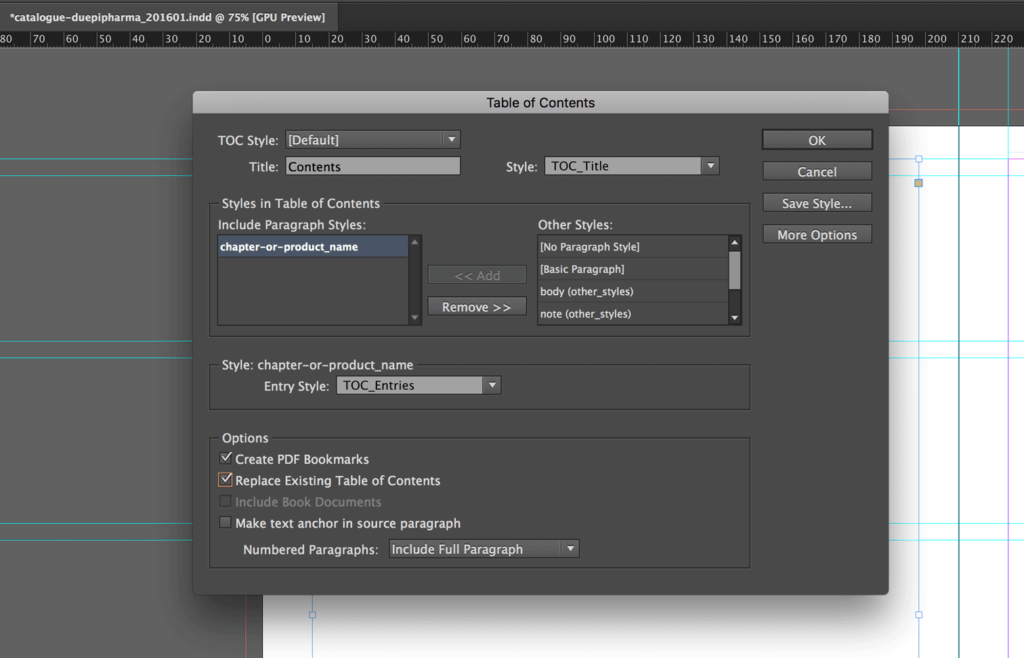
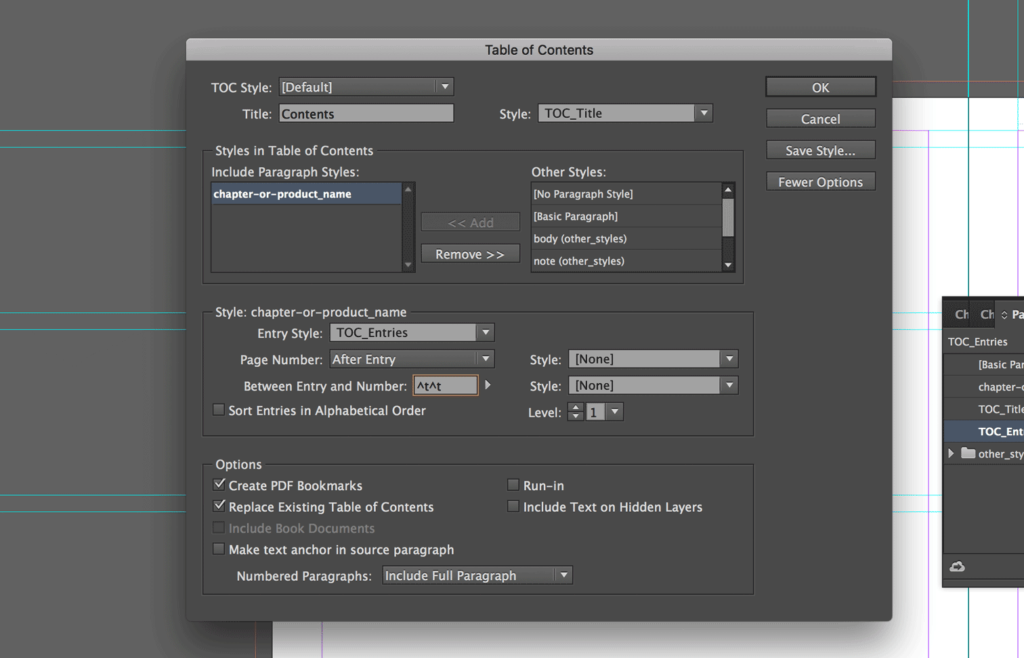
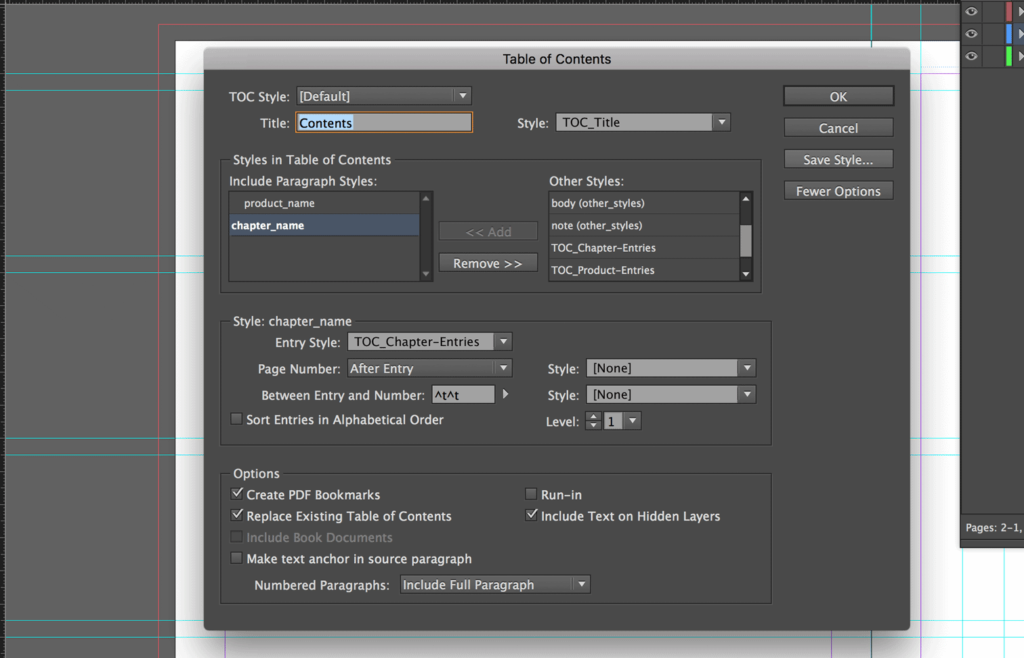
- Let's click on Layout and then on Table of Contents....
- We write the title of the TOC and we set the Paragraph Style TOC_Title we created before.
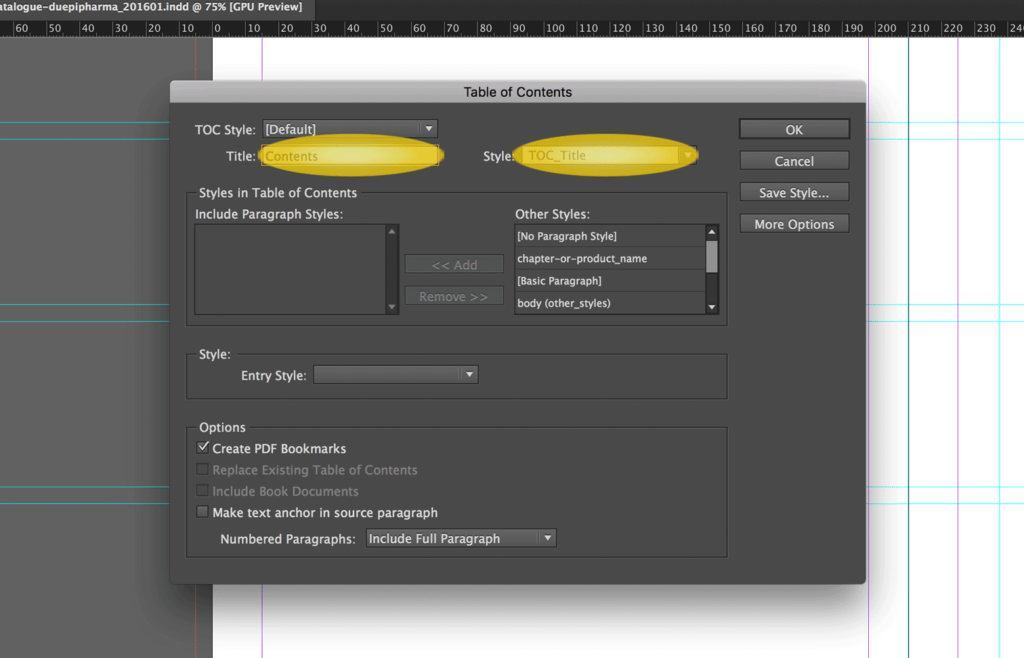
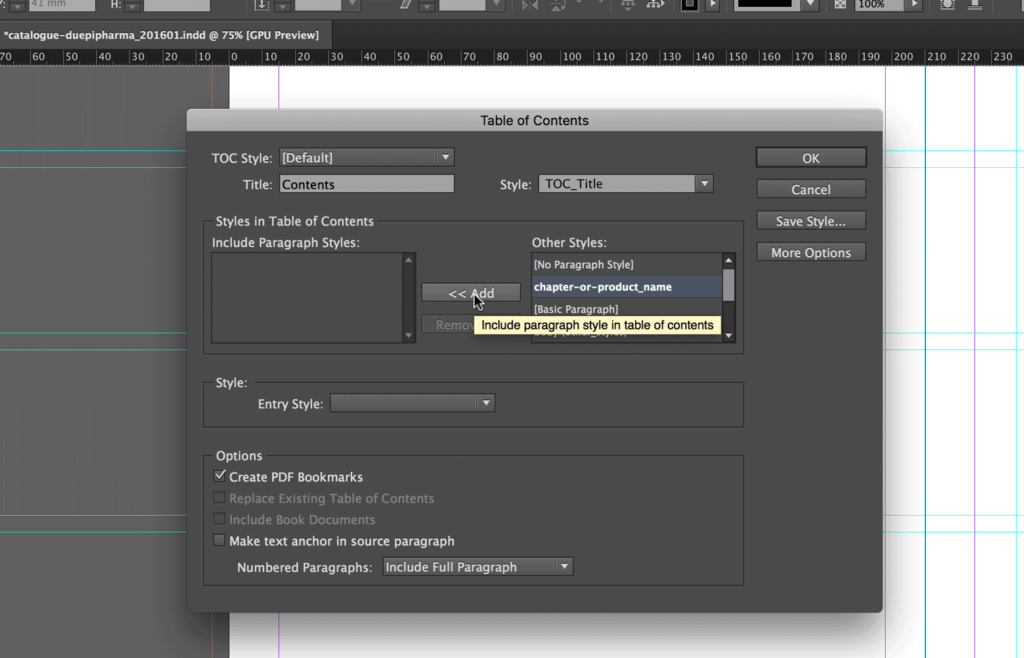
- We add the Paragraph Style "chapter-or-product_name" into the Include Paragraph Style: box. The TOC will list all the entries that use the styles that are added to this box (we will add some complexity further in this tutorial but for now, let's see the basic use of the feature).
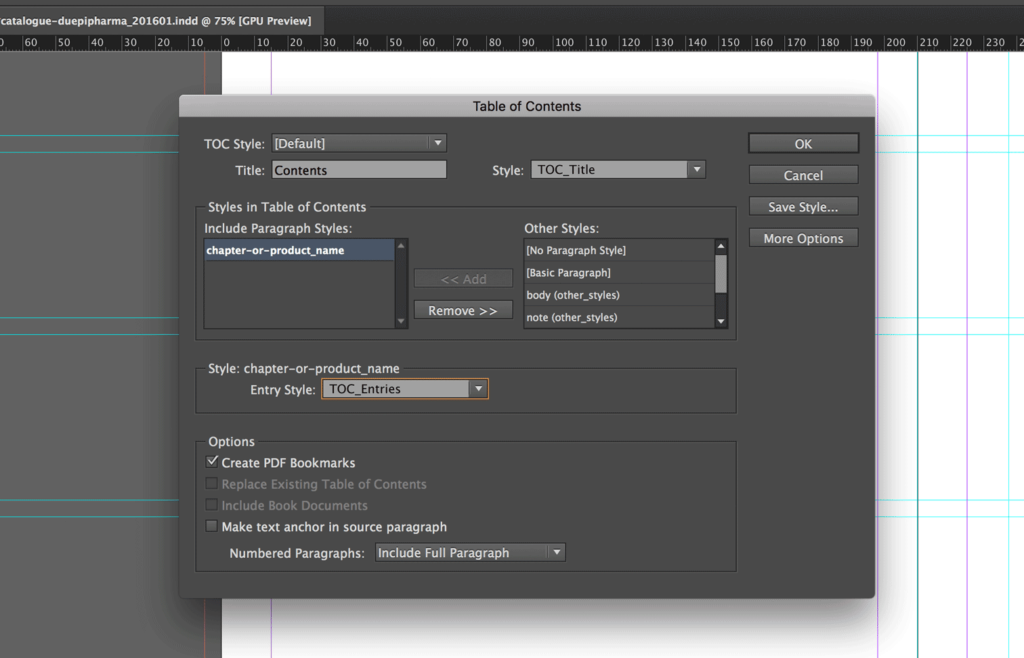
- Let's tell InDesign which style it should apply to the entries that has the Paragraph Style "chapter-or-product_name" by setting Entry Style: to TOC_Entries.
- Let's click OK and draw a text-box in a blank page of the InDesign document.
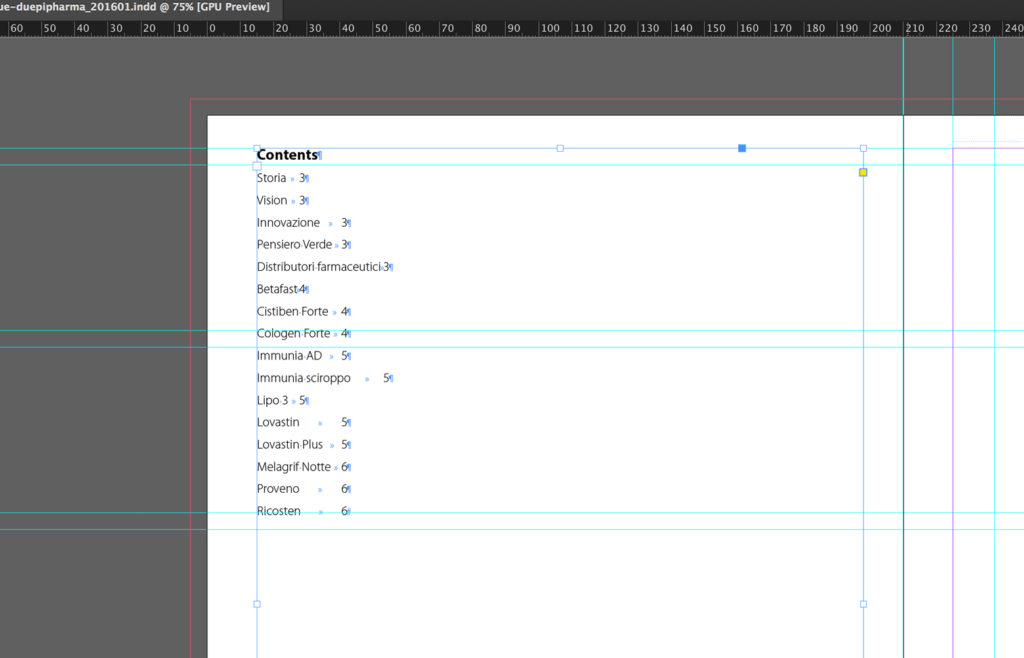
InDesign has created a thread of text which has a title set to the TOC_Title Style, and a list of Paragraphs in the TOC_Entries Style. By default, the Table of Contents feature places the entries in page-order and adds a tabulation and the page number of the entry after each entry.
In the Options (without activating More Options) you can select:
- Create PDF Bookmarks: It creates a bookmark for each entry of the TOC. When you click above one of the entries in the exported PDF, you will be brought to the page of the entry.
- Replace Existing Table of Contents: Updates the TOC
- Include Book Documents: It searches for entries in all the documents of the Book (Read about Books here). It's available only if the Book is open.
- Make text anchor in source paragraph: it sets up a hyperlink for each entry to its paragraph in the text.
This is how you create a simple Table of Contents in InDesign for your book/magazine or product catalogue/pricing list. Let's now see one by one all the cases/issues that you might face.
Advanced settings and issues you might face
Update the Table of Contents
To update the entries of the TOC, just click on Layout and then Update Table of Contents.
Make sure that the page numeration starts after the Table of Contents
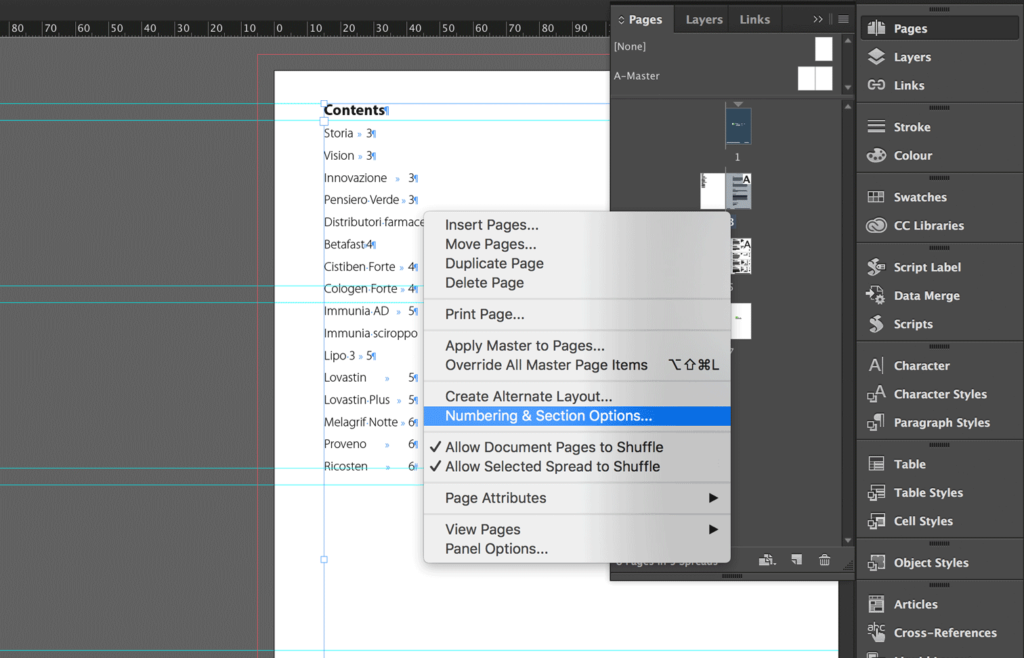
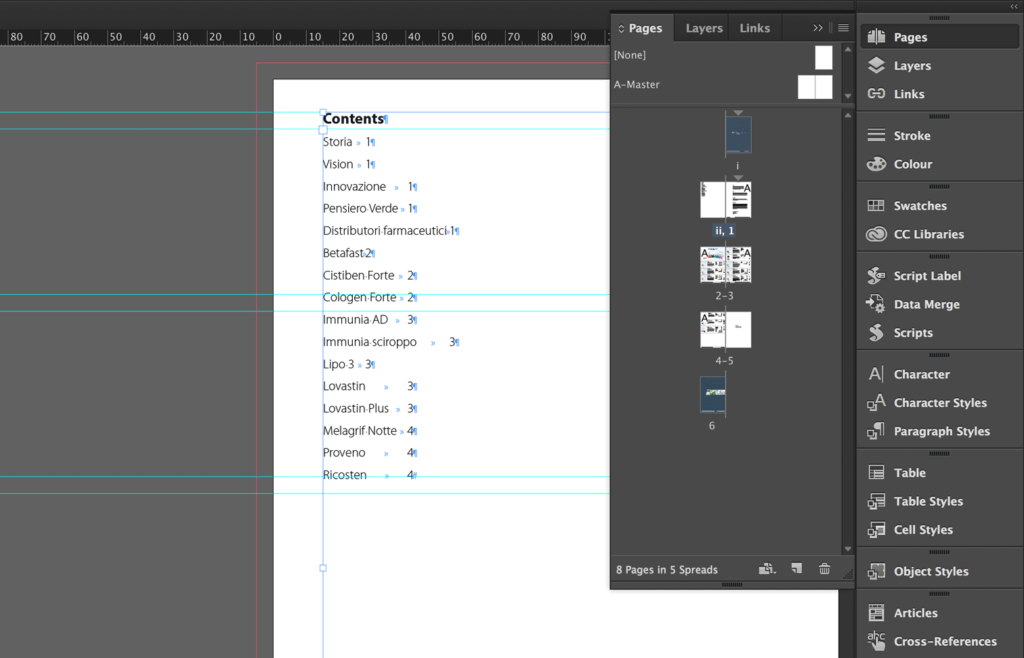
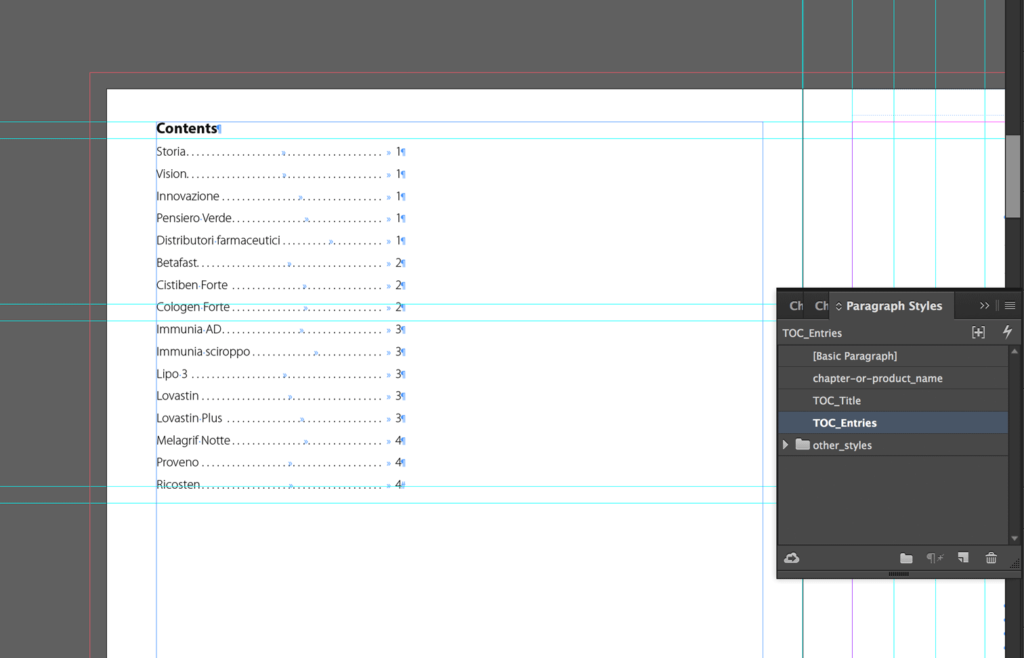
You have probably noticed that my first entries which is ‘Storia’ shows '3' as page number instead of '1'. This happens because the page numeration of my document starts from the cover. To change this behavior, we need to create a Section in the InDesign file.
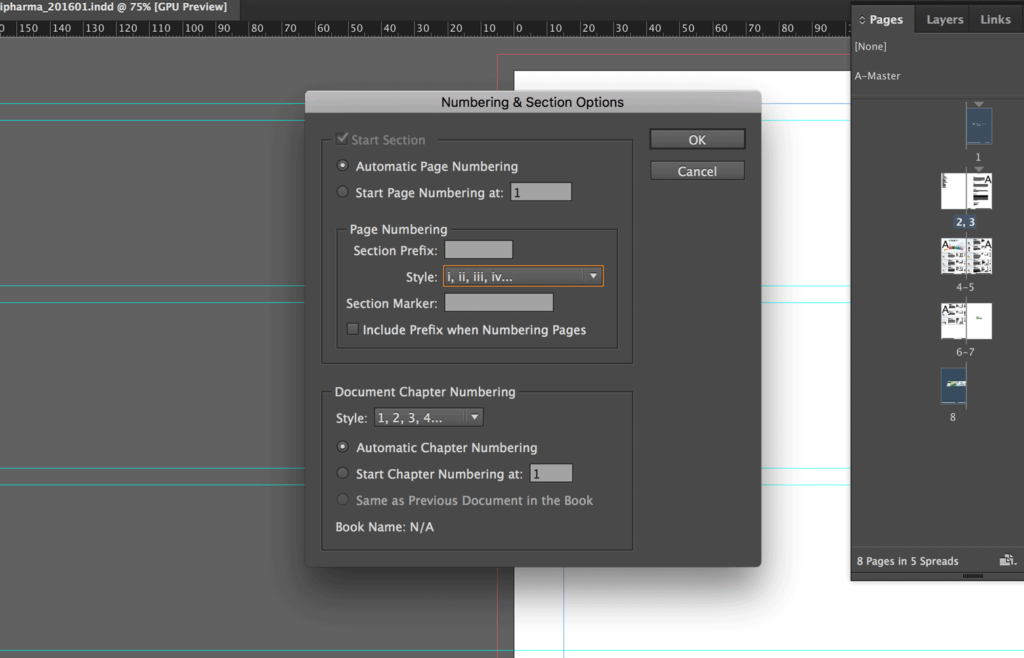
- In the Pages menu to the right panel, I select page ‘3’ and do right-click on it. Then I click on Numbering & Section options....
- In the dialog window that opens, simply click OK.
- Again in the Pages menu, I select page ‘1’, right-click on it, and click again on Numbering & Section options....
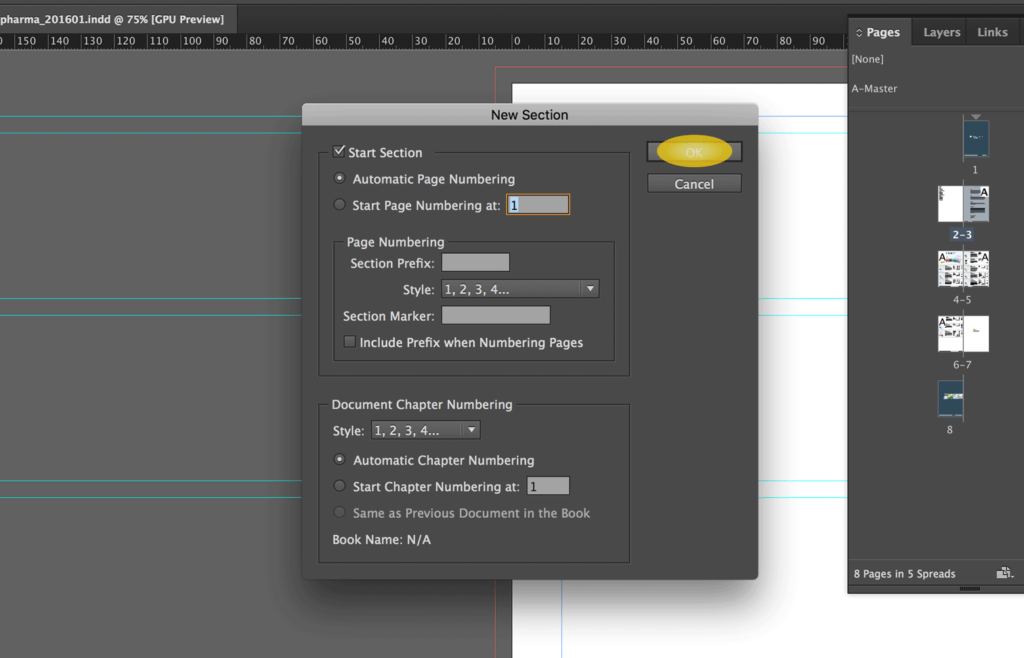
- In the dialog window that opens, you can decide to add a Section Prefix to this first section, or change the styles of the Page Numbering. I decide to change the style.
I am doing this because I want to set page ‘3’ as ‘1’, and without changing the numbering style of this section, InDesign would get confused by the presence of two pages ‘1’.
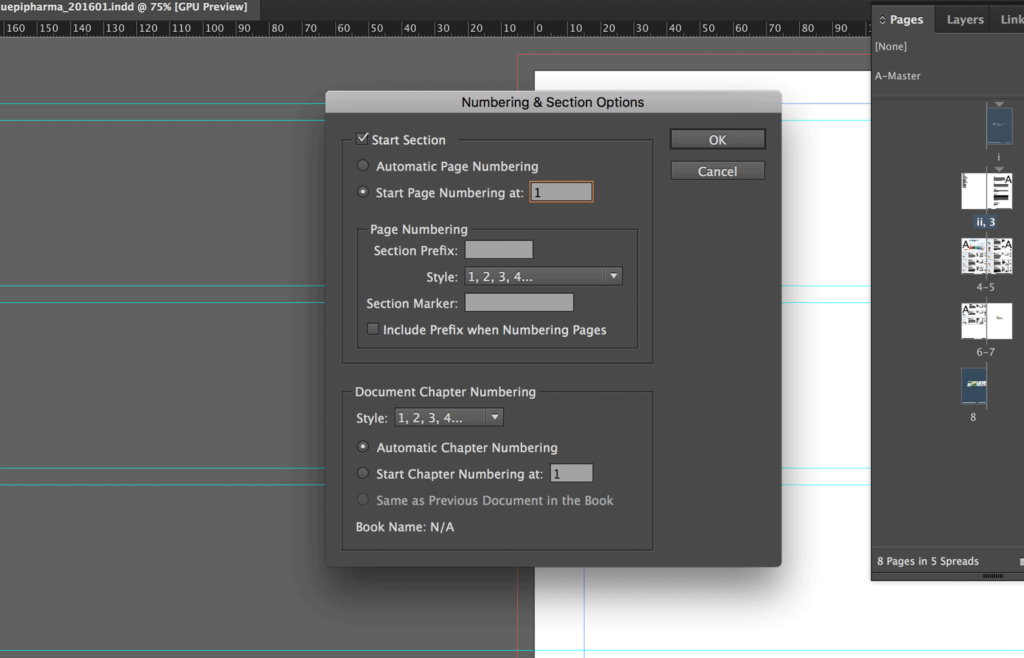
- In the Pages menu, I select page ‘3’ and right-click on it. Then I click on Numbering & Section options....
- In the dialog window that opens, activate Start Page Numbering at: and set the value to 1. Then click OK. After this, the page number will be set correctly.
In the Table of Contents, you’ll see the entries with the updated page numbers. (To appreciate the results you need to update the TOC first).
Put dots between the entries and their page numbers
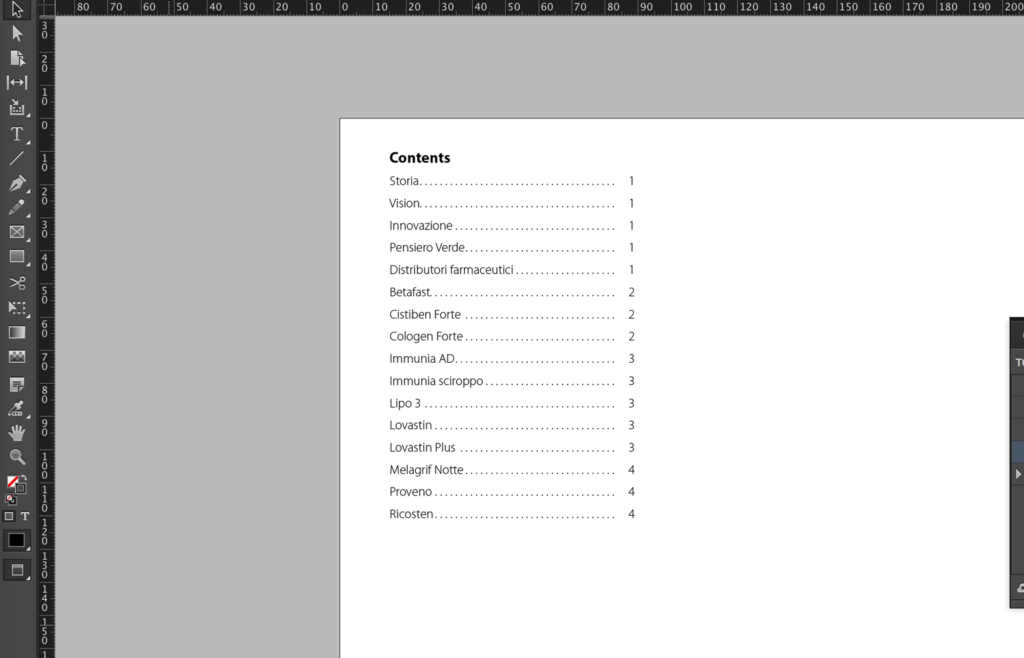
If you want to achieve the same result as above, you need to edit the Paragraph Style assigned to the TOC entries and the character that InDesign puts between each entry and its page number. Let's see the best way to do it.
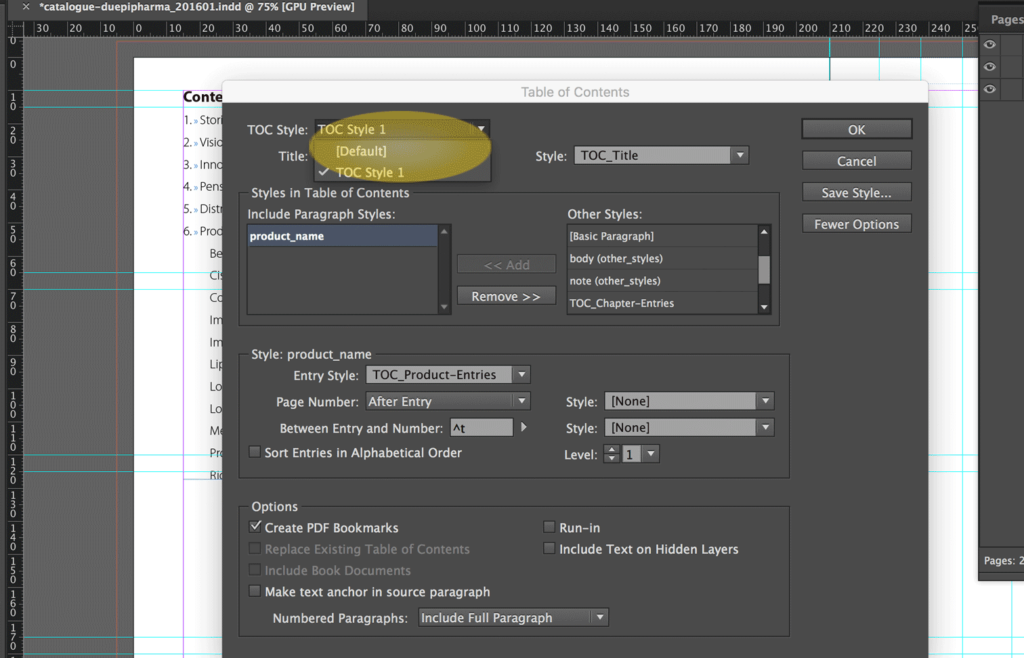
- The first thing I do is change the character that InDesign puts between each entry and its page number. Click Layout then Table of Contents... select the style in Include Paragraph Style: and, if they are not already active, click More Options.
Right now the value of Between Entry and Number is ^t. I'll replace it with ^t^t because, as you saw in the image above, I want a little space between the end of the dots and the page number.
Now we edit the Paragraph Style “TOC_Entries” which is the one InDesign assigns to the entries of the TOC.
- Double click on the style name. Move to the tab Tabs. Let's place a first tabulation (the arrow) and set it to X = 68mm and Leader = '. ' (there is a space after the dot). This will create the dotted line which will stop at 68mm of the text length.

- I also place a second tab. This will create the space between the dotted line and the page number. I set it to X = 74 mm and change the type of justification.
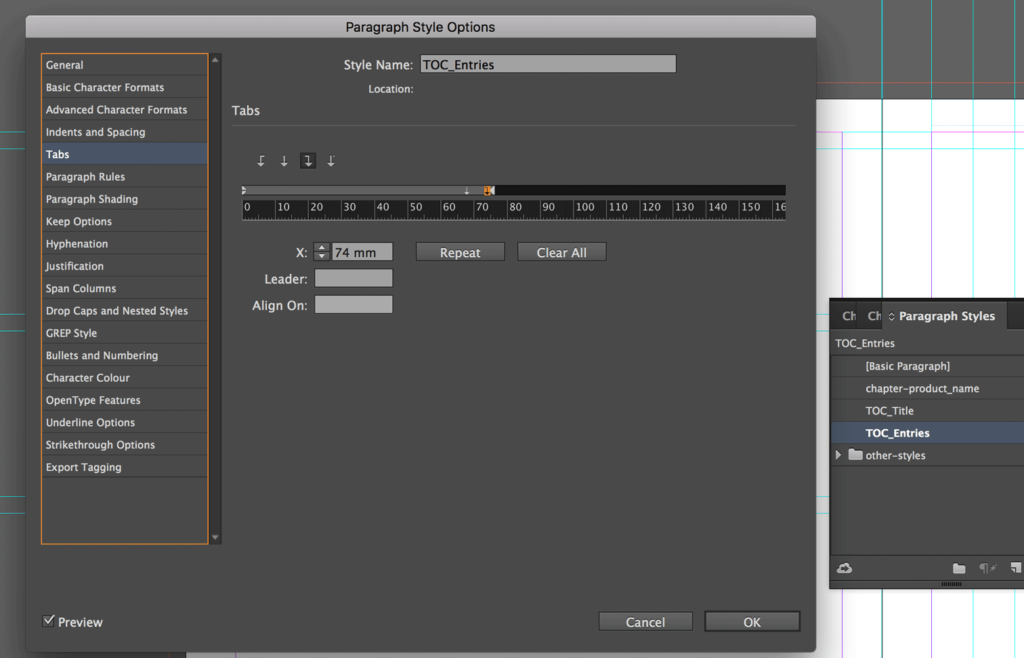
- I save and apply the changes by pressing OK. Done.
Listing more than a single Paragraph Style – and work with the indentation
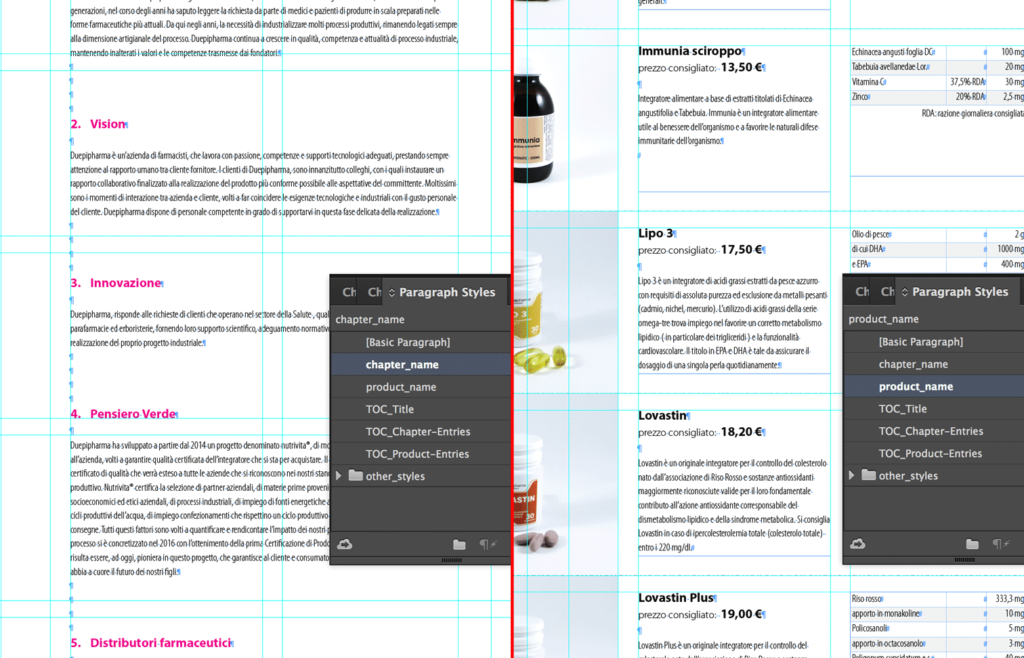
Let's say that I want to add entries with two different Paragraph Styles. To show you how to do so, from the Paragraph Style "chapter-or-product_name" I create two different styles "chapter_name" and "product_name".
I set "chapter_name" to the chapters of my document, and "product_name” to the name of the products (I changed the "chapter_name" style to give a different color to my chapters - so you can appreciate the difference between the two styles).
We are going to set the Table of Contents so that it lists entries with two different paragraph styles.
Let's add the Paragraph Styles "chapter_name" and "product_name" in the Include Paragraph Style: box.

By default, each time you add a Paragraph Style to the Include Paragraph Style: box, InDesign sets the level value in incremental order. This level doesn't affect the generated TOC (except for ePubs).
However, I prefer to be tidy, so I generally change the level based on the hierarchy of the entries (i.e. Chapters have Level 1, Subchapters have Level 2).
Notice that if you want to change the indent of the entries you need to work on the assigned Paragraph Styles (As we are going to do in the next instructions).
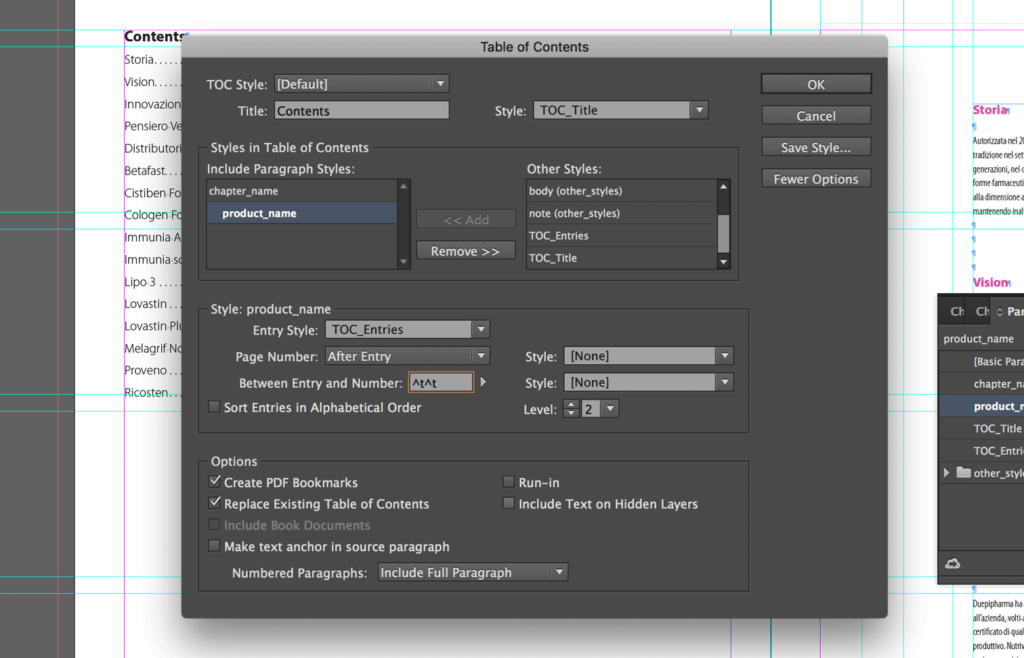
Both the entries from the "chapter_name" and "product_name" style now use the same Paragraph Style, which is TOC_Entries – and the same settings.
I am changing it as follow:
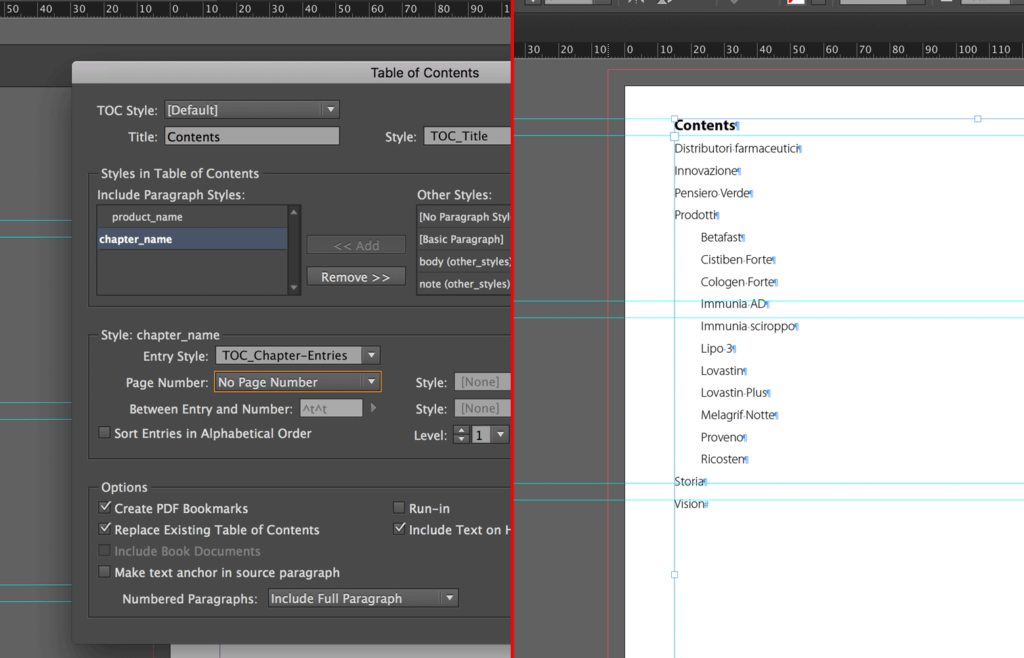
- "chapter_name" = TOC_Chapter-Entries (Level is 1)
- "product_name" = TOC_Product-Entries (Level is 2)
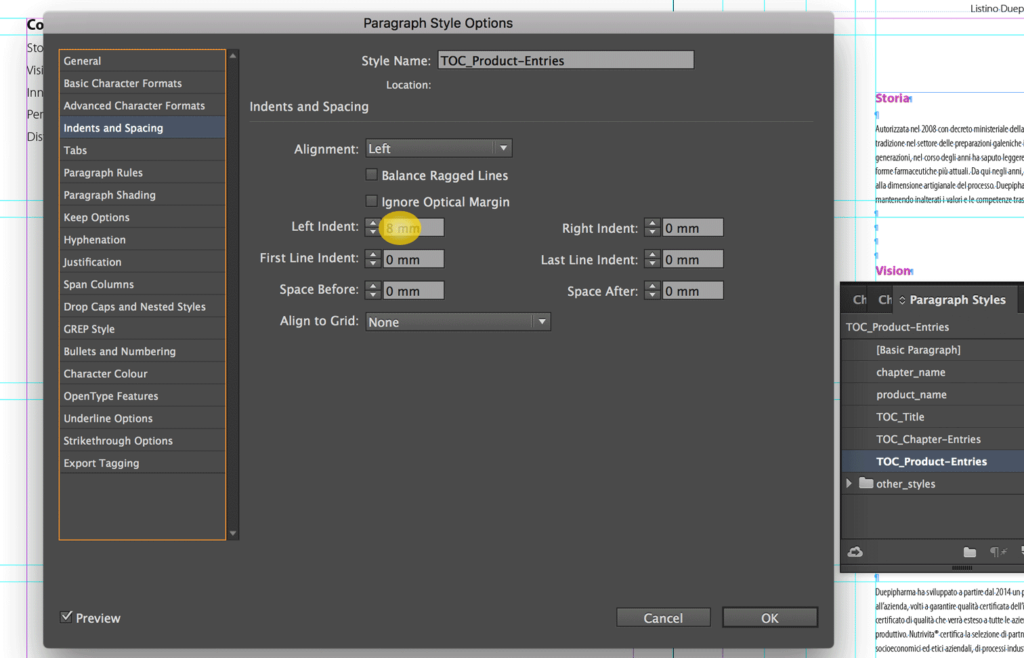
Then I change the indent of the entries from the “product_name” Paragraph Style. To do so, I need to edit the TOC_Product-Entries Paragraph Style. In the tab Indents and Spacing I set the Left Indent to 8 mm.
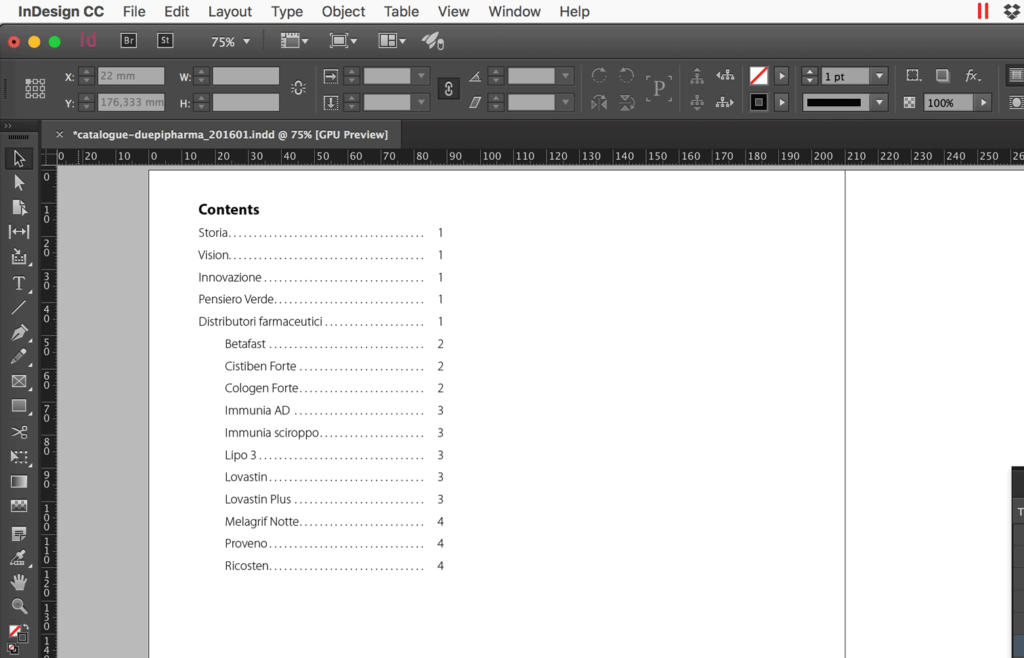
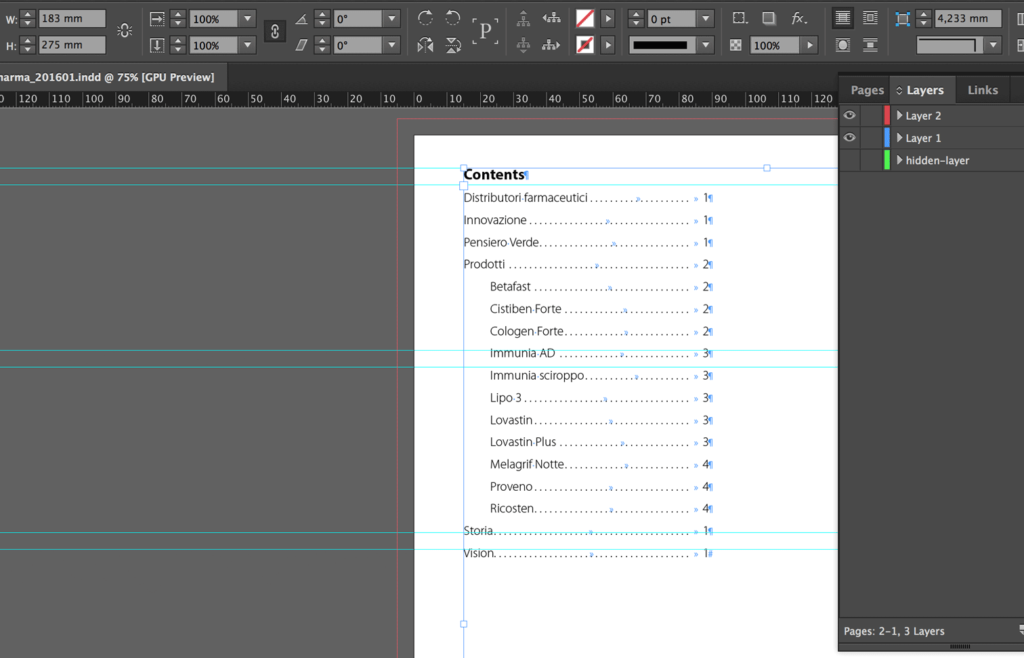
This is how the TOC looks like now.
Add entries from a hidden level
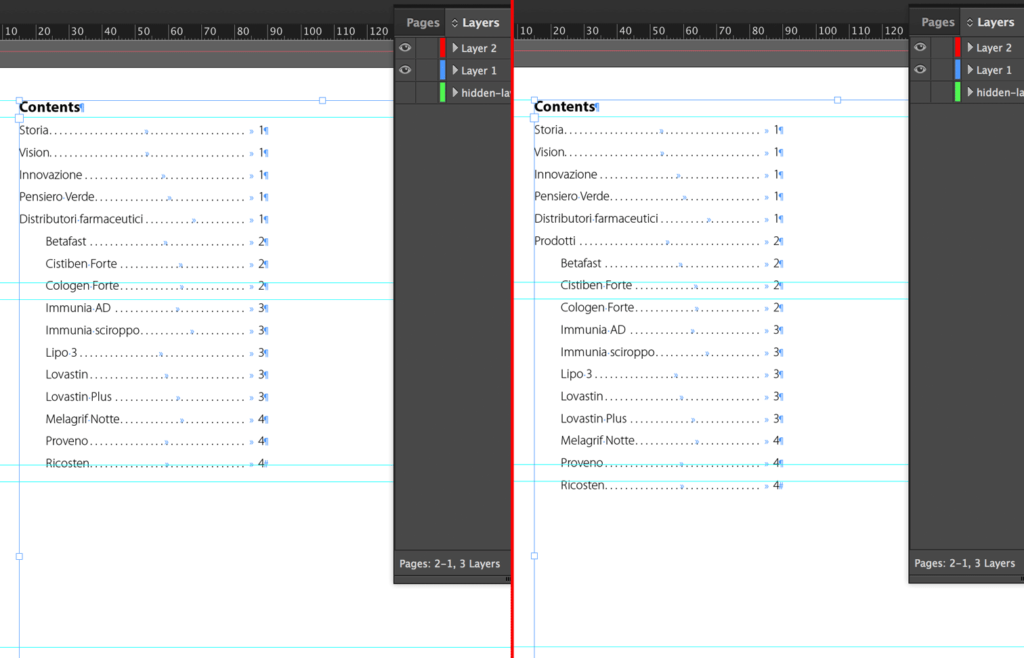
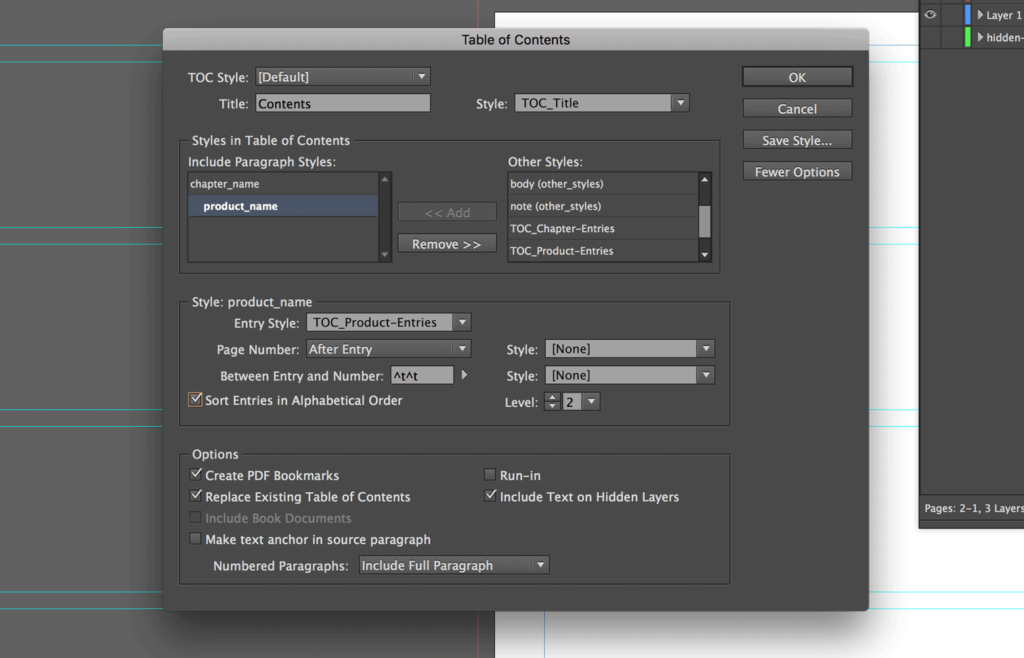
If you also want to add to the TOC entries from hidden layers, you should activate the option Include Text on Hidden Layers.
In a hidden layer, I have added a text "Prodotti" and set the Paragraph Style chapter_name
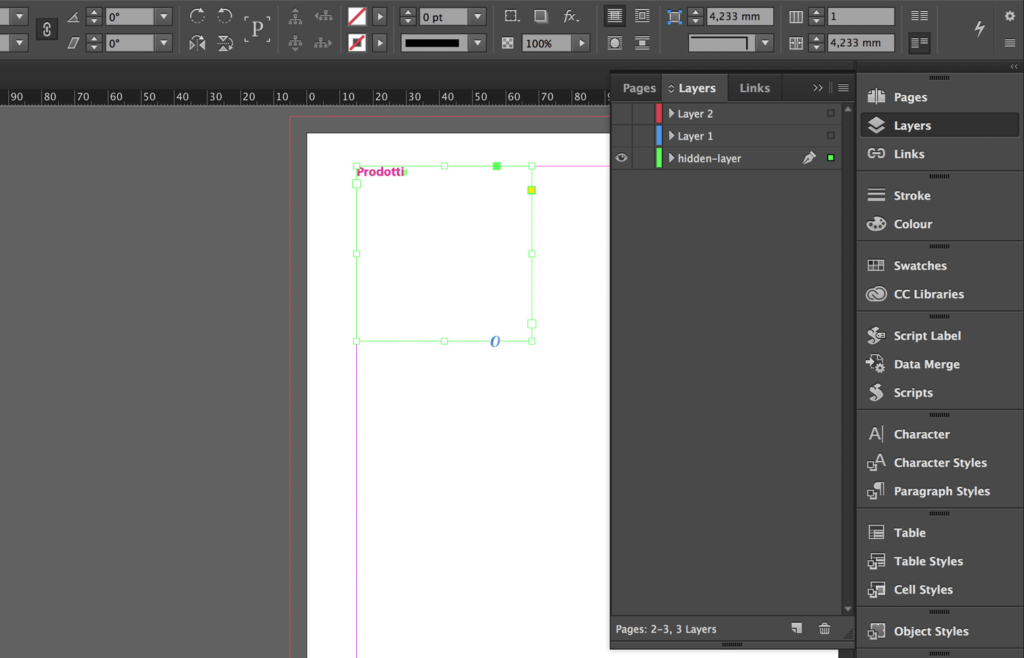
As you might appreciate from the image below, the chapter "Prodotti" is listed in my TOC (left part of the image). The right part of the image shows what would happen if I didn't activate the option Include Text on Hidden Layers.
How to set the TOC to list the entries in alphanumerical order
As we've seen, InDesign by default creates a list of entries in page order.
To create an index in alphanumerical order, you should click on More Options and then activate the Sort Entries in Alphanumerical Order option for each paragraph style included in the TOC.
Notice that if the TOC has entries with more than a Paragraph Style, the entries will be sorted in alphanumerical order within each level. If that's not what you want to achieve, change the level value as we previously saw.
Show entries without page number
To create a list of entries without showing their page number, you should click on More Options and then set Page number to No page number for each paragraph style included in the TOC.
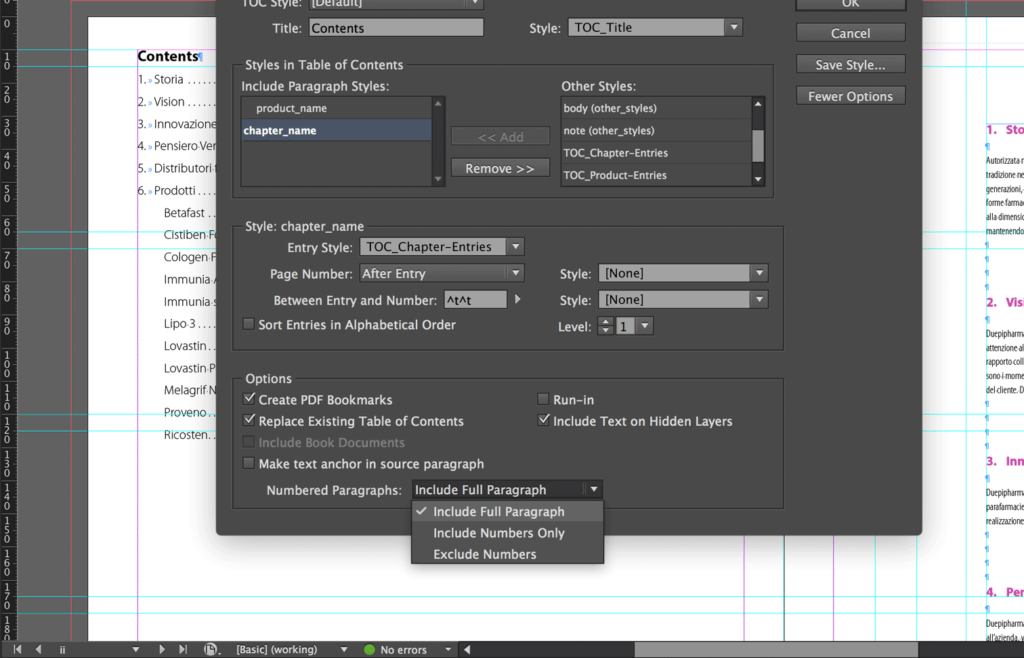
What about Numbered Paragraphs?
If the Chapters in your document are numbered, you can decide to show their numbers in the TOC (or not) by setting the Numbered Paragraph drop-down menu.
- Include Full Paragraph: presents both the text of the paragraph (i.e. your chapter title) and its number (i.e. chapter number) - see image above
- Include Numbers Only: presents only the number (i.e. chapter number)
- Exclude Numbers: presents only the text of the paragraph (i.e. your chapter title)
Save the Table of Contents Style
You can save the Table of Content Style you created for later use, by clicking on Save Style... and then choosing a name (The option is in the window you open by clicking on Layout and then Table of Contents...).
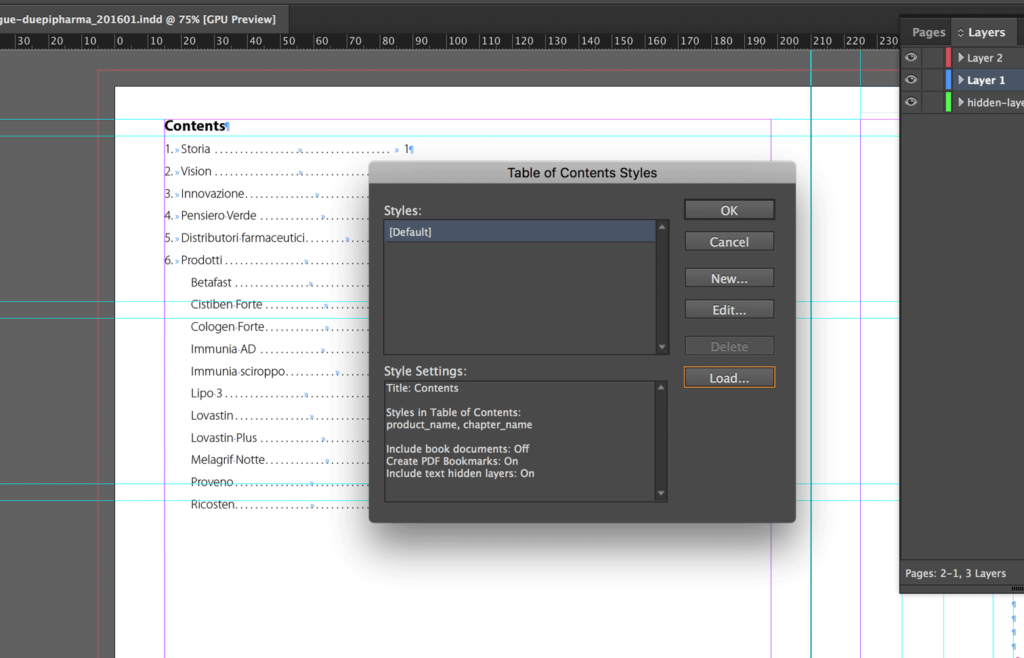
Import a Table of Contents Style
You can import a TOC Style from another InDesign document by going to Layout then clicking on Table of Contents Style....
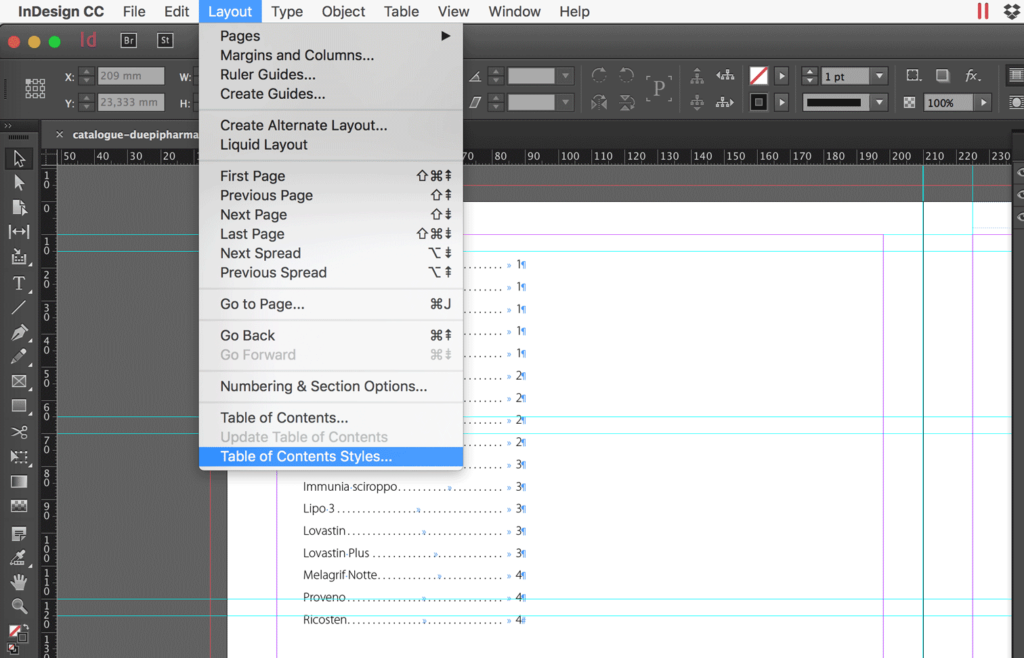
In the window that opens, click Load... and choose the file InDesign from which you want to import the TOC Style. Then click OK.
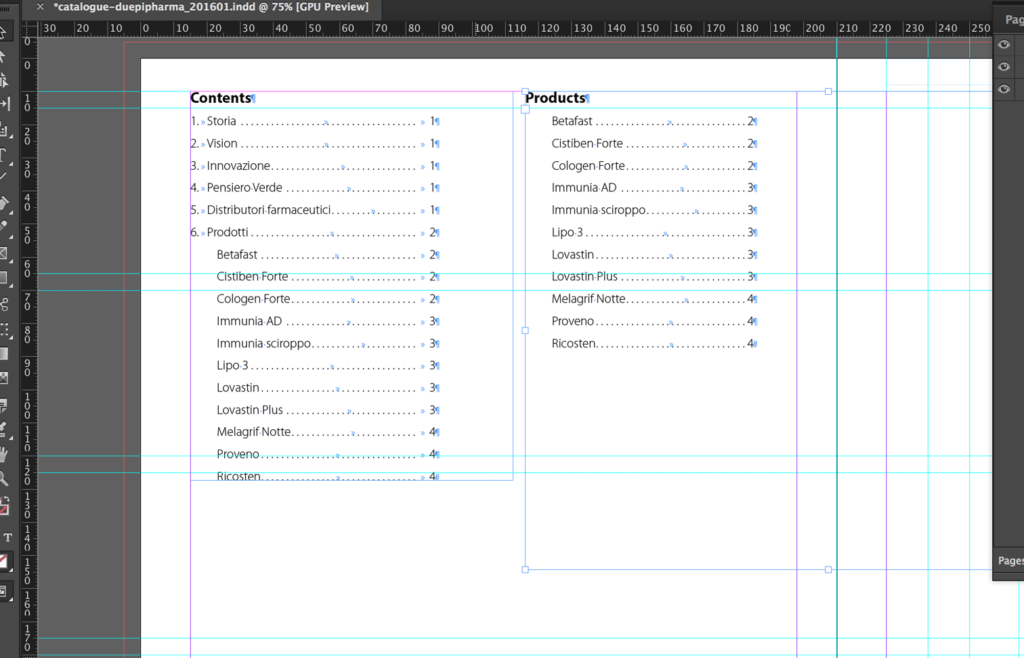
Multiple Table of Contents in a document
To insert more than one TOC in your InDesign document, you need to use the Table of Contents Styles.
In the TOC I created in this document, the TOC Style is set to Default (probably also in your file if you already have a TOC to which you haven't set a customized TOC Style). The TOC Style dropdown can be used to manage multiple TOCs inside your document.
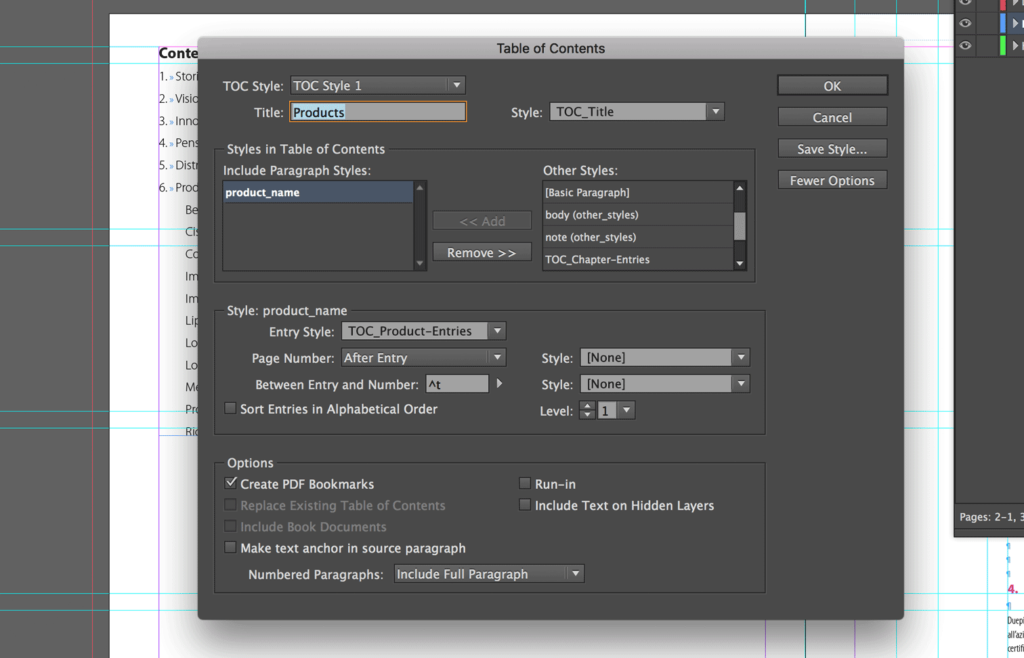
I want to create a new TOC with only the entries from the Paragraph Style “product_name”.
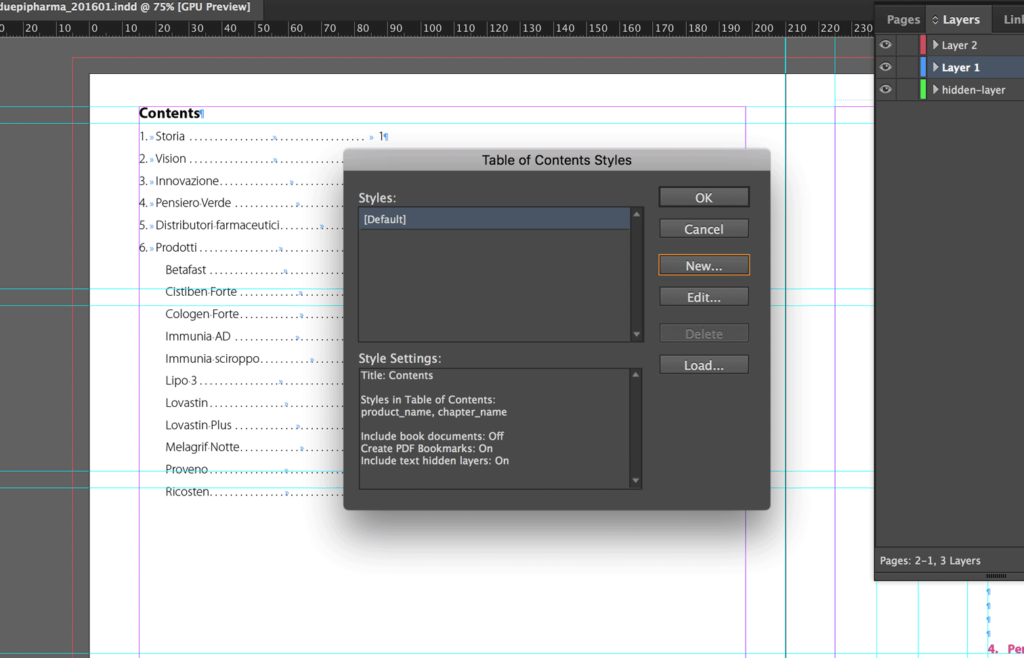
- Let's create a new Table of Contents Style. Click on Layout then Table of Contents Style....
- Click New....
- In the window that opens we edit the options as to create a new TOC. And then we click OK.
- Here we have our new TOC Style. Click Ok.
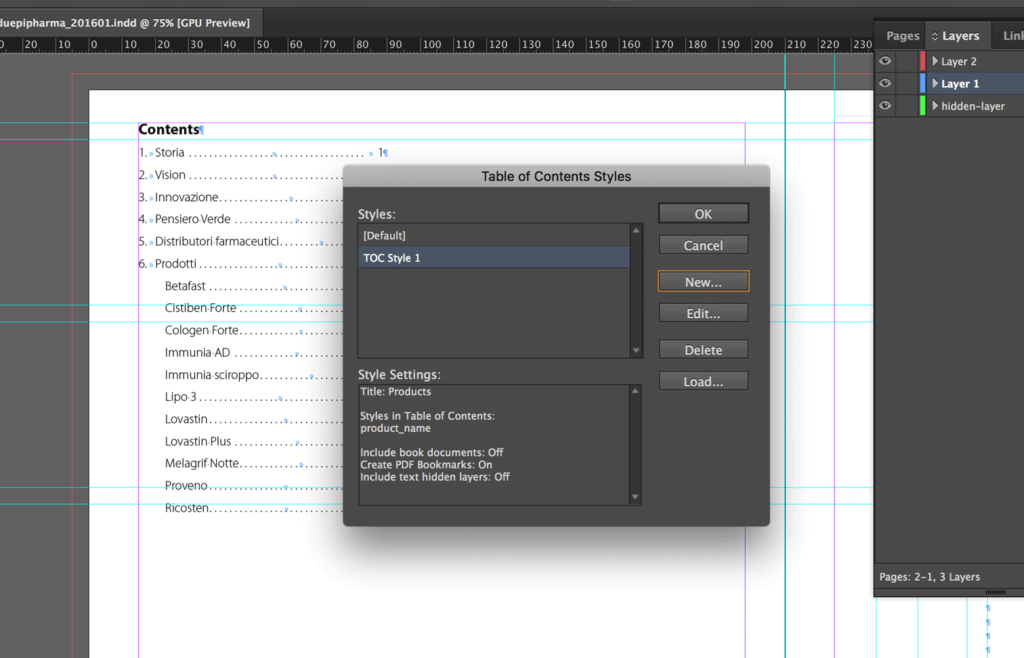
- Now we have to insert the TOC into the InDesign file. Click on Layout then Table of Contents.... In the window that opens be sure to select the new TOC Style from the dropdown TOC Style. Then Click OK and place the new TOC into the InDesign document.

- Here we have the new TOC.
Conclusion
The Table of Contents feature is great and gives you many benefits.
If you have never used it, download the two examples I created for this post, and try to create your first TOC. If you have questions feel free to post them in the comments.
Be sure to subscribe to our newsletter to keep up with future posts or major updates.
Even more, here is a short list of other content you might find useful during this process:
- InDesign Master pages
- InDesign Page Numbers (step by step tutorial)
- How to use Hyphenation and Text-wrap feature
If you liked the post, I'd really appreciate you sharing it!


