


Making banners and ads.
Running a sale campaign, or simply getting those banners translated, often requires teams to work around the clock.
But don't worry!
In this post, I'll help you structure an easy workflow that will save you hundreds of man-hours and that you and your team can implement right away.
Let's start.
Warning
Some of the steps in this guide are not mandatory. However, by following the entire guide you'll make sure your team will encounter less issues and will make less mistakes.
What should you expect from this guide
I've had Marketing Managers and Product Managers, as well as Designers, asking me for help with this task.
It's a process that stresses everybody, so I'm writing this guideline for both parties involved.
If you are a Manager, you'll learn what tools can help your team, what their challenges are and what issues you should pay particular attention to. We will see how to simplify the process, and automate or reduce drastically the effort necessary to complete all tasks.
If you are a Designer, you'll find a step-by-step guide and you'll have way more time on your hands to be creative!
Let's use the correct tools
Using the correct tools is fundamental in any process.
With banners, the usual question is whether to use a vector graphic editor (ex. Illustrator) or a raster graphic editor (ex. Photoshop).
While they are both amazing tools, there is a better choice that you might want to consider: Adobe InDesign.
Why is that?
InDesign is the right tool because it offers (in order of importance):
- great text control;
- automation (already included in the software);
- it's easy to use;
- it can export file formats for digital products (website banners, facebook ads, etc..);
- it can export file formats for printed products (store banners, traditional advertising, etc..);
- and most companies already have a license.
The process explained below will entirely be based in InDesign (and Excel).
Before starting this guide, make sure you and your team have access to Adobe InDesign (You can try it for free for 7 days at this link) and a spreadsheet program (Microsoft Excel, Google Spreadsheet, etc..).
Before starting
If you (or your team) are not comfortable with InDesign, I'd suggest you spend 30 minutes and look into David Blatner's InDesign Quick Start (Or have a look at our list of the best InDesign courses you can find online).
Here is the template
In the post you will find a step-by-step of everything you need to know to create your own banners.
However, you can download my template from here. And save some time (the images are not included).
Overview
In this guide, we will see how you can quickly create your banners in minutes.
In short, we will:
- Create a "banner prototype"
- Set up InDesign to create all the banners automatically
- Explore a few issues and see how to solve them
- Create banners in many languages (optional step
- Export the banners
Create a banner prototype
In the example below, I will create several Facebook Ads. We will start by creating the first prototype. And then, in the next section, we will learn how to automate the creation of all the different versions for each ad/product.
These are our steps to create the first prototype:
Set up the document
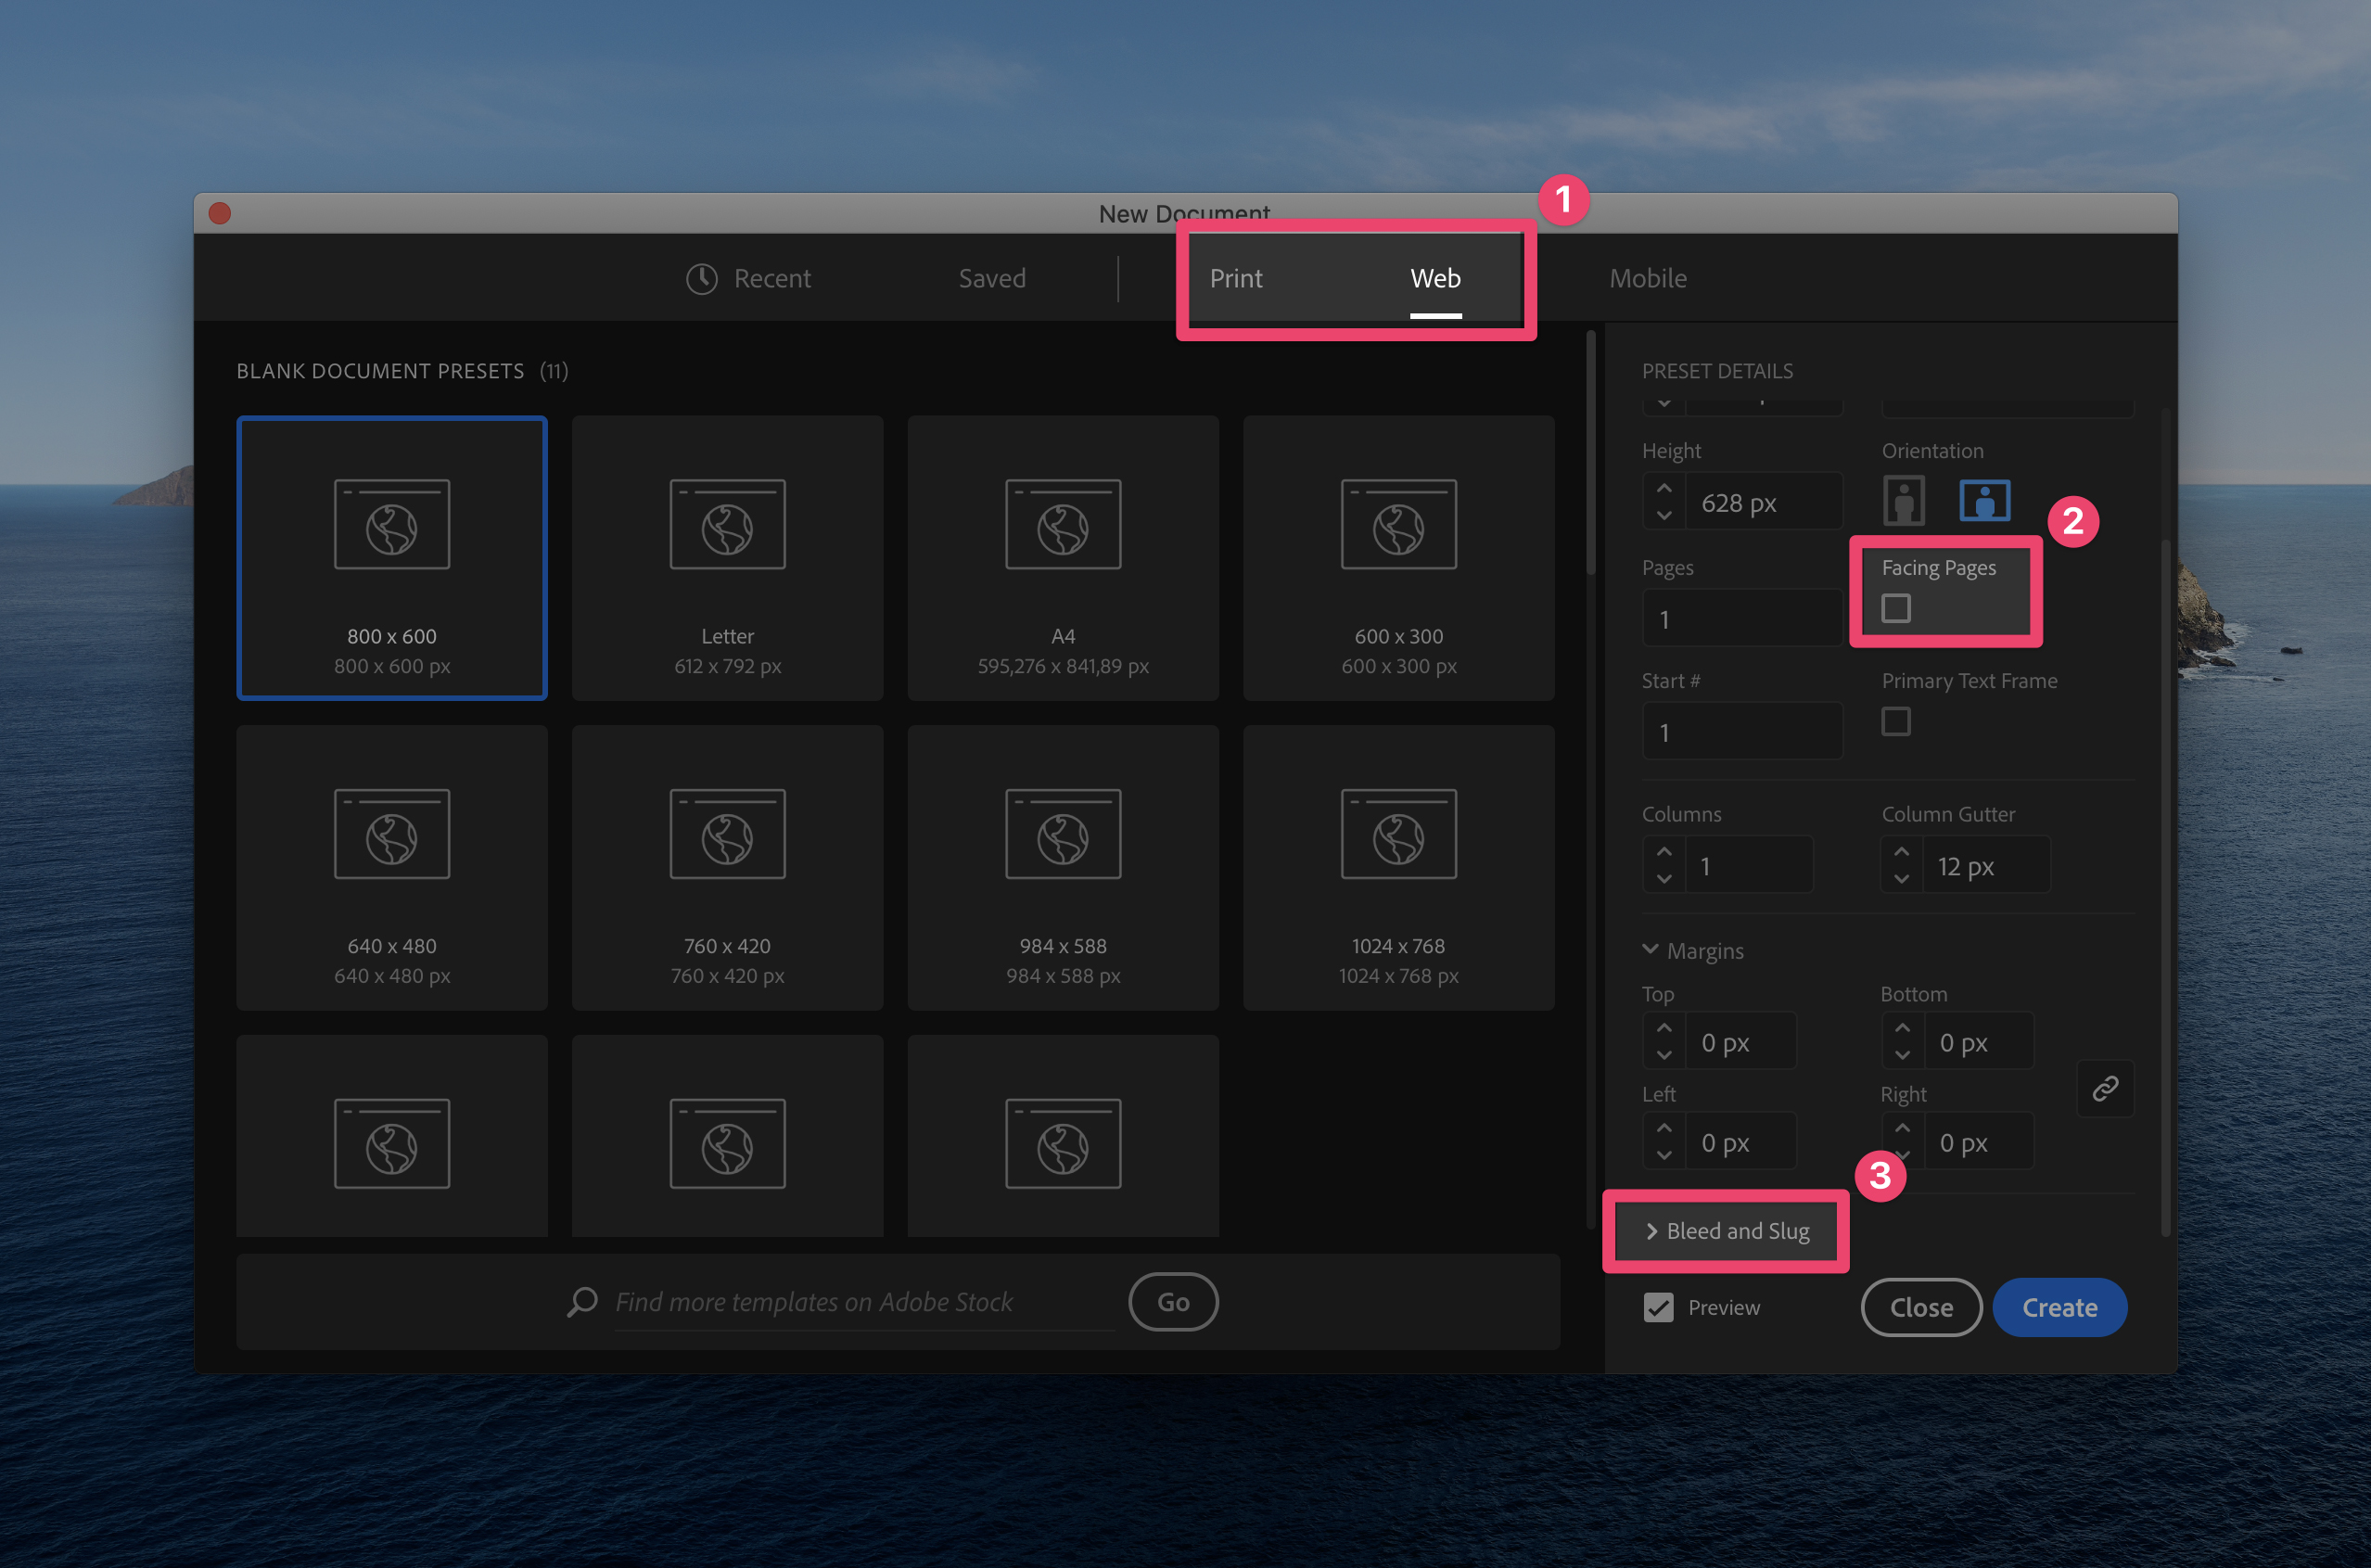
Setting up a new document in InDesign is easy (here Adobe explains how to create a new document) but there are a few things you should consider.
- Decide immediately whether your banner will be printed or will go on the web (1).
- Make sure to deactivate the option Facing Pages (2).
☝️ We want to work with a single-page layout and not a book-like layout. When Facing Pages is turned on the document behaves like a book. That's why we want it to be turned off.
- If your banner will be printed, make sure to add the bleed area (3).
☝️ When it comes to designing for print it can be extremely difficult to print exactly to the edge of your page. In order to do so you need to set your print area to a slightly larger area, allowing you to trim around the page to the right size. This larger area around your page is often known as the bleed area. (source)
Set up the graphic
This next part on how to set up the graphic is almost exclusively useful if you are a designer setting up the prototype. If that's not the case, skip to the next step (Set up the text).
Add layers to avoid mistakes (optional)
I'll try to keep things as simple as possible, but there are some best practices that — even though they are not necessary — could help you avoid mistakes.
One of these is "Layers".
Layers are quite important in InDesign because they help you manage your content and avoid mistakes.
Layers work as containers. The containers on the top have more “priority” than the ones on the bottom – elements inside top layers will be displayed above (and cover) elements inside bottom layers.
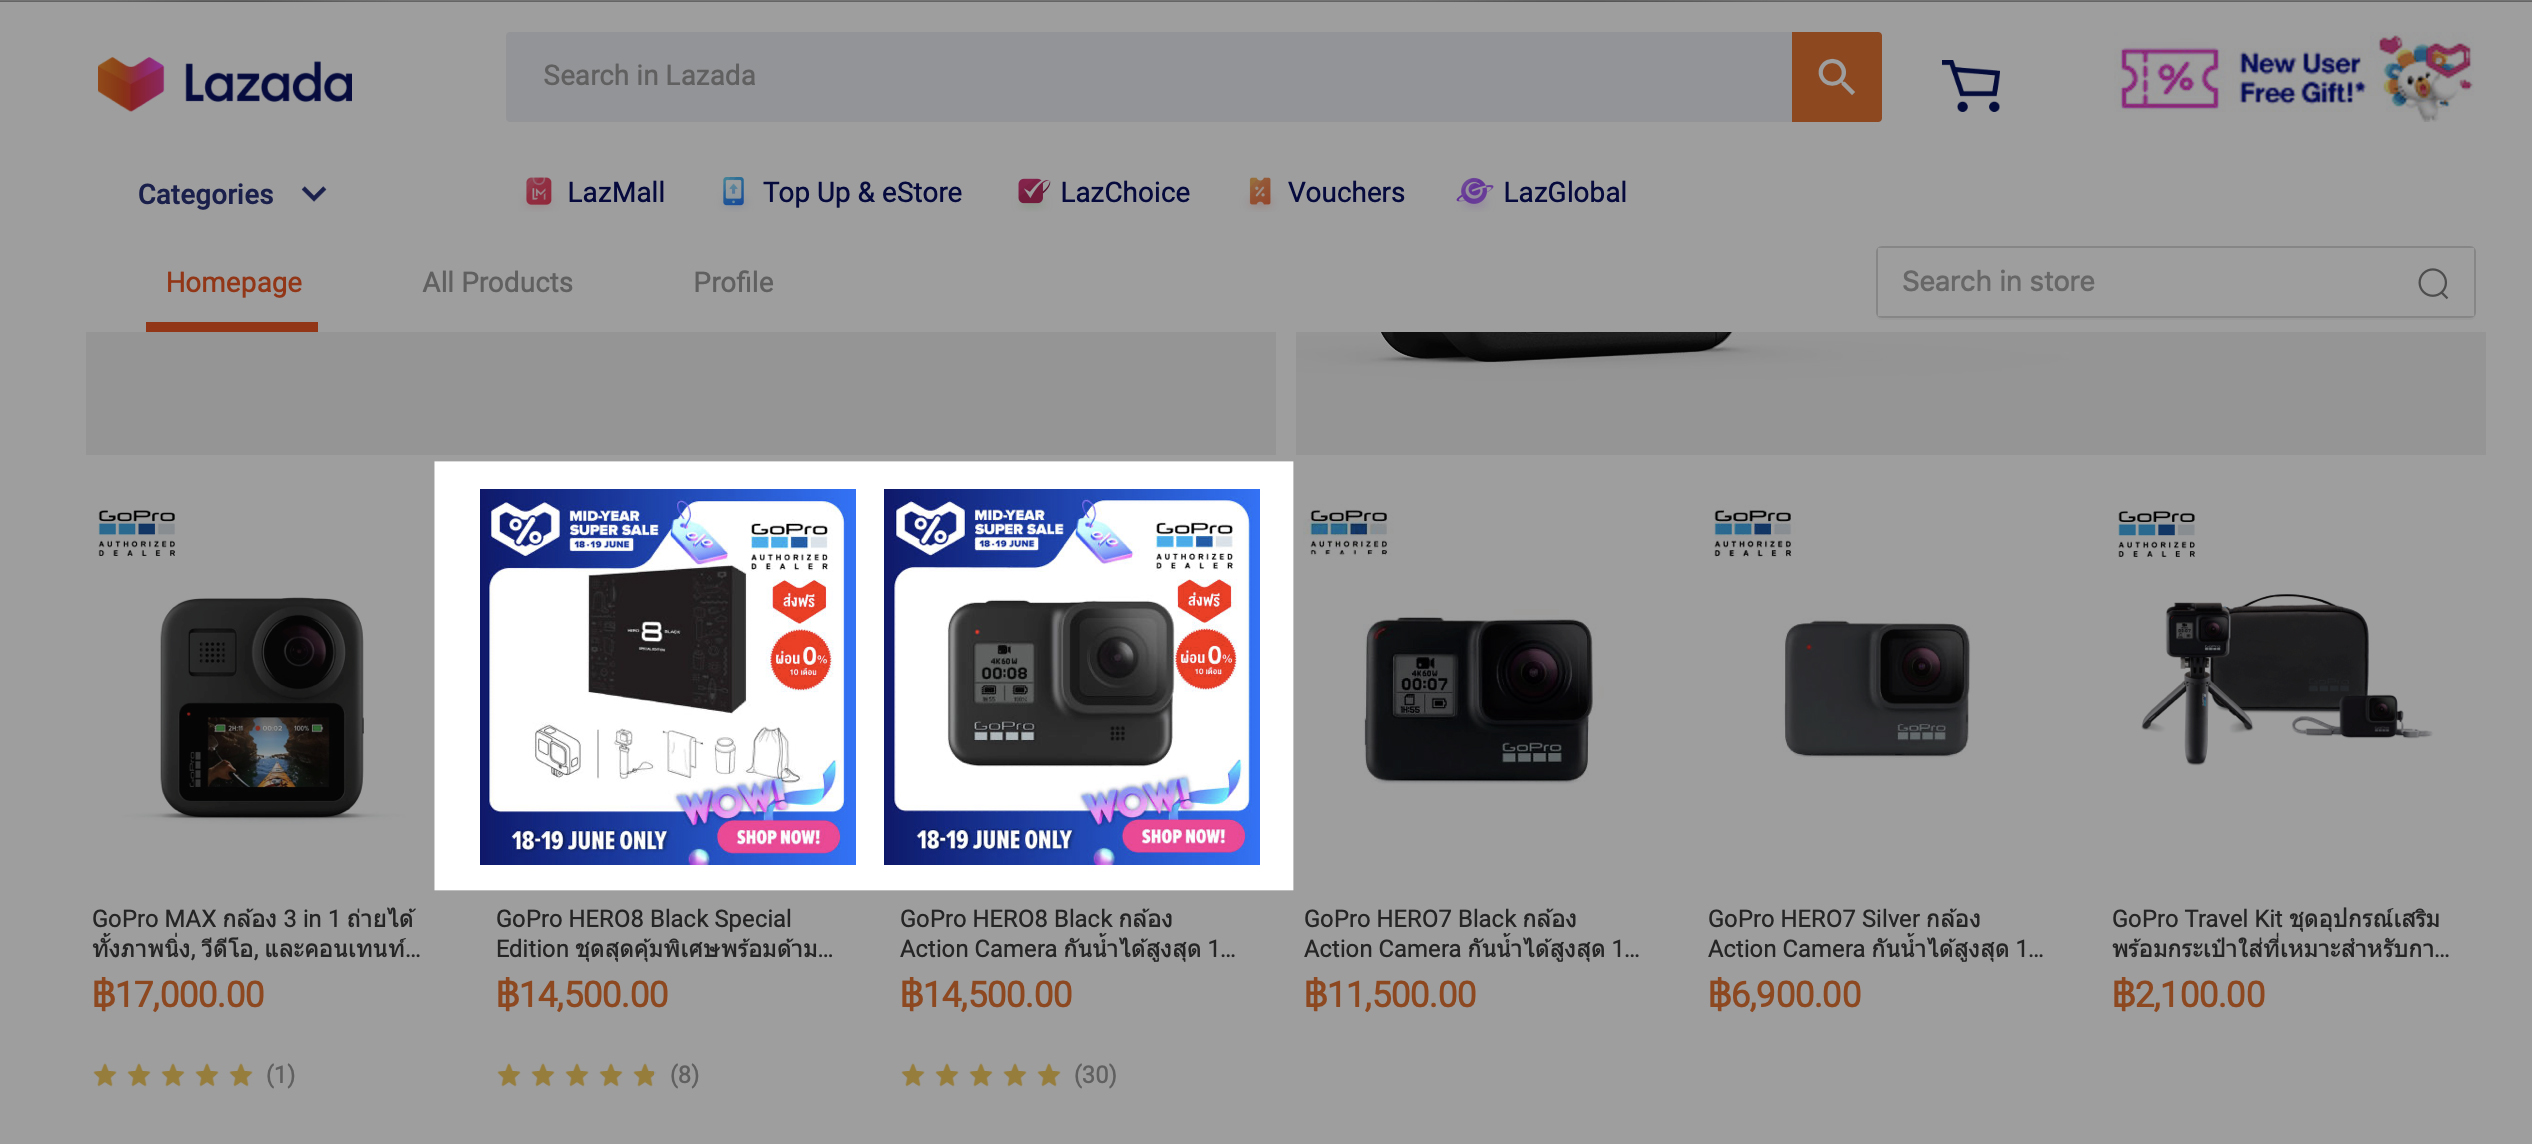
They are not mandatory, but consider the screenshot below.
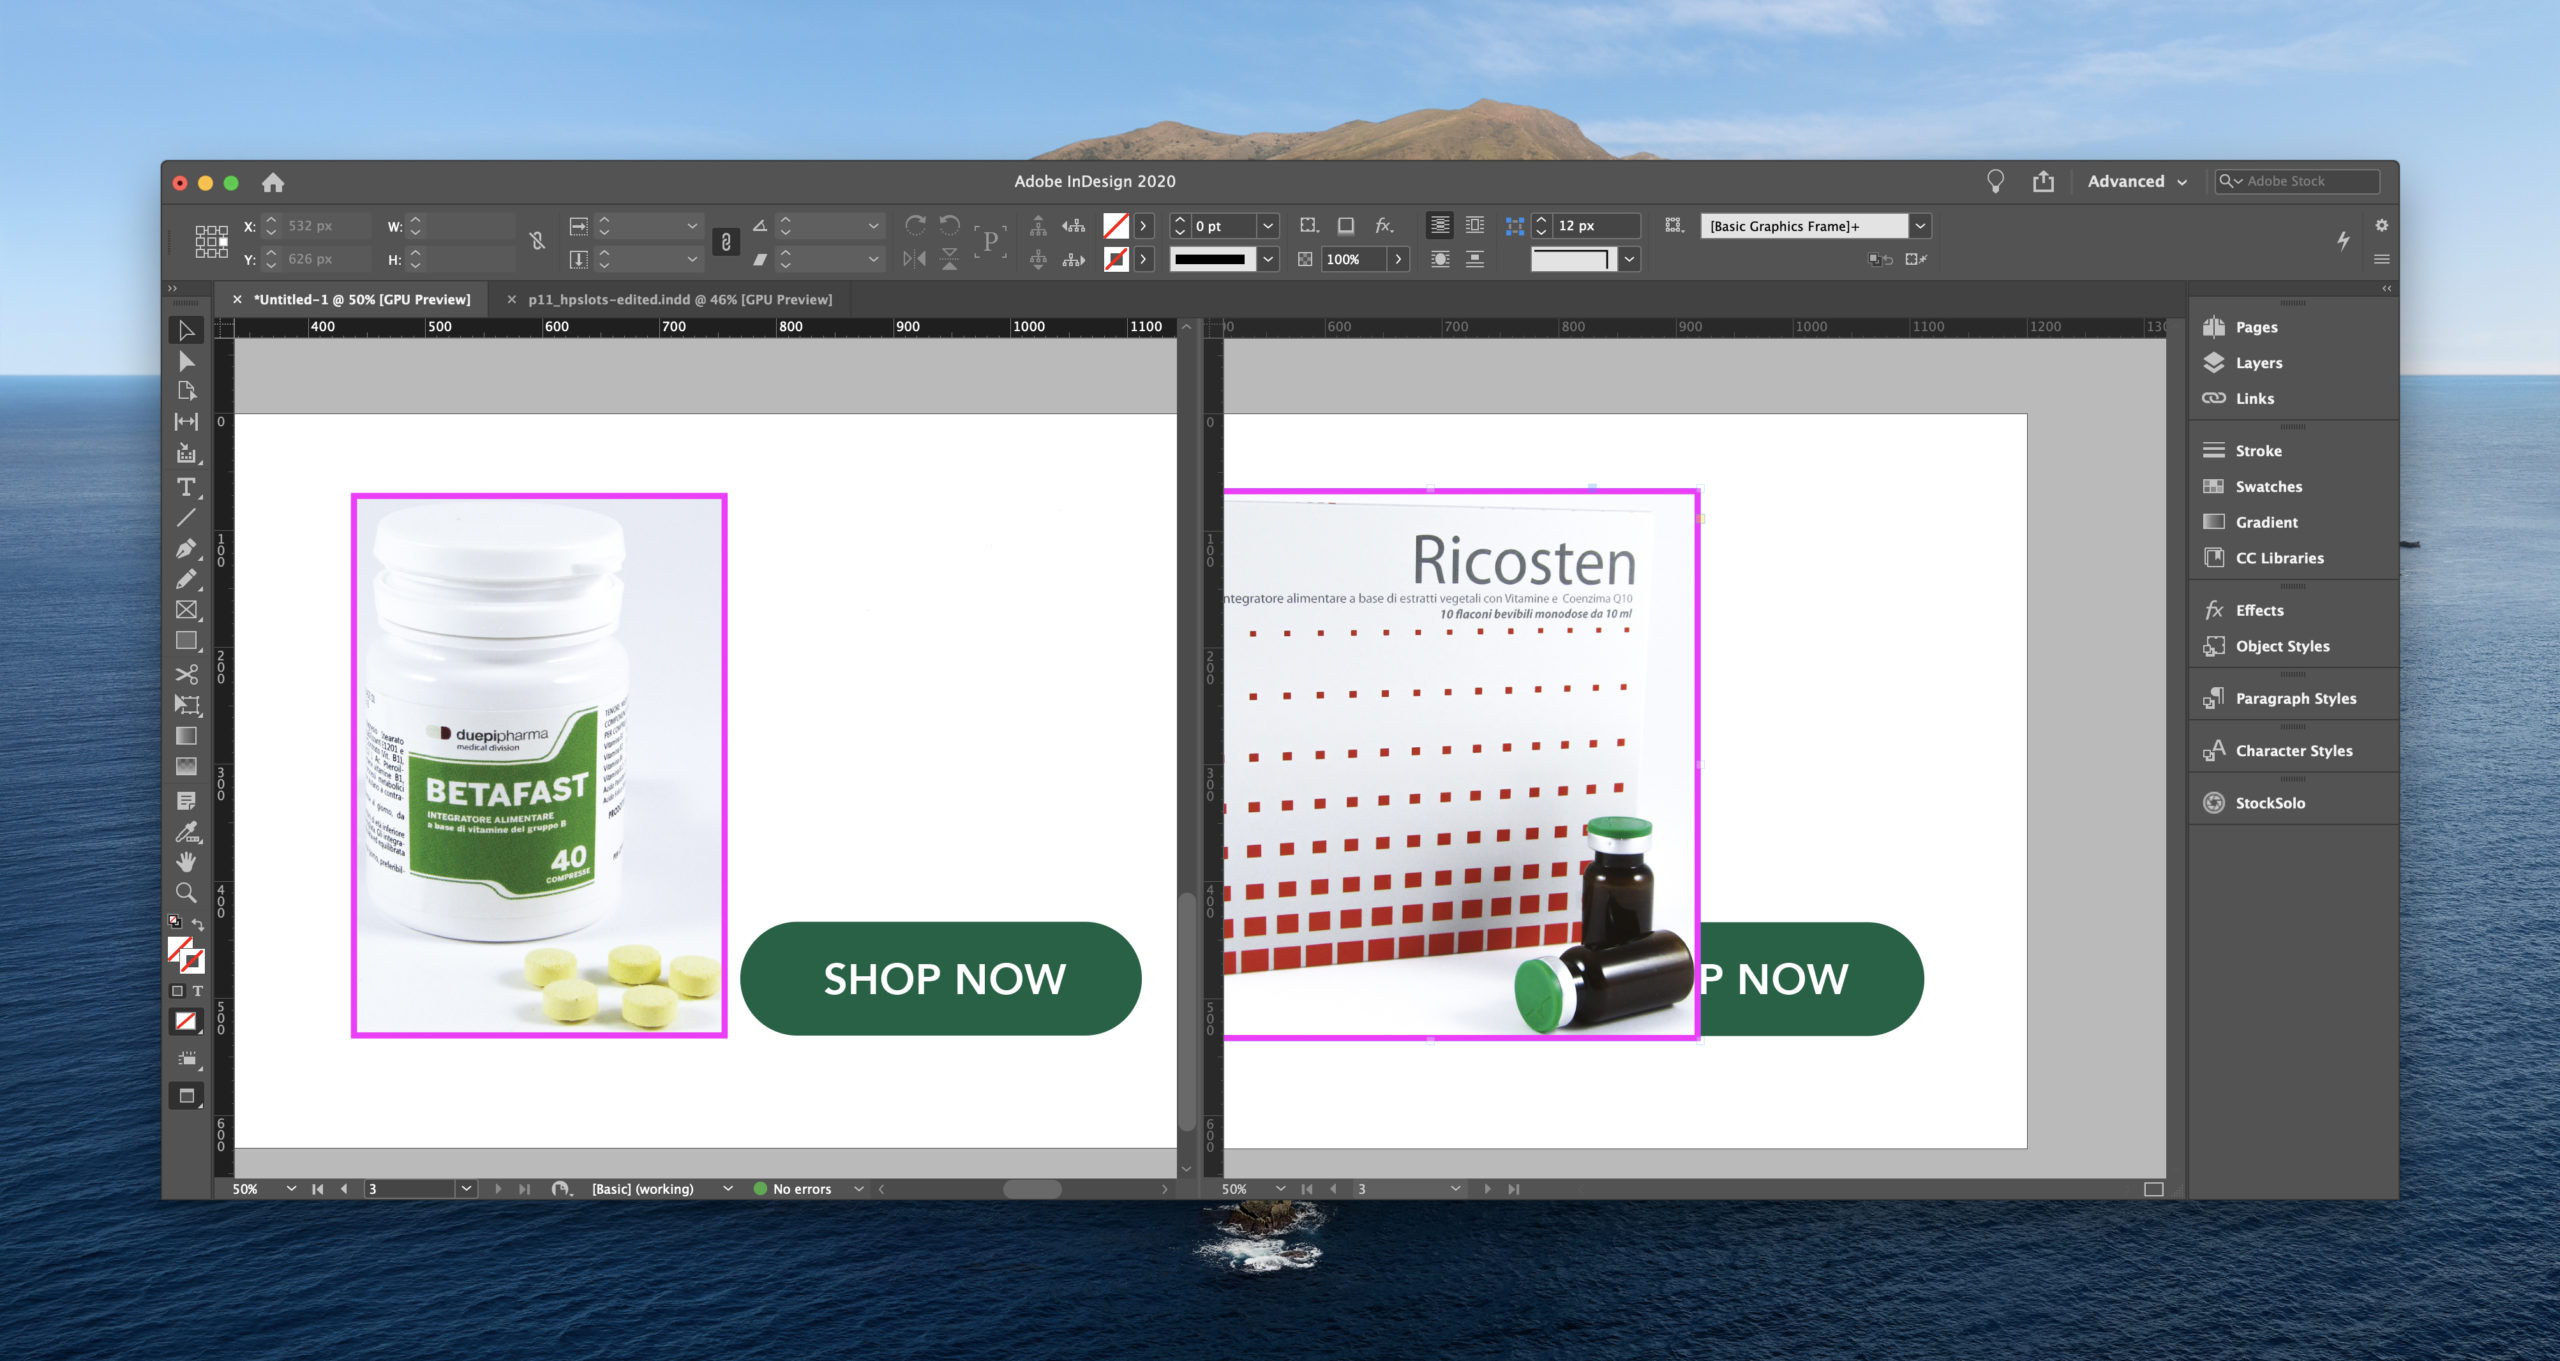
These are two examples of a banner created without layers. You could imagine them as the resulted banners after we've launched the process to create them automatically.
You probably immediately noticed that the button "SHOP NOW" in the right banner is covered by the product image.
We want to avoid similar mistakes (and avoid having to check for similar mistakes).
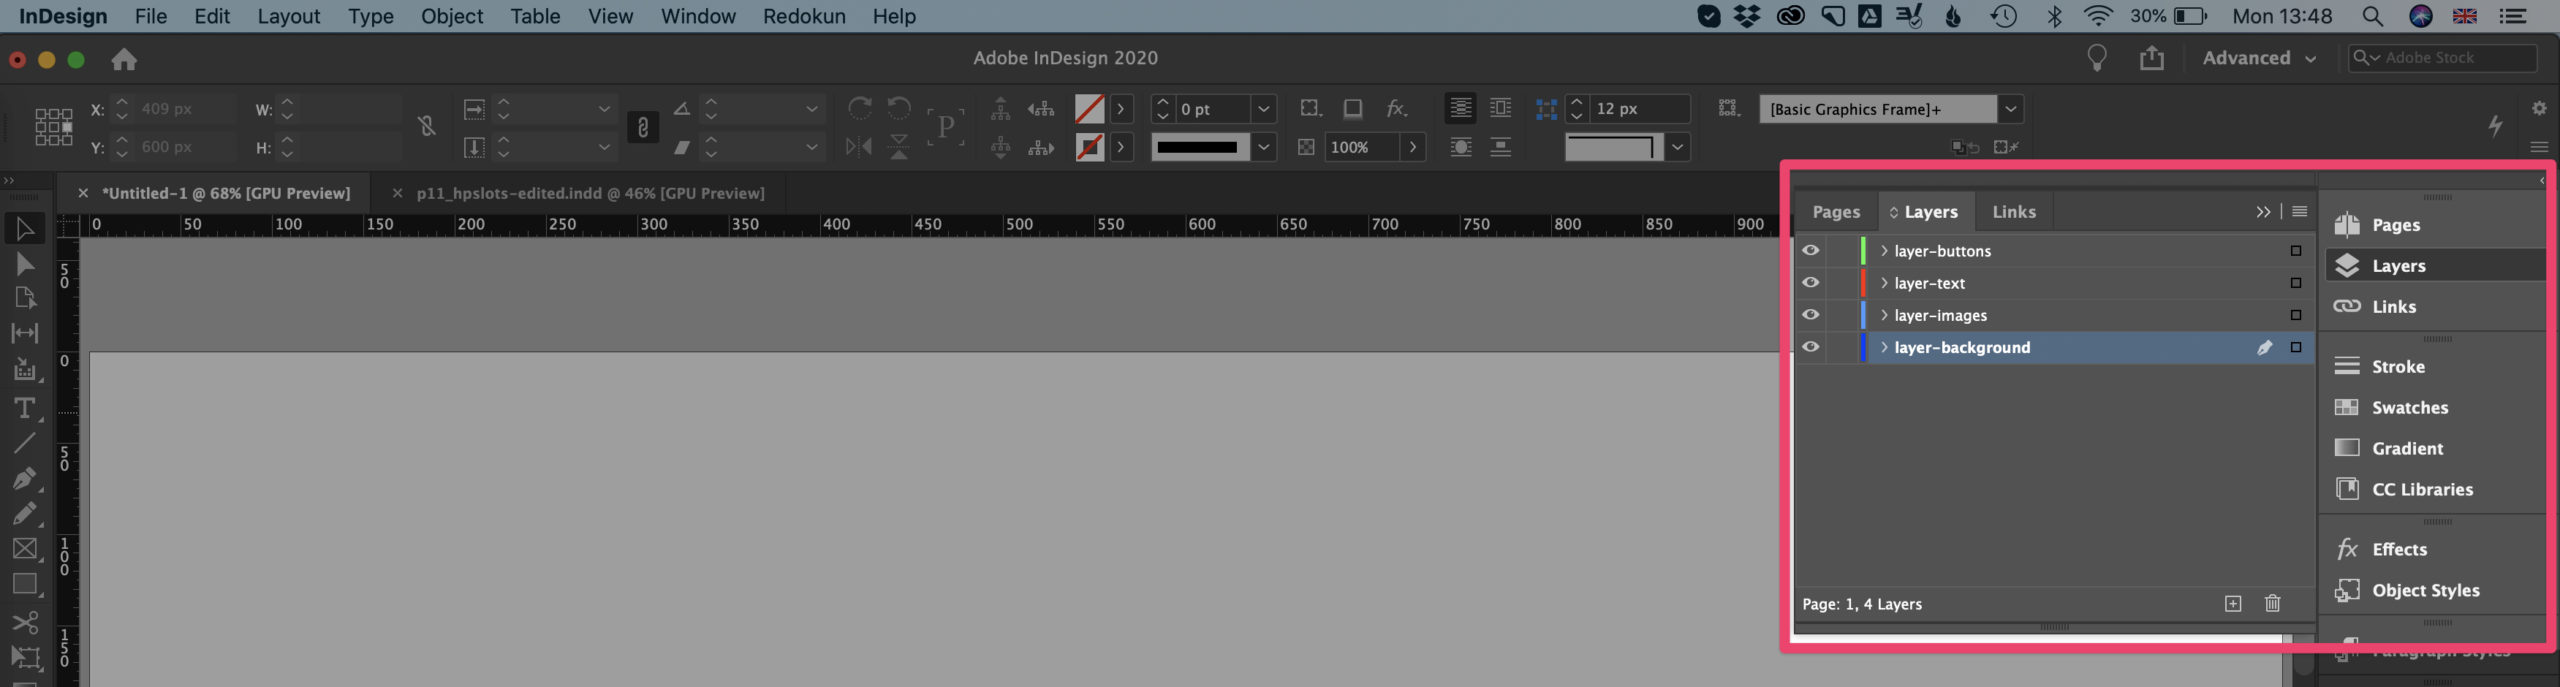
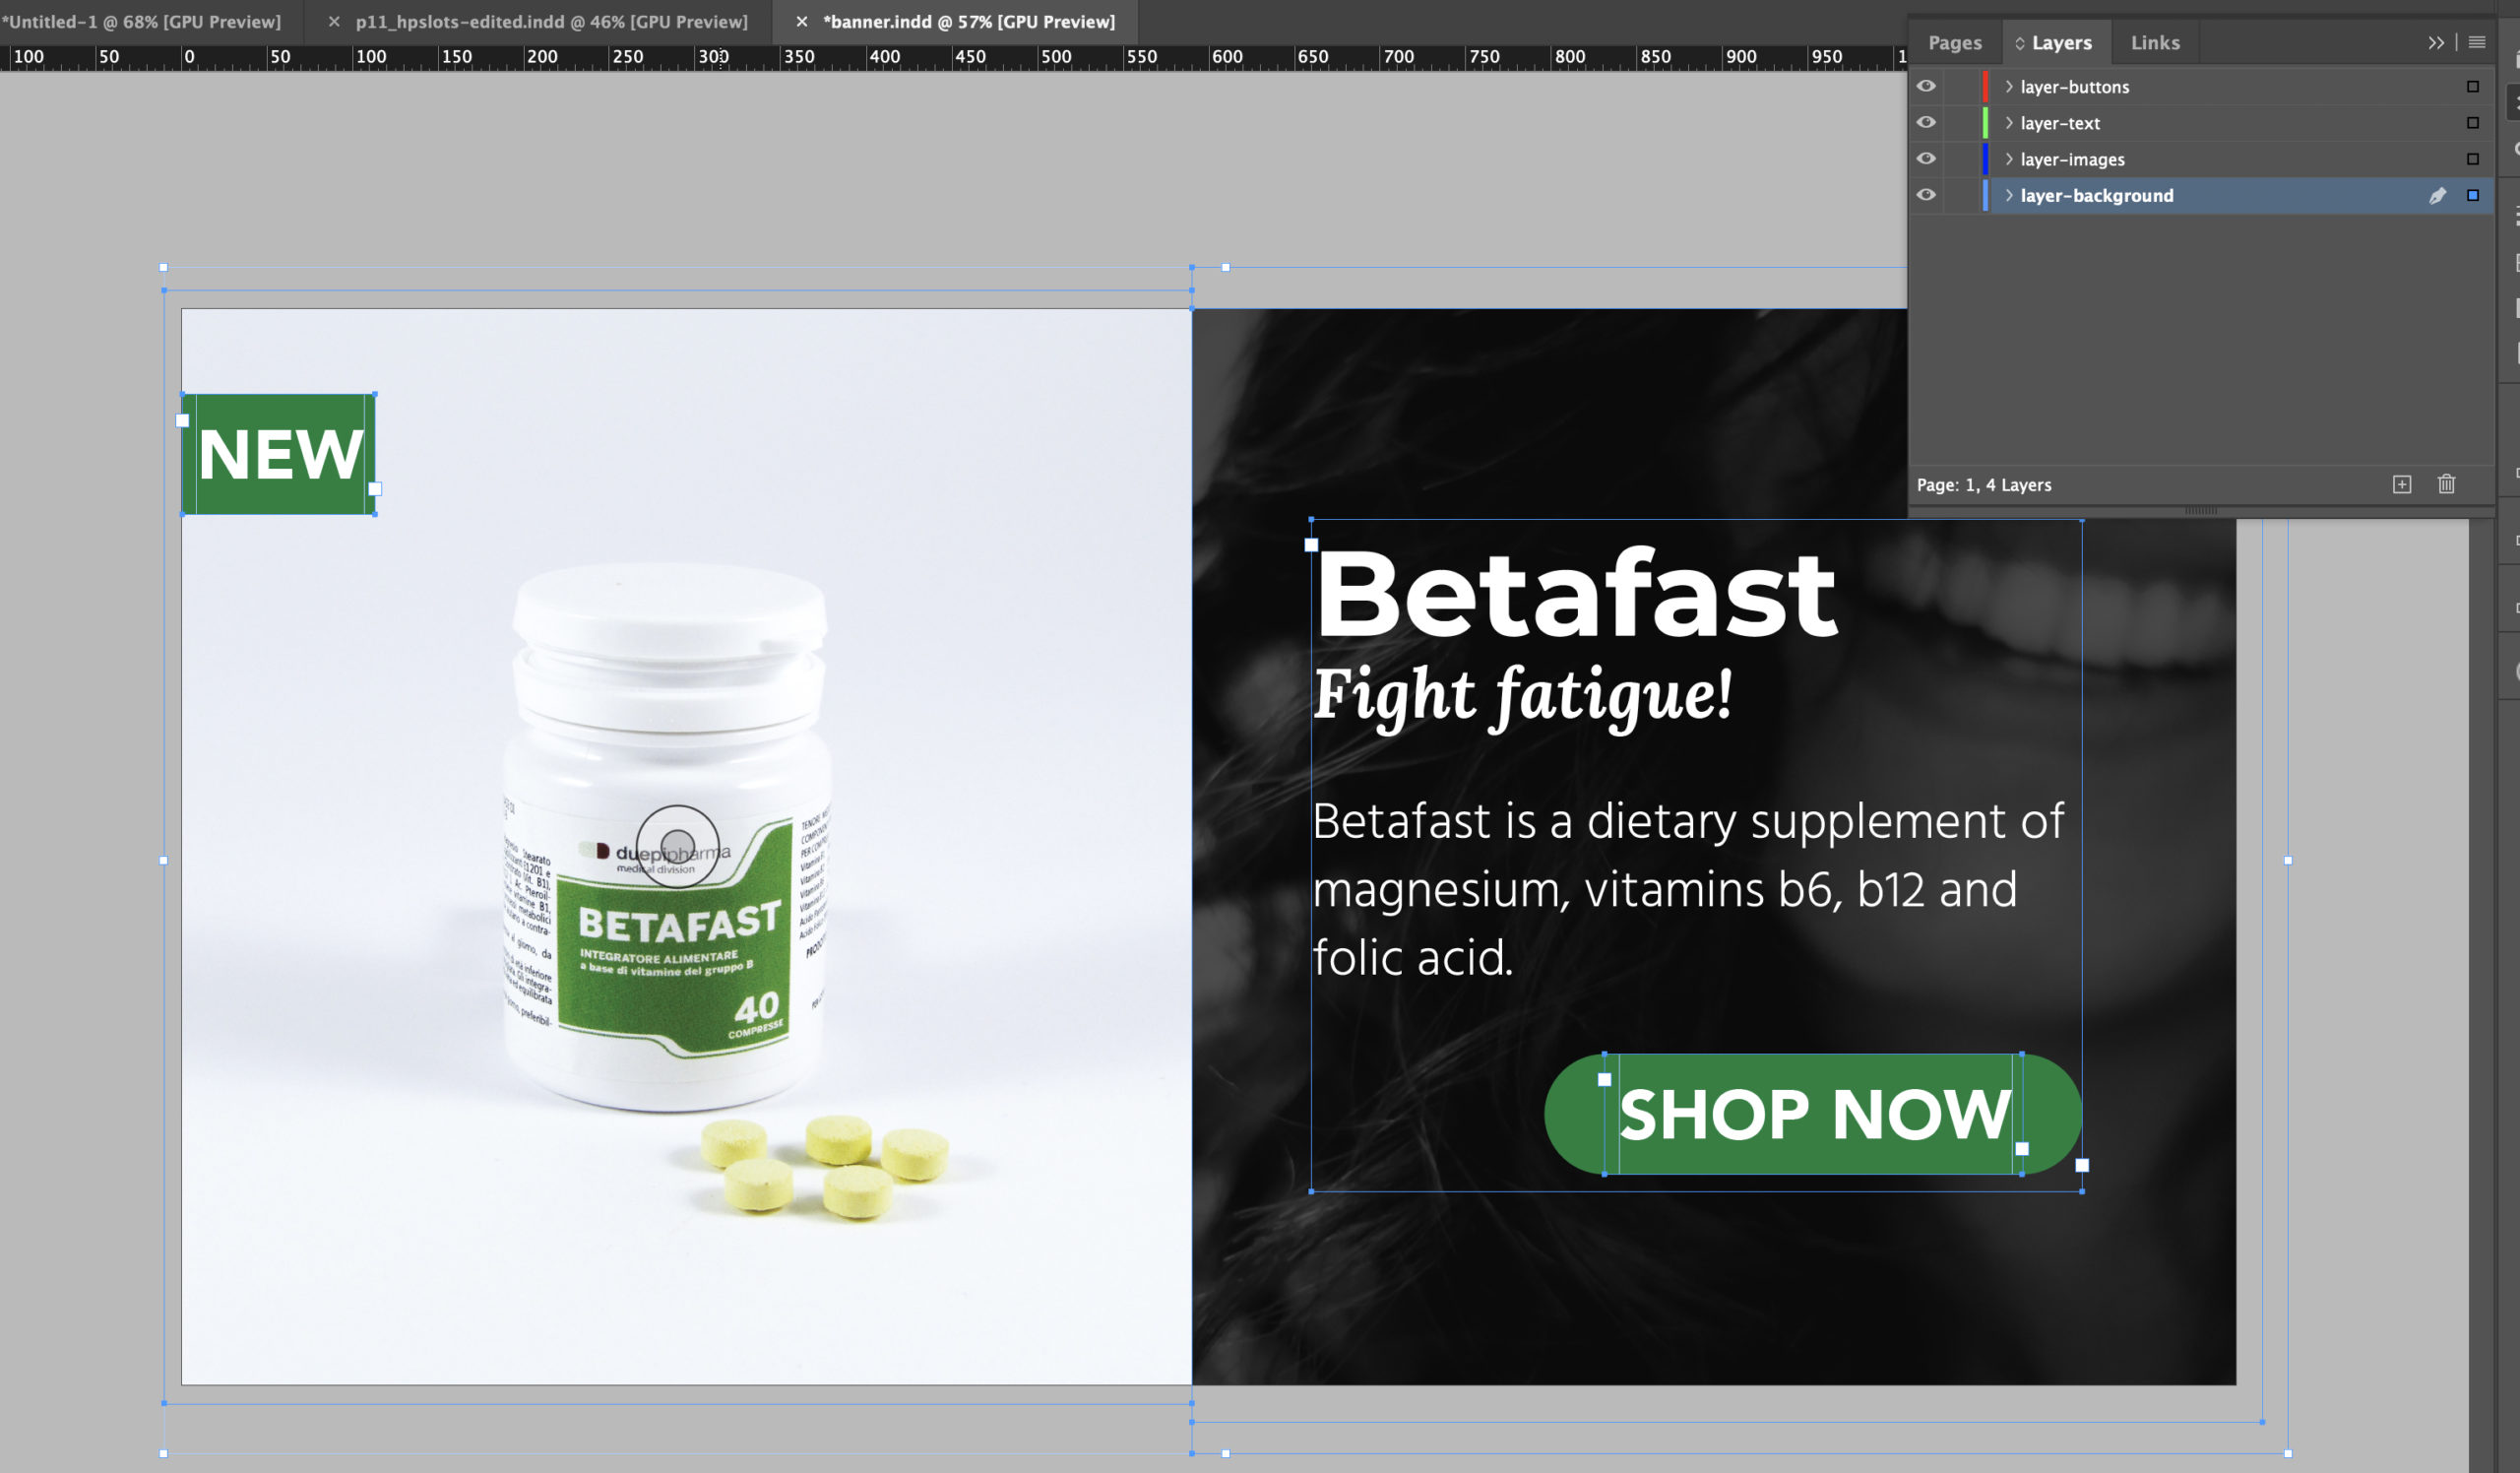
We can do so by creating 4 layers (from top to bottom):
- layer-buttons;
- layer-text;
- layer-graphic: you should place the images here;
- layer-background: you should place graphics or objects that are part of the background.
☝️ In this way, we will make sure the background is always at the bottom, images are on top of the background, the text is always above the graphic, and the buttons (or call to actions) are always at the top of everything.
How to create a layer (optional)
- Open the Layer panel ( Window > Layers).
- Click on the + icon at the bottom of the panel to create a new layer.
- Double-click on the new layer to change the name.
Set up the text
Formatting and handling text is the most delicate part of any design because:
- it's hard to maintain a consistent formatting;
- changing the formatting usually requires a lot of manual editing.
In this part we will learn how to deal quickly with these two issues — here is where the automation starts.
We will learn what are paragraph and character styles. We will lean how to change the formatting quickly. And we will also learn how to ensure there is no local edit to the text style.
If you are in charge of checking the process, you should read the next few paragraphs in which we will see how to ensure there is no local edits to the text style.
However, this next part on how to set up the text is almost exclusively useful if you are a designer setting up the prototype. If that's not the case, skip to the next step (Set up InDesign to create all the banners automatically).
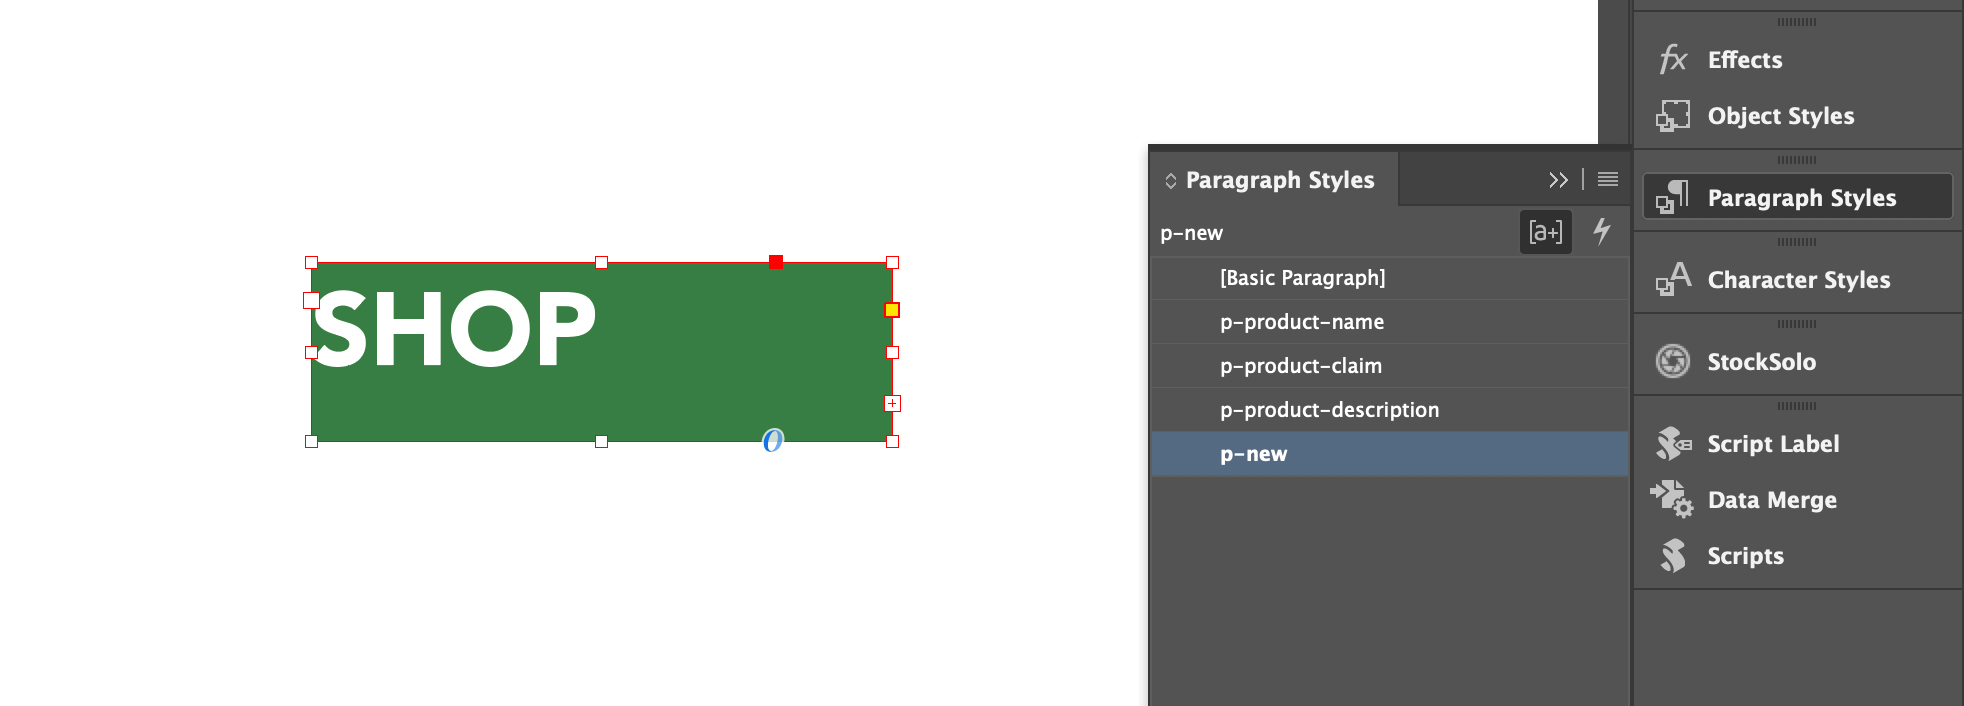
Ensure there is no local edit to the text style
We will see later why we want to have all our text formatting added using Paragraph Styles and Character Styles.
But first, I'd like you to learn how to check when and where your prototype contains local formatting.
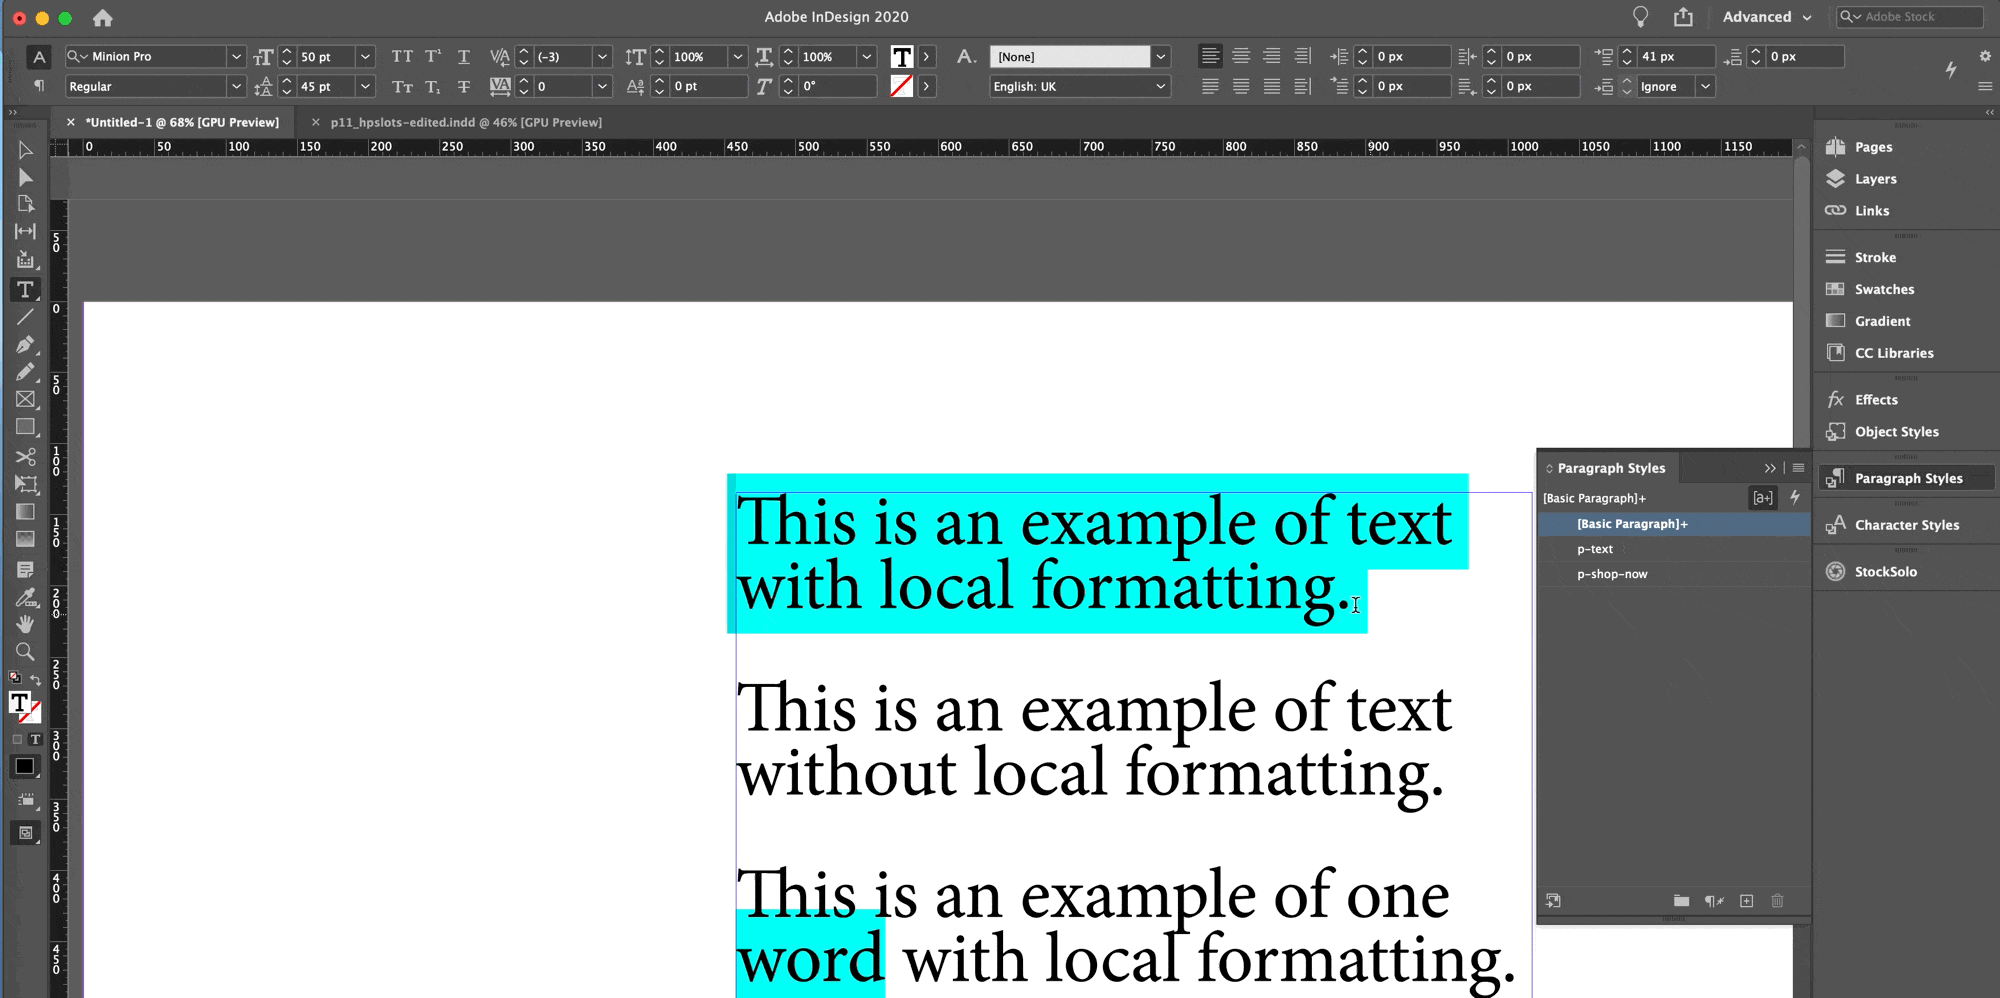
- In the Paragraph Styles panel, click on the icon [a+] to activate the Style Override Highlighter.
- When the "Style Override Highlighter" is active, InDesign will highlight with a blue background the text that has any local formatting applied.

IMPORTANT! Make sure there is no style override applied to the text.
We will go more into details in the next few paragraphs.
☝️ Already the fact that InDesign has a "Style Override Highlighter" feature available should be enough for you to consider how important it is to make sure there is no local formatting applied to your text.
Create and assign Paragraph Styles
In our blog, you can read everything about InDesign Paragraph Styles, but I'll quickly summarise here what you need to know for this specific issue.
Paragraph Styles are the foundation of any InDesign document. Use them and you (and your team) will be able to:
- maintain consistency on the text formatting;
- be more precise with the layout;
- change the text formatting instantly.
Creating a paragraph style is easy. There are two ways:
- Create a style from an already formatted text:
- Select the text and apply the formatting you want.
- Keep the text selected and, in the Paragraph Styles panel, click on the Create new style icon.
- Otherwise, create a style from the Paragraph Panel:
- In the Paragraph Styles panel, make sure there is no style selected and then click on the Create new style icon.
- Double click on the name of the new paragraph style and change its settings.
- Select the text where you want to apply the style and click on the new style name.
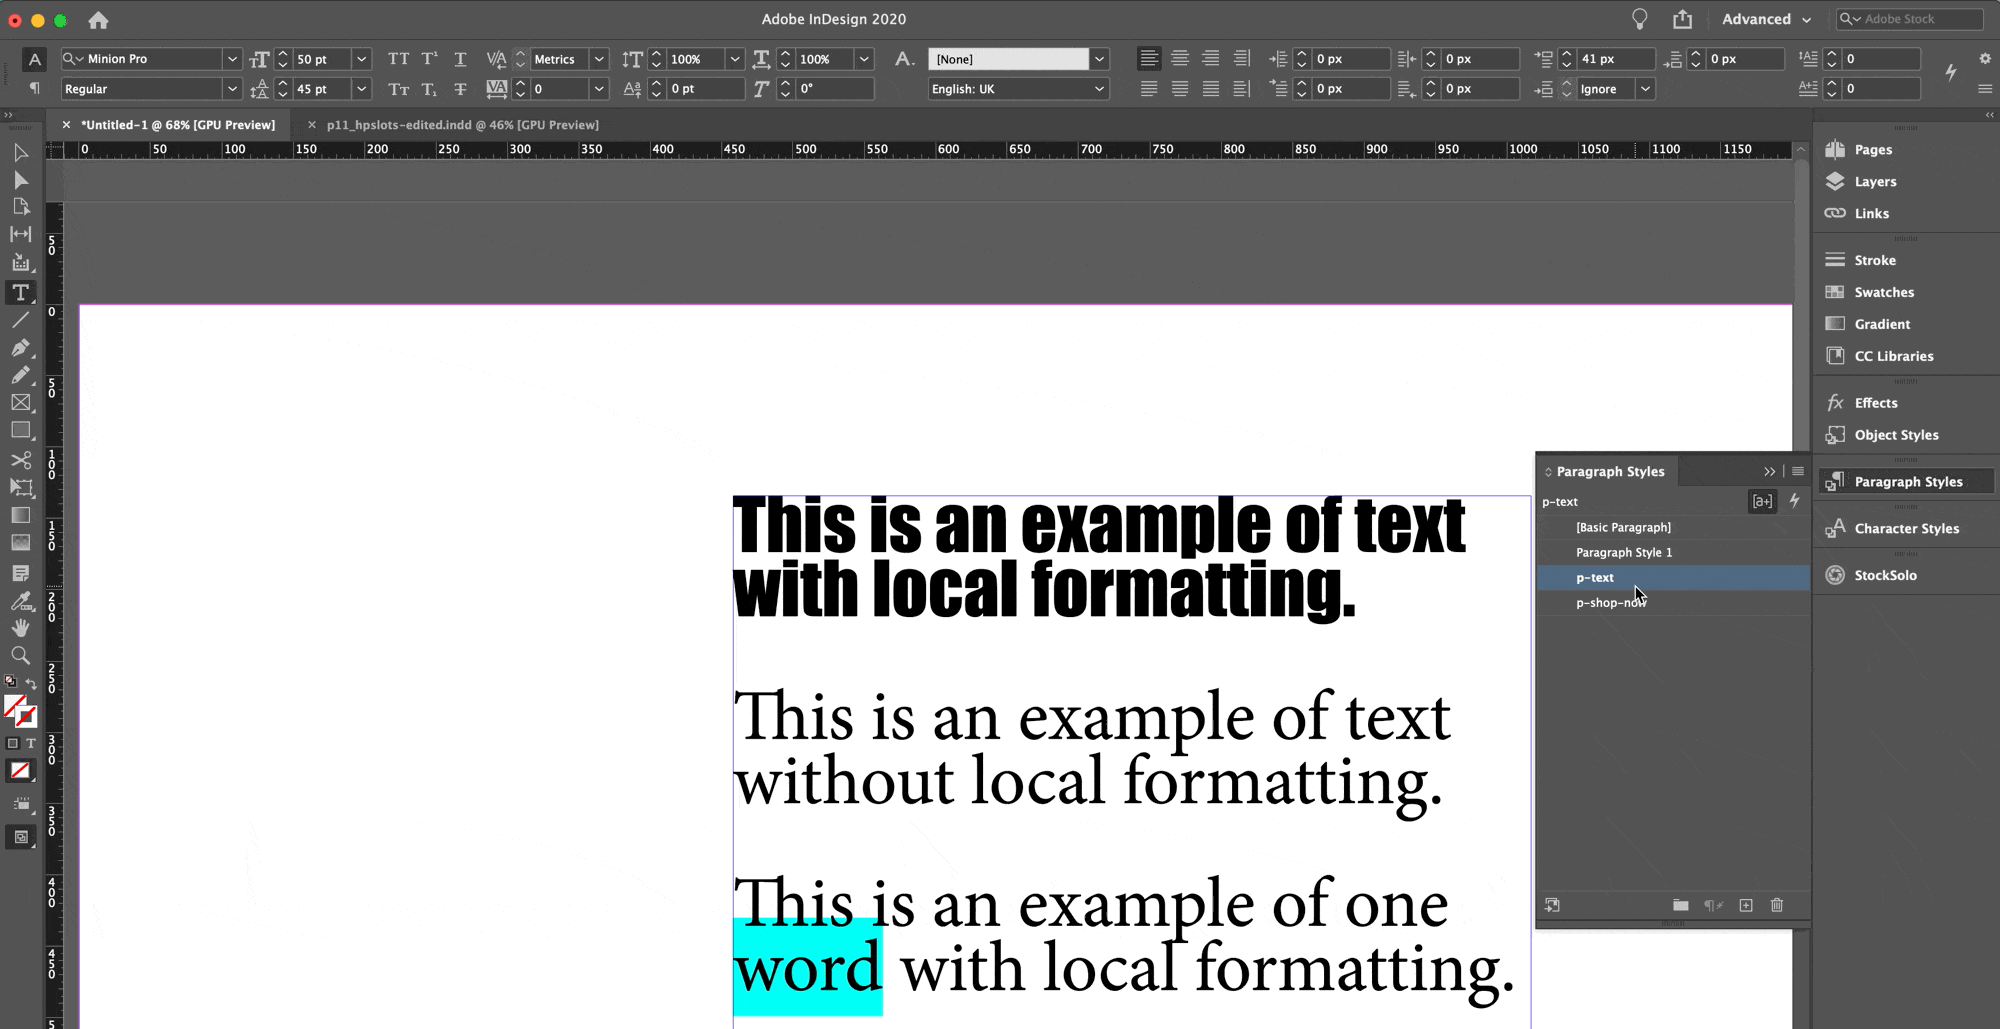
Learn to Redefine a Paragraph Style
The great thing about InDesign, and probably the #1 reason most designers love it so much, is because — once you use it correctly — any change becomes simple and quick.
Learning how to use the "Redefine Style" feature will help you instantly update the formatting of different sentences:
- when working on the graphic of the prototype;
- after the automation has been already launched (redefining the style will update all the banners).
☝️ This works only if you formatted your text with Paragraph Styles and Character Styles — and you didn't apply any local formatting
Let's see how you can take advantage of the "Redefine Style" feature:
- Change the formatting of one paragraph (even changing it to a single word is ok);
- Keep the selection on part of the text you just edited. In the Paragraph Styles panel, InDesign will highlight the Paragraph Style in use in that text.
- Right-click on the highlighted Paragraph Style, and select Redefine Style.
- All the paragraphs with that Paragraph Style applied are instantly updated with the new formatting.
Character Styles: something different from Paragraph Styles
I found a funny and great analogy in the Adobe Forum that perfectly clarifies the difference between Paragraph Styles and Character Styles:
☝️ Walking the dog:
- Paragraph styles dictate what your route is, how fast you are going, and the frequency of breaks.
- Character styles handle picking up the poop and holding the chain tight if you see another dog or shiny car during the walk.
What does this mean?
It means that you should create and use Character Styles to format the exceptions. You should apply a Character Style only to a few characters or maximum a few words in each paragraph.
If you find yourself adding a Character Style to an entire sentence, you are probably confusing when to use a Paragraph Style and when to use a Character Style.
Create and assign Character Styles
You can create Character Styles in the same way you create Paragraph Styles, but in this case you have to use the Character Styles panel.
- Edit the formatting of a single word, and create the Character Style as you would create a Paragraph Style.
- Or create a new Character Style and edit the formatting from its settings.
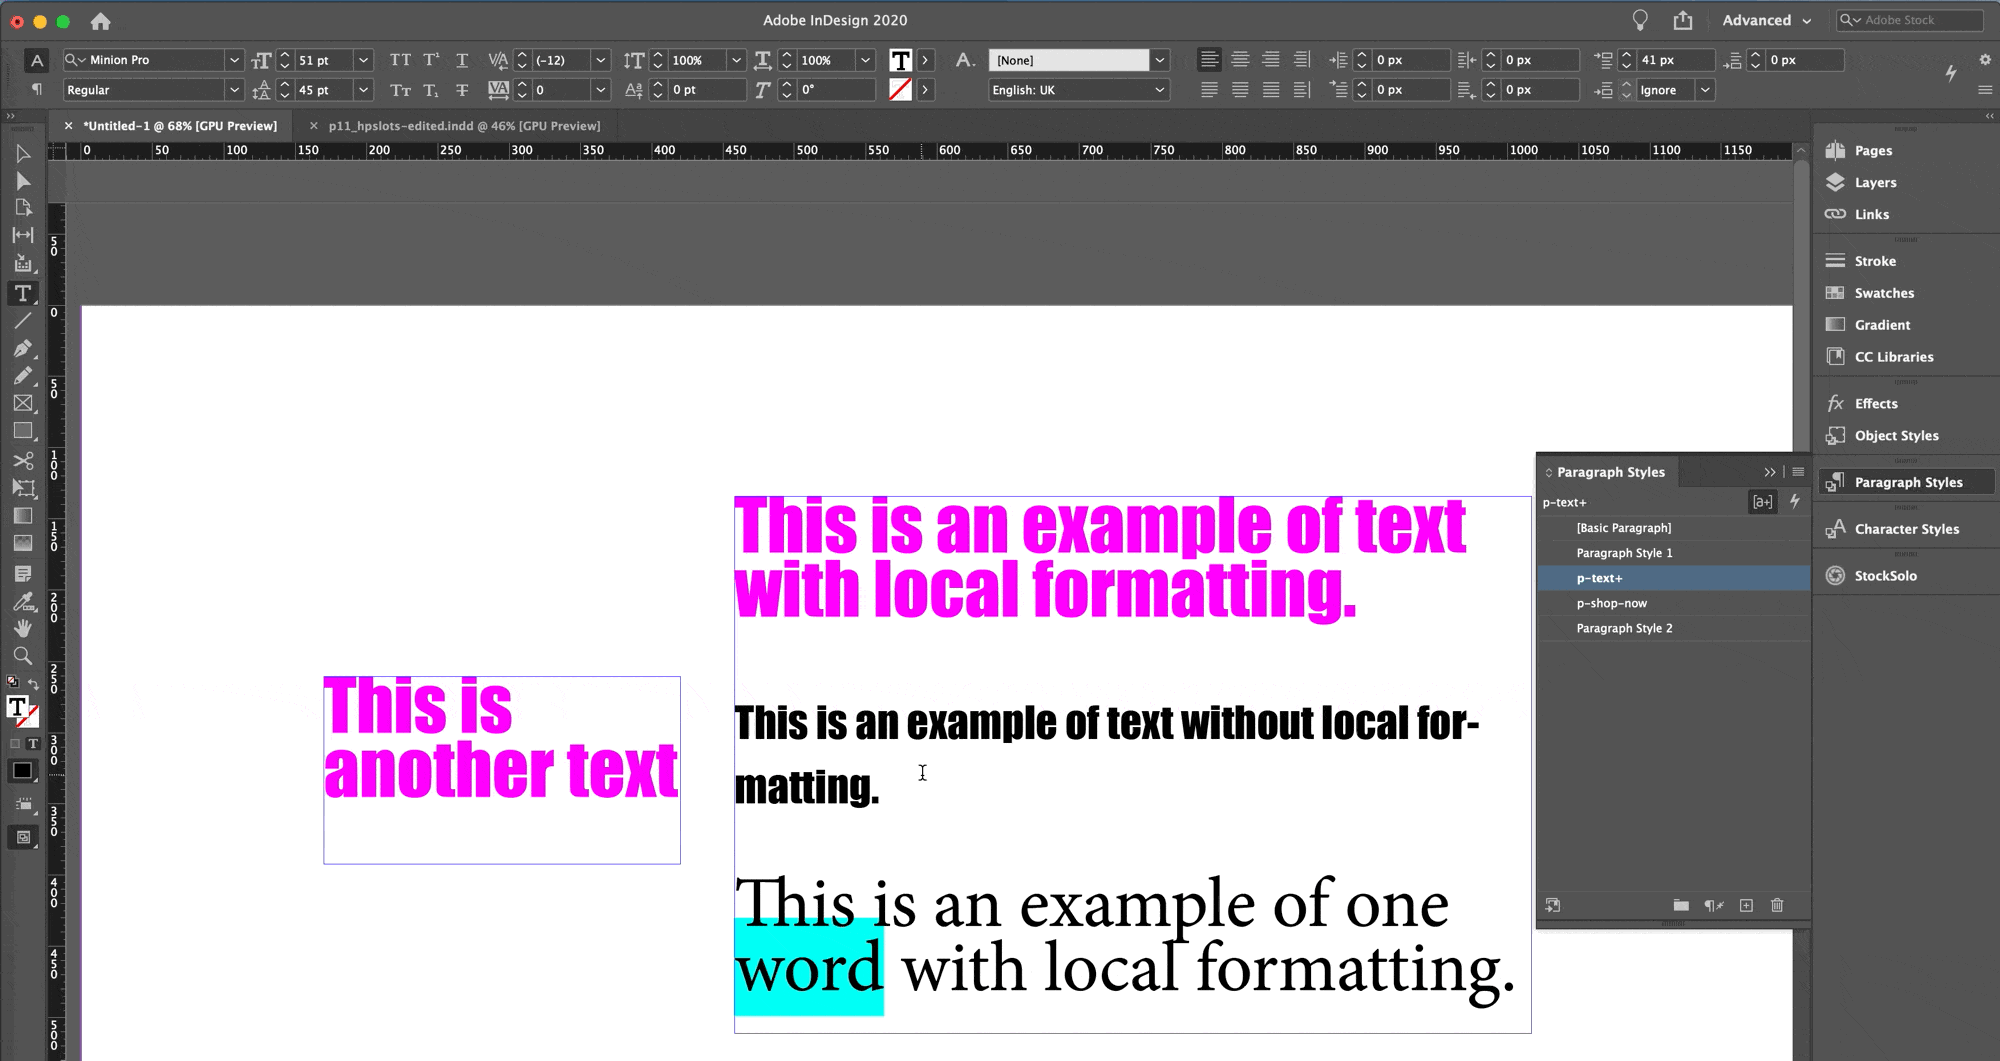
Redefine a Character Style
We have just learned how to Redefine a Paragraph Style and have all the paragraphs with that formatting assigned updated with the new settings.
You can do the same thing with Character Styles.
- Edit a word to which you have already assigned the Character Style.
- Keep the selection on part of the text you just edited. In the Character Styles panel, InDesign will highlight the Character Style in use in that text.
- Right-click on the highlighted Character Style, and select Redefine Style.
- All the parts with that Character Style applied are instantly updated with the new formatting.
Where are we now? What have you just learned?
Ok. We are at 2.000 words or more. So, let's recap what we have just learned.
We learned:
- How to use Layers to make sure the important parts are visible (from the bottom to top: background, images, text, call to action).
- How to correctly and QUICKLY add the formatting to our text (Paragraph Styles).
- How to deal with formatting exceptions (Character Styles).
- How to change all the formatting — EVERYWHERE — by changing a single part and using Redefine Style.
I hope it's clear that this is already a huge automation added to your workflow.
If you had to update 100 banners made in Photoshop, you would just go crazy. While updating 100 or 1.000 banners made with InDesign (following the steps we've seen above) probably takes 1 single minute.
Prepare the "banner prototype"
This below is an example of the Facebook Ad I want to create.
We are going to learn how to use InDesign Data Merge to create all the different banners.
In this guide, I'll explain only the steps necessary for this workflow, so if you have questions or are curious about Data Merge, go and check the post I just linked above.
- Create the Layers as we've seen in "Set up the Graphic"
- Start adding the background, the images, and the text (use Paragraph and Character Styles).
☝️ Make sure you are placing each component in the correct Layer. To do so, before placing an object select the correct layer in the Layer panel.
- If you need to move a component to a specific layer:
- Select the component
- In the Layer panel, click on the little square on the right part of the panel, hold and drag the square to the correct layer.
☝️ In my example, I will place the NEW label inside the buttons layer because that element is quite important for my layout.
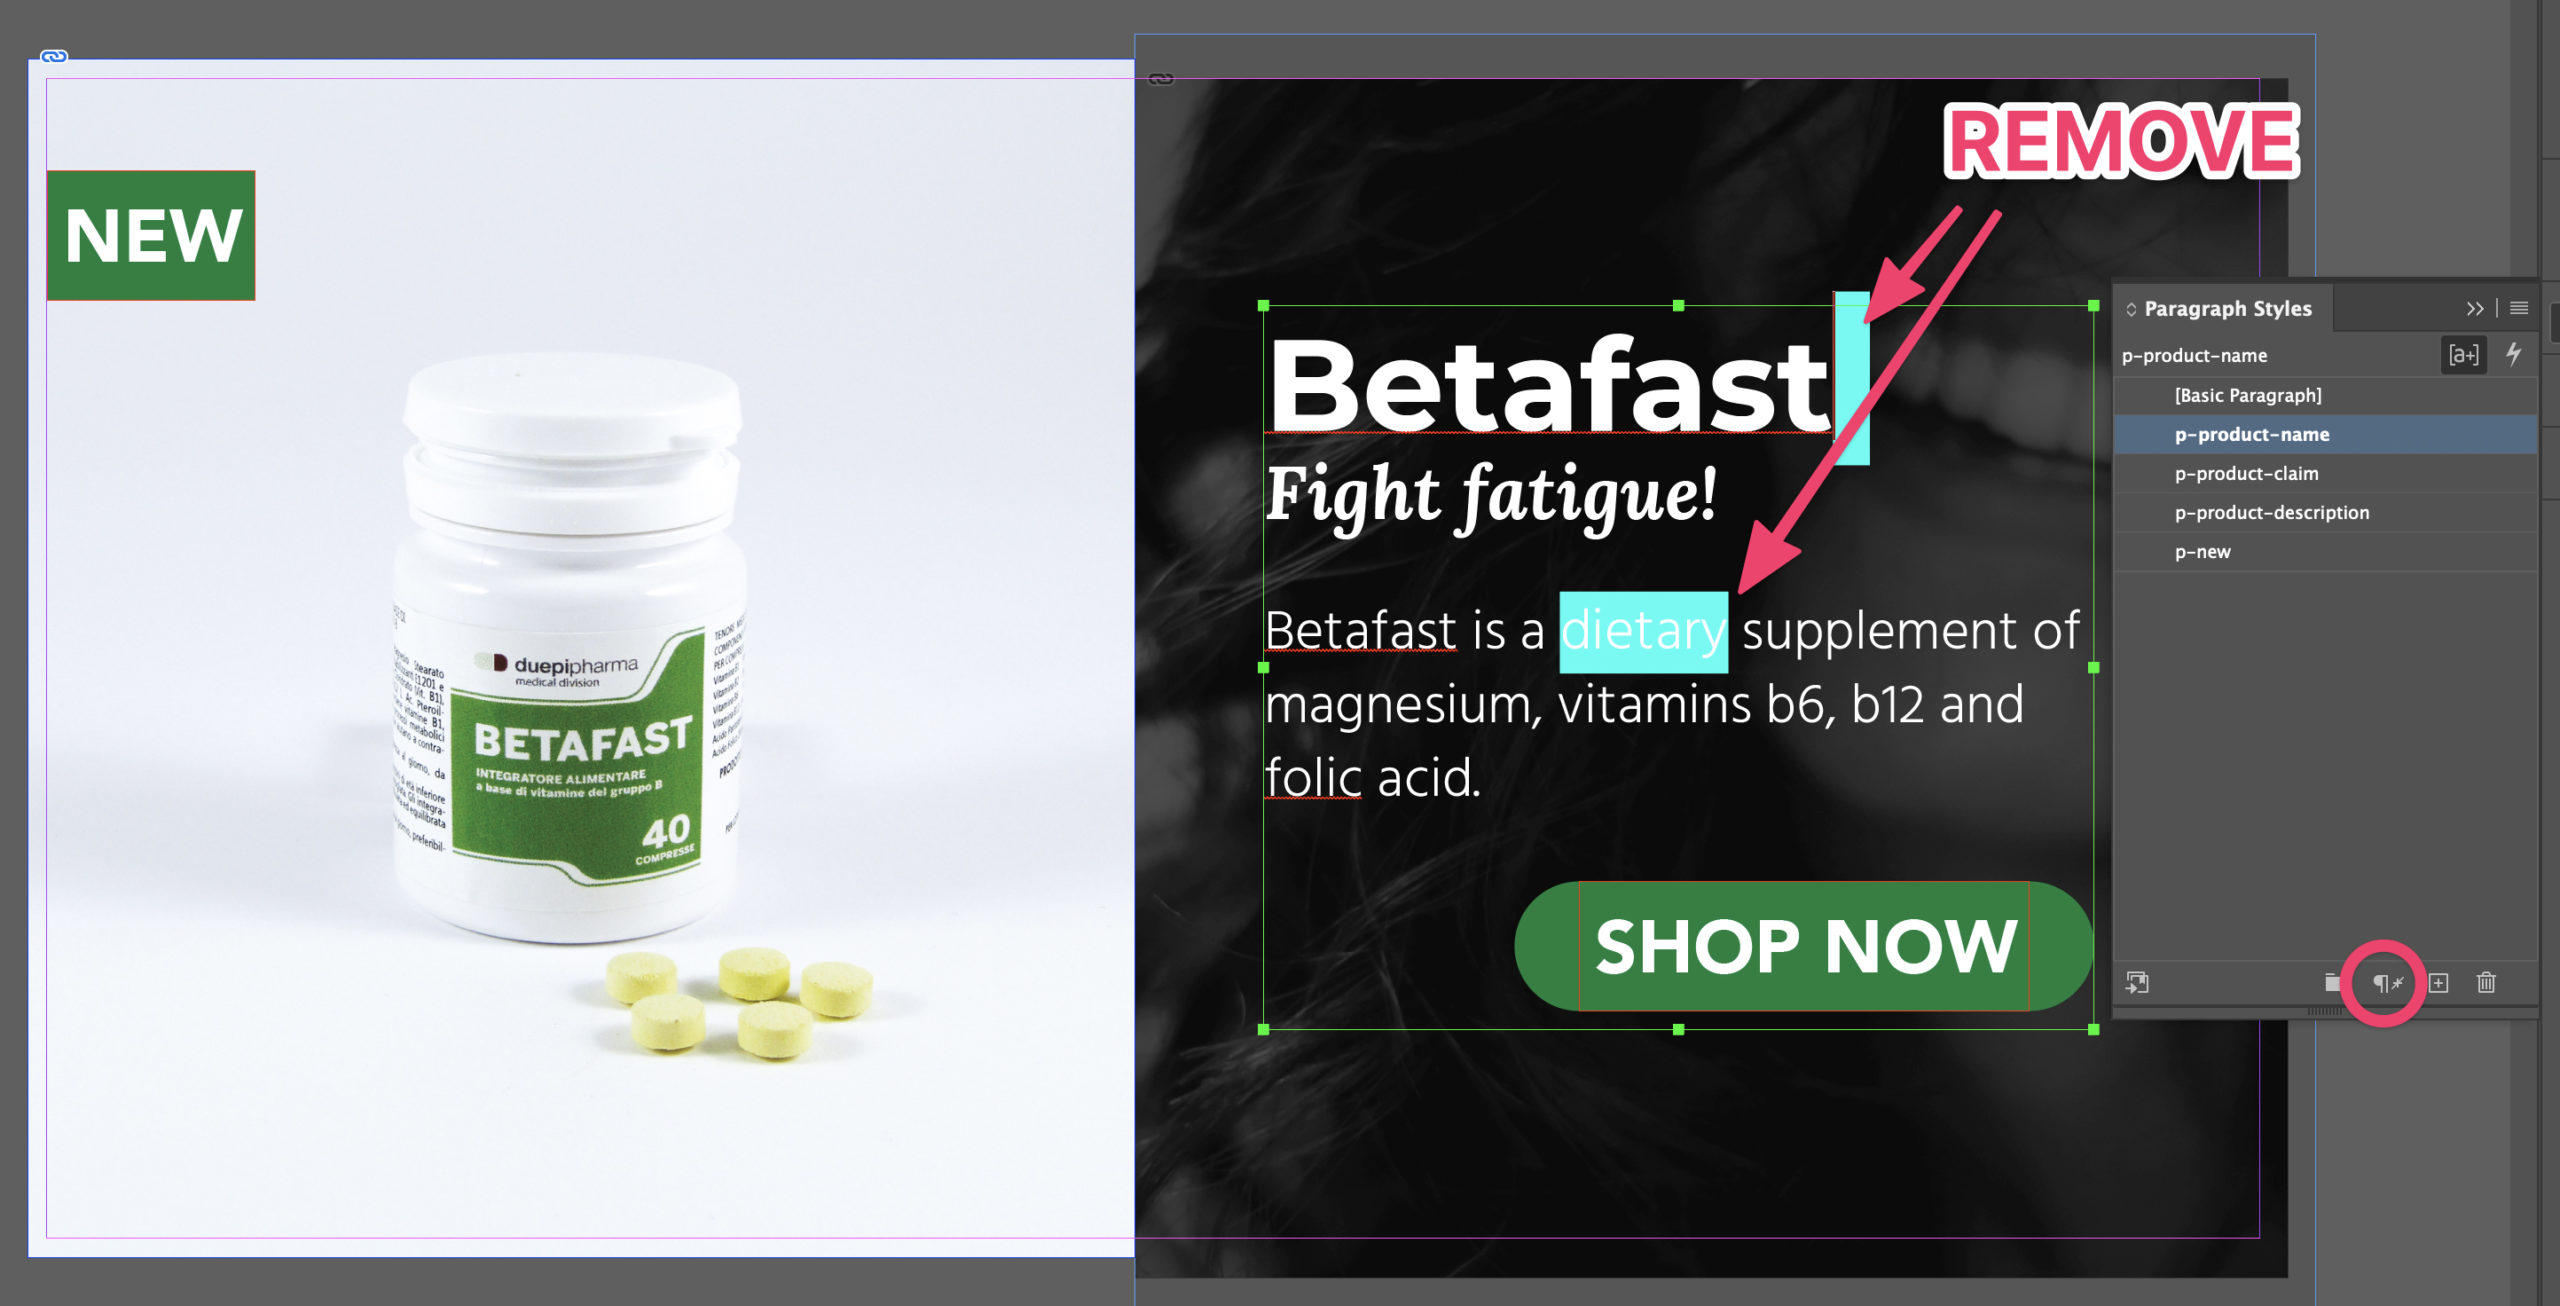
- Check that there is no local formatting applied to the text. To quickly remove any local formatting, select the text with the local formatting and click on the icon highlighted in the screenshot below.
Set up InDesign to create all the banners automatically
Now that we prepared the "Prototype" it's time to create all our banners.
Time to:
Collect the data for all banners
As I mentioned above, we will use an InDesign feature called Data Merge.
☝️ Data merge is a feature that you should use when you have to lay out a document (or part of a document) that has a "prototype example" (repetitive layout) that needs to be repeated in a grid or one record per page with different data.
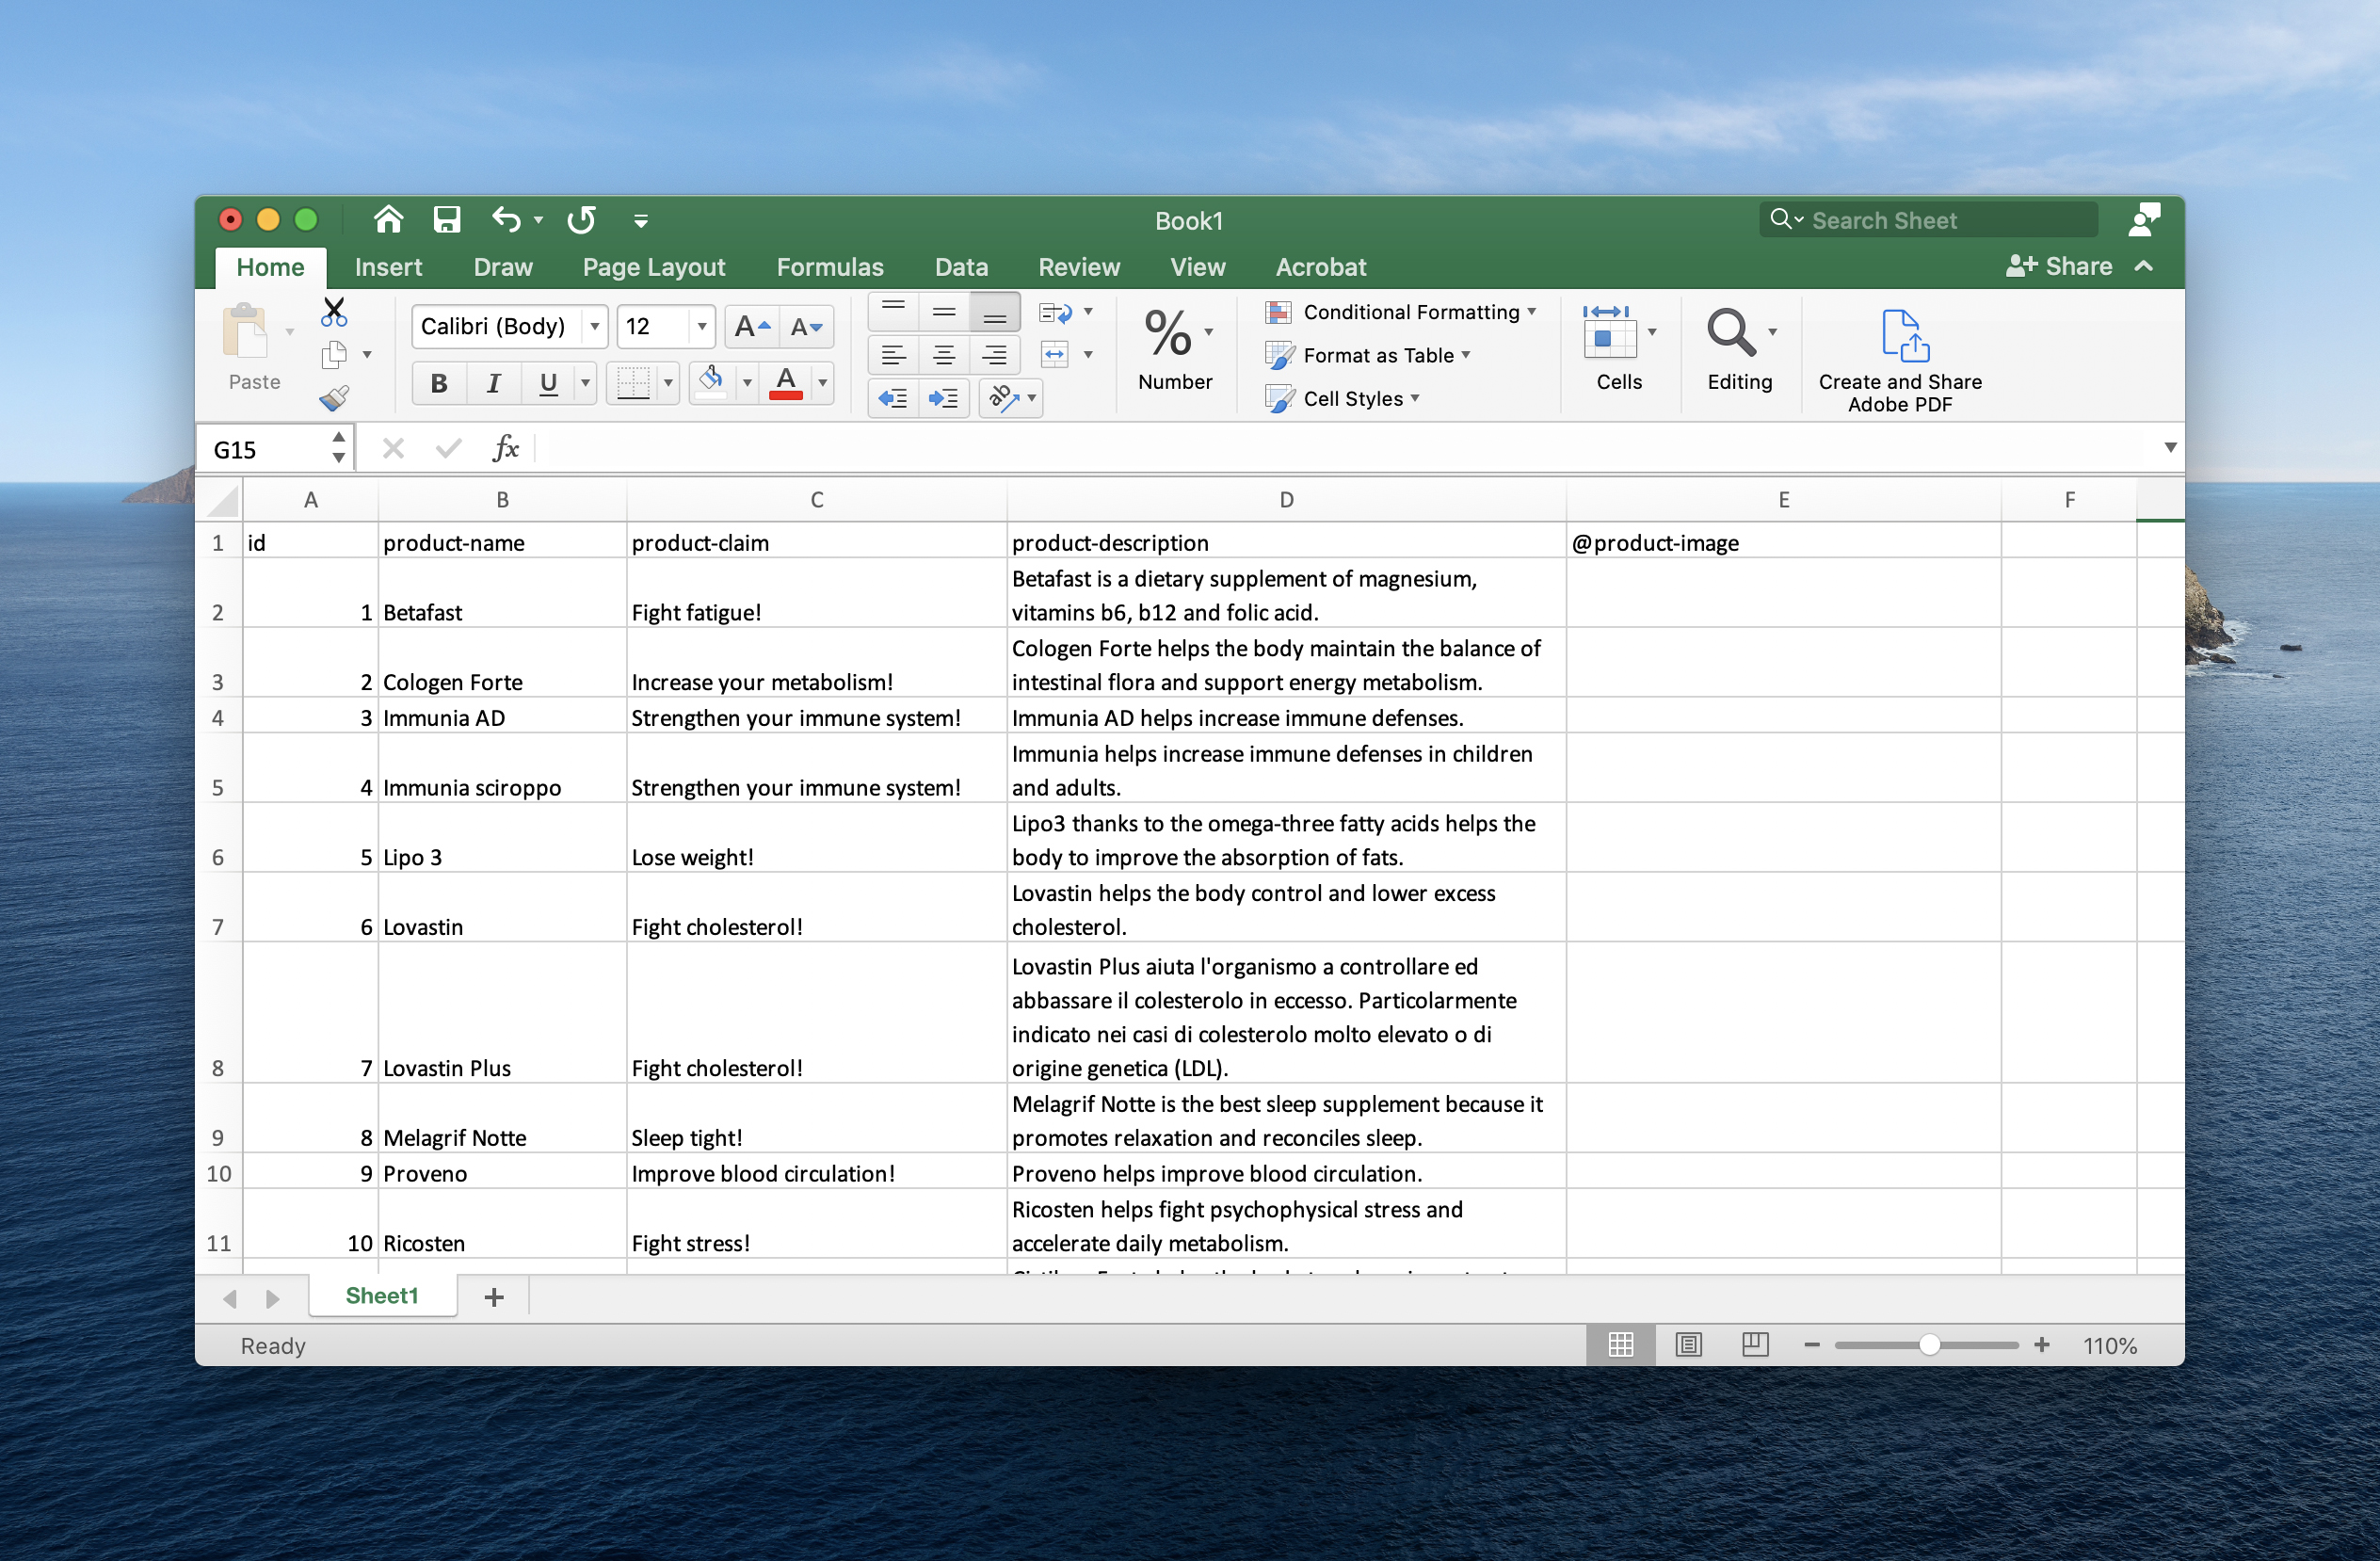
- The first step of Data Merge is to collect the data in a spreadsheet document. So, open Excel (or a spreadsheet software like Google Spreadsheet — this is probably a good choice if more people have to work on the data).
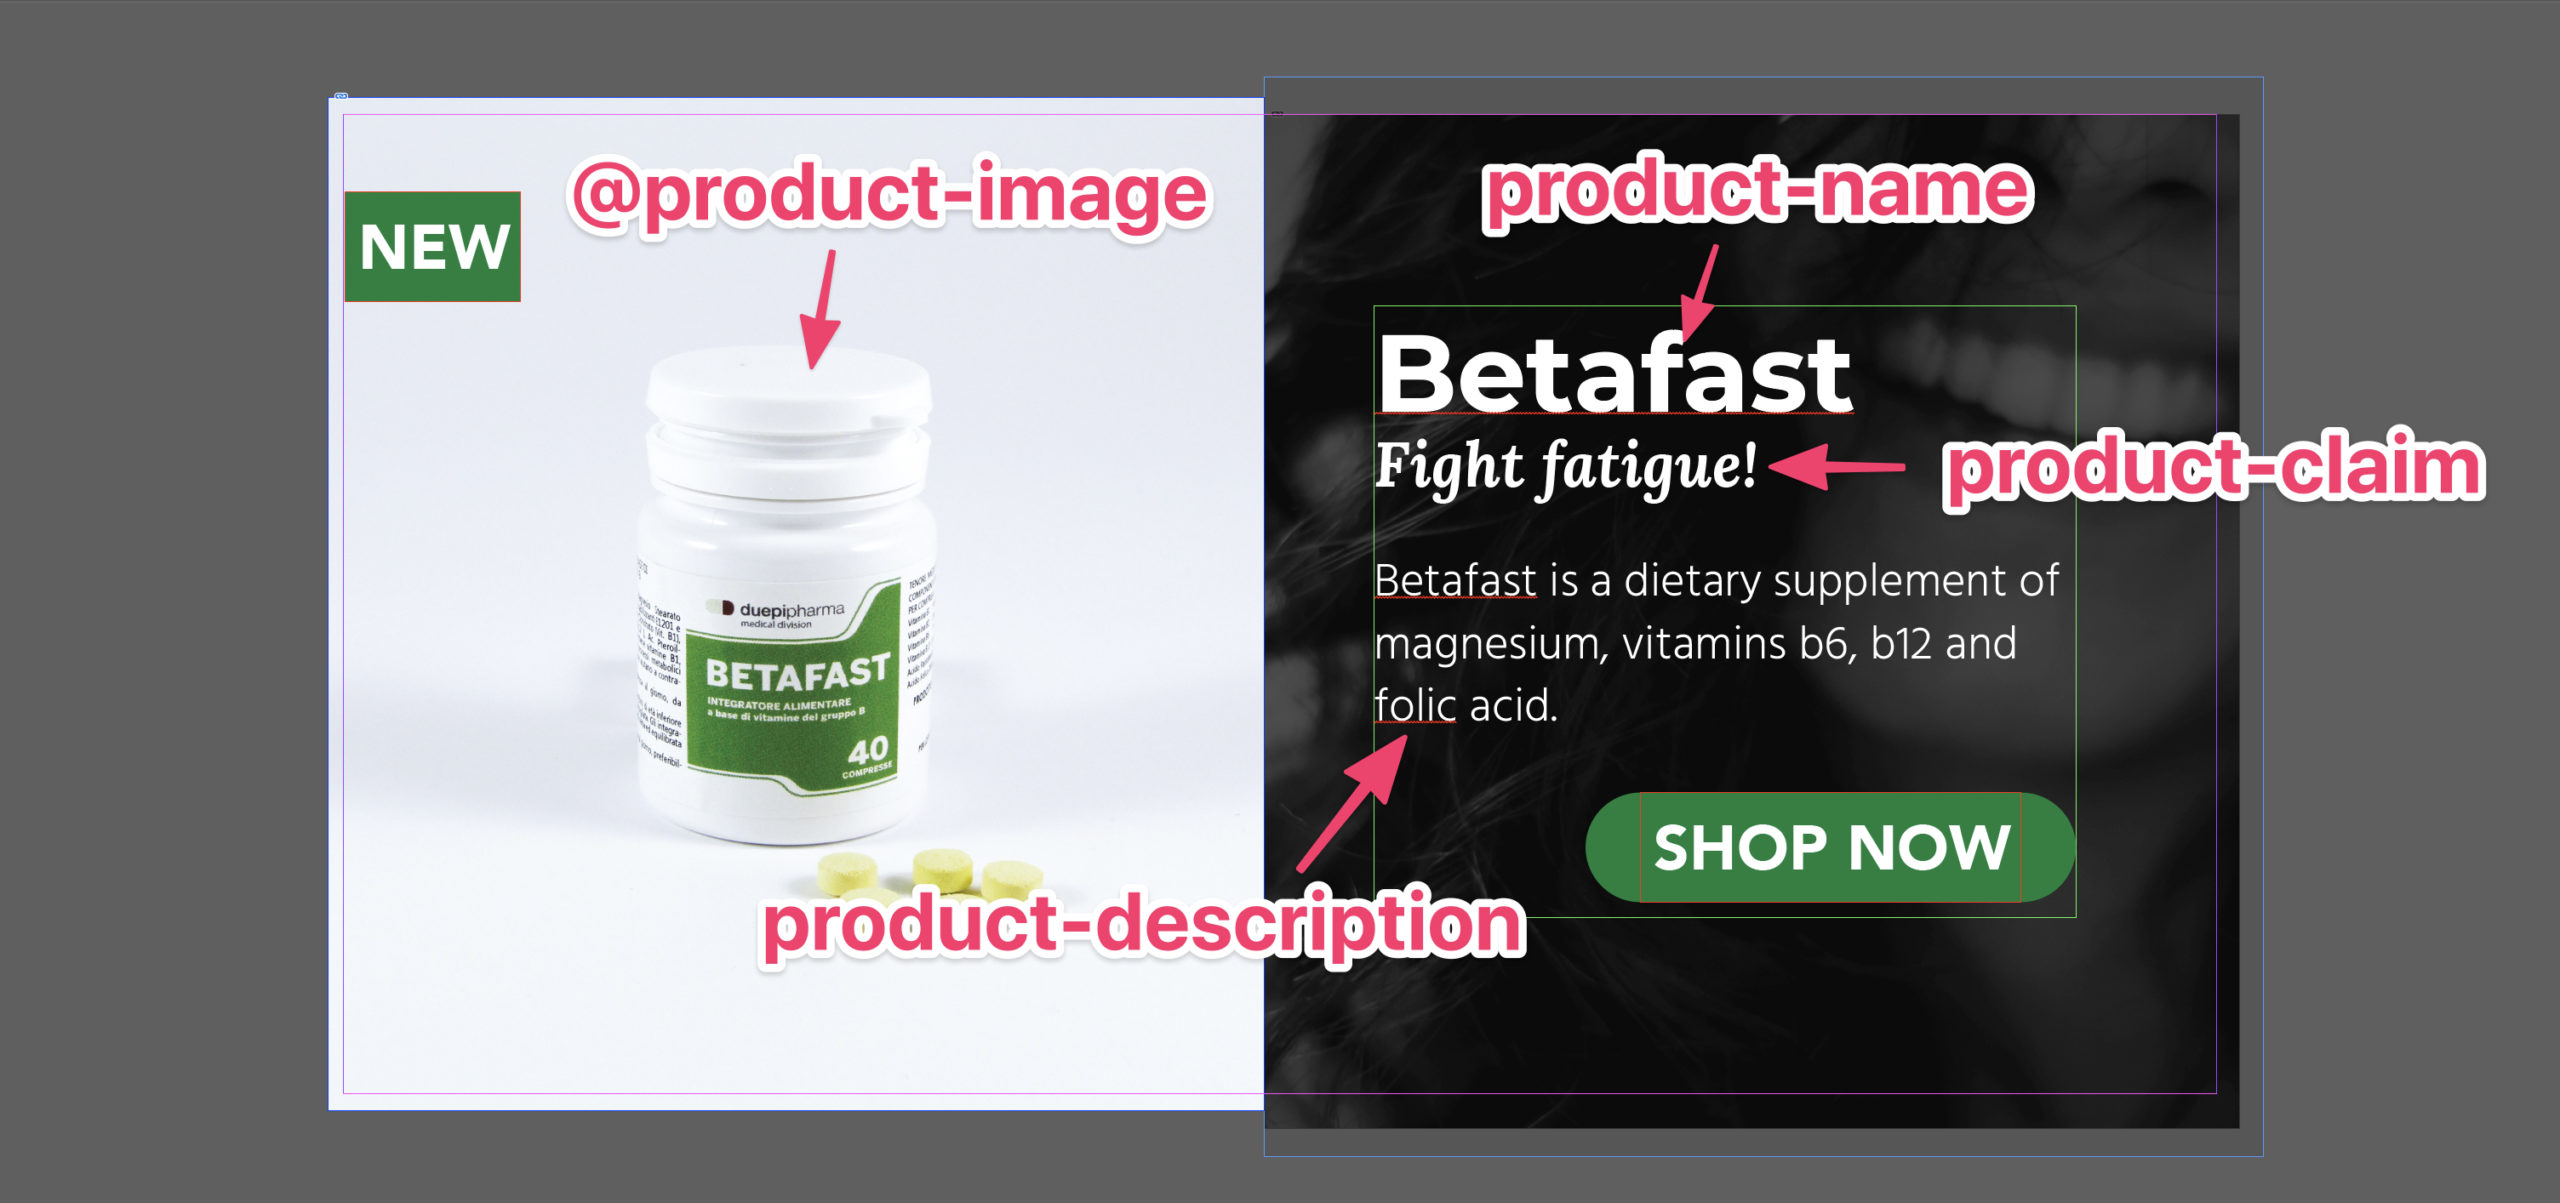
- In the first row of your table you should name each field of your layout. In my case they are:
- id (optional — it's a field I always add to any table I create);
- product-name;
- product-claim;
- product-description;
- @product-image: use @ in front of the field name for images.
- Complete the Excel file with the data of each banner.
Data Merge doesn't allow more then 1 paragraph per field. So, if you have descriptions with more paragraphs, jump here to see how to solve this.
- Images are a bit more tricky, so I'll delve a little more into it, and give you two different options on how to proceed:
- The simplest way is to save the InDesign Prototype file in your computer, and in the same folder create a new folder called Links. You should place all your images inside this new Links folder. And after you do so, you can just add the name + file extension of the image to the spreadsheet (ex. image.jpg).
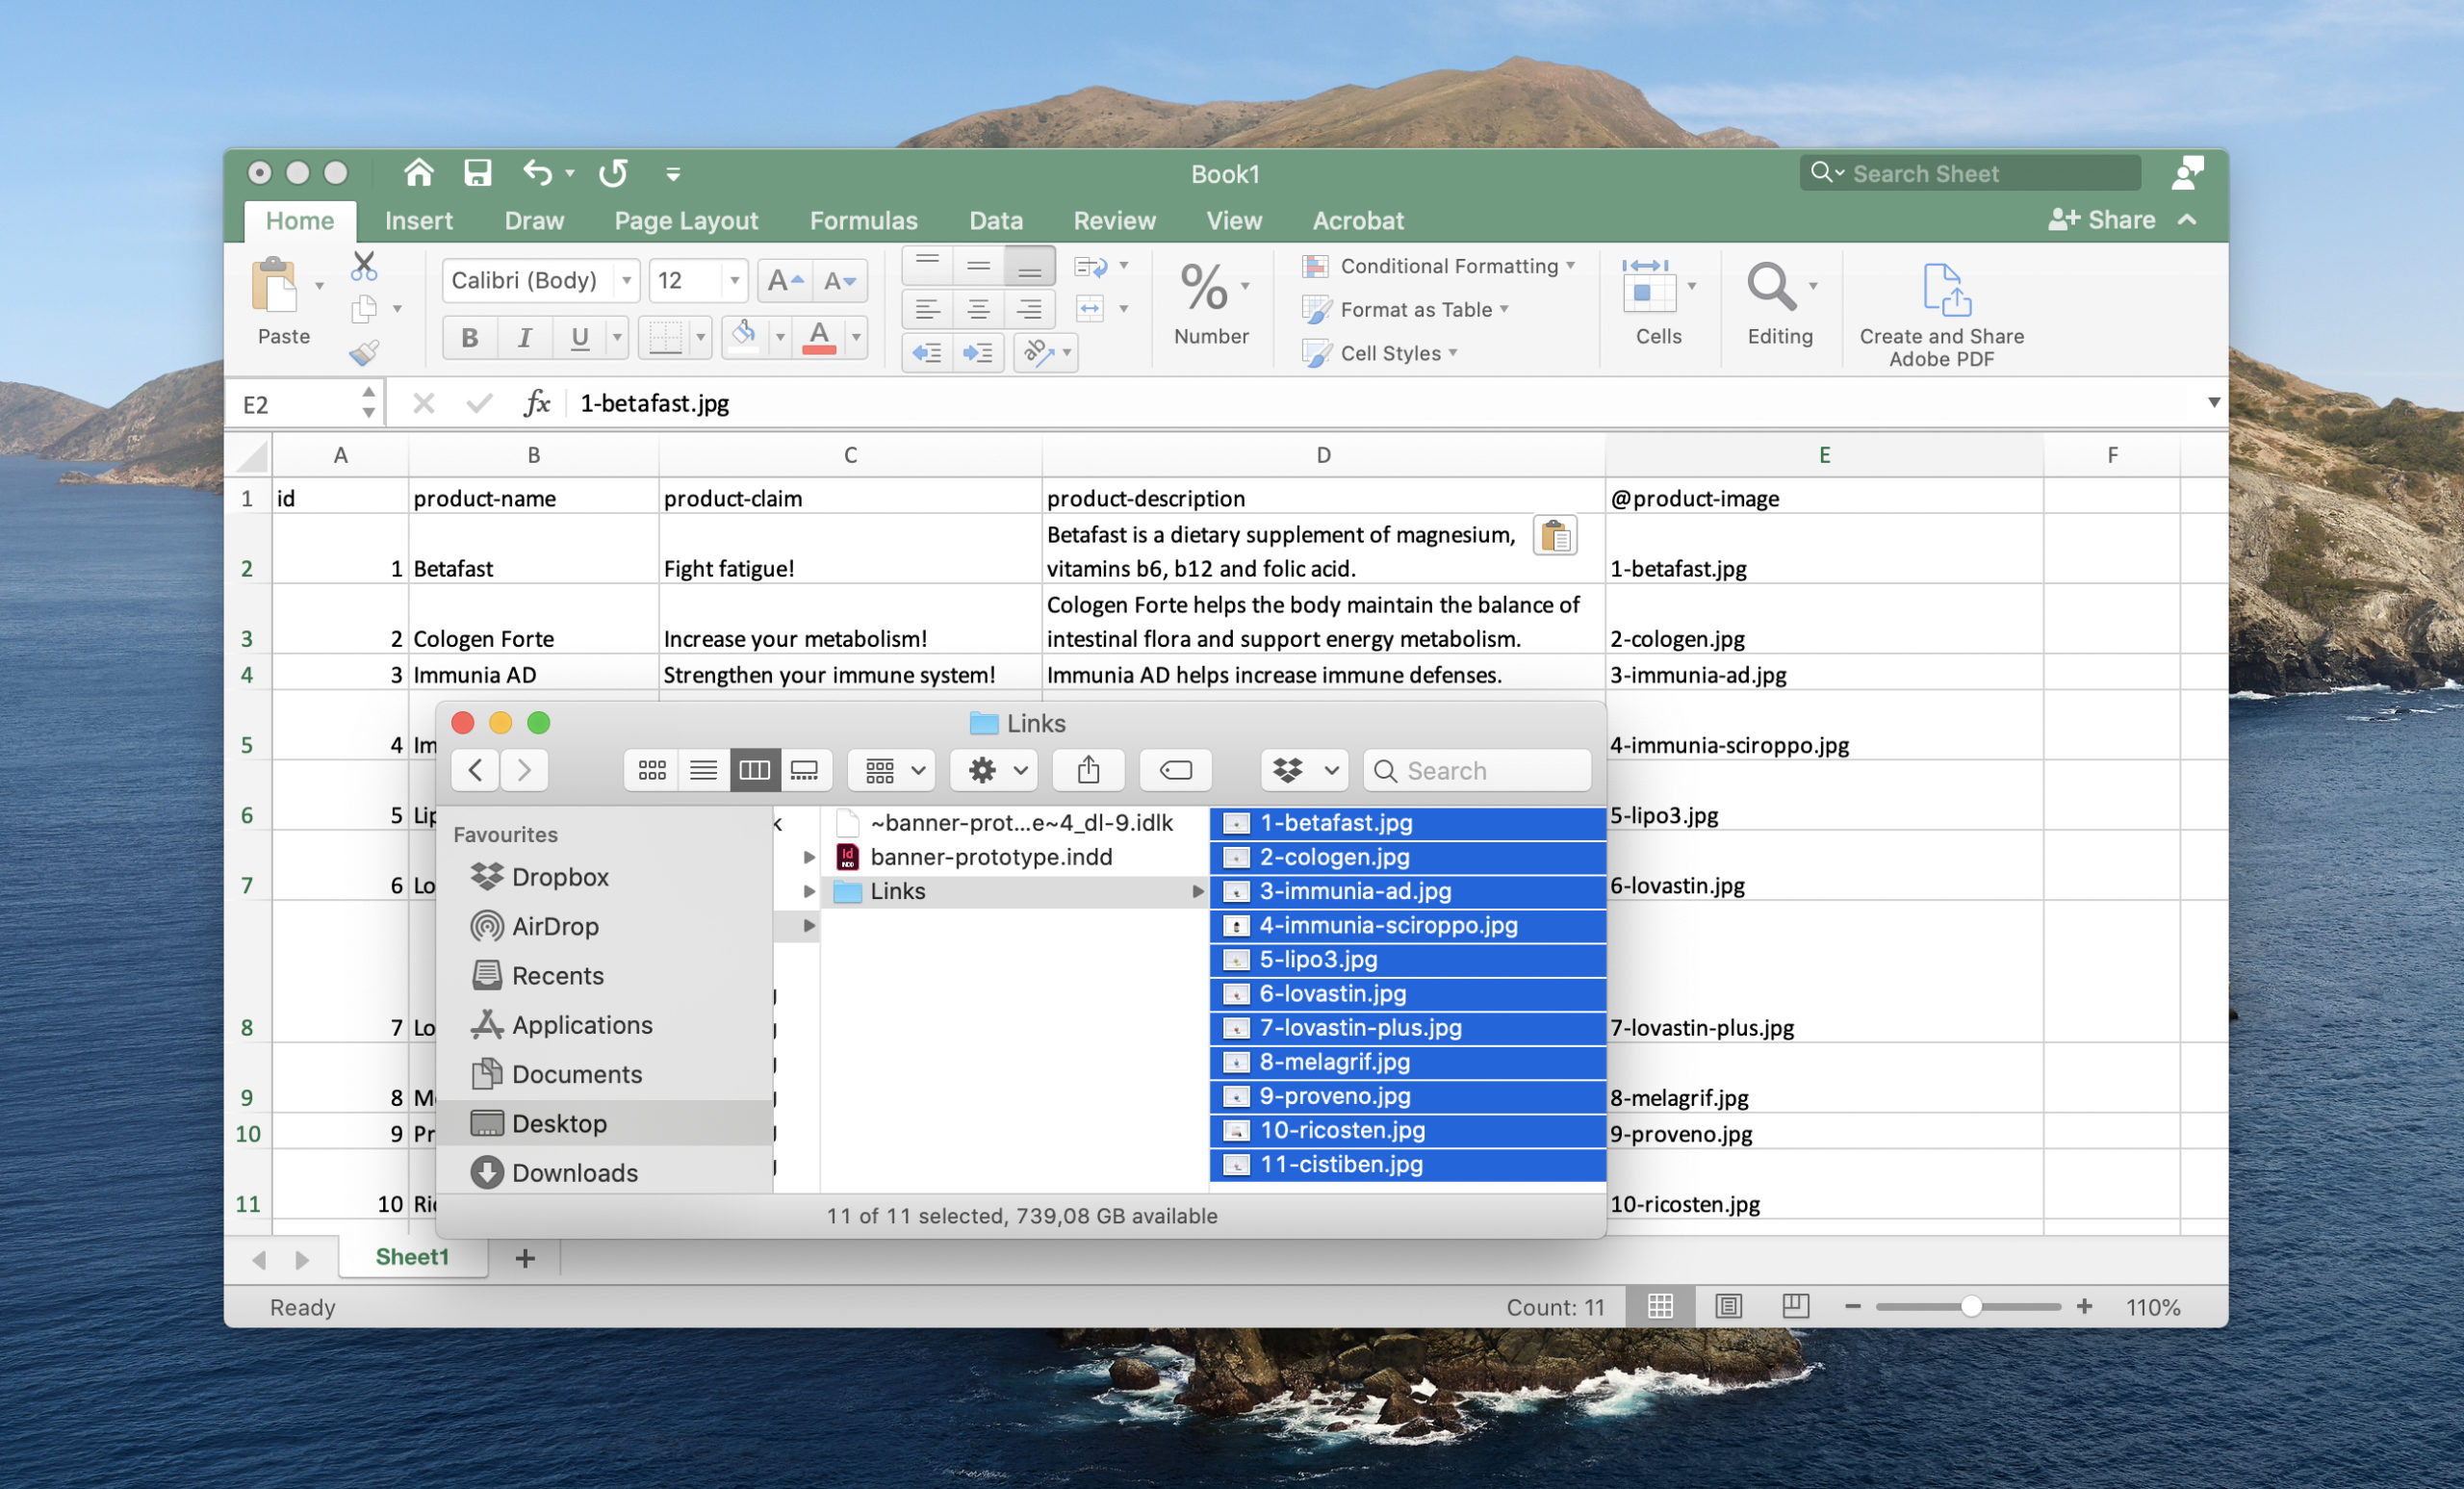
- If you can't do so, then check my complete guide on InDesign data merge (section: Prepare the data file for import).
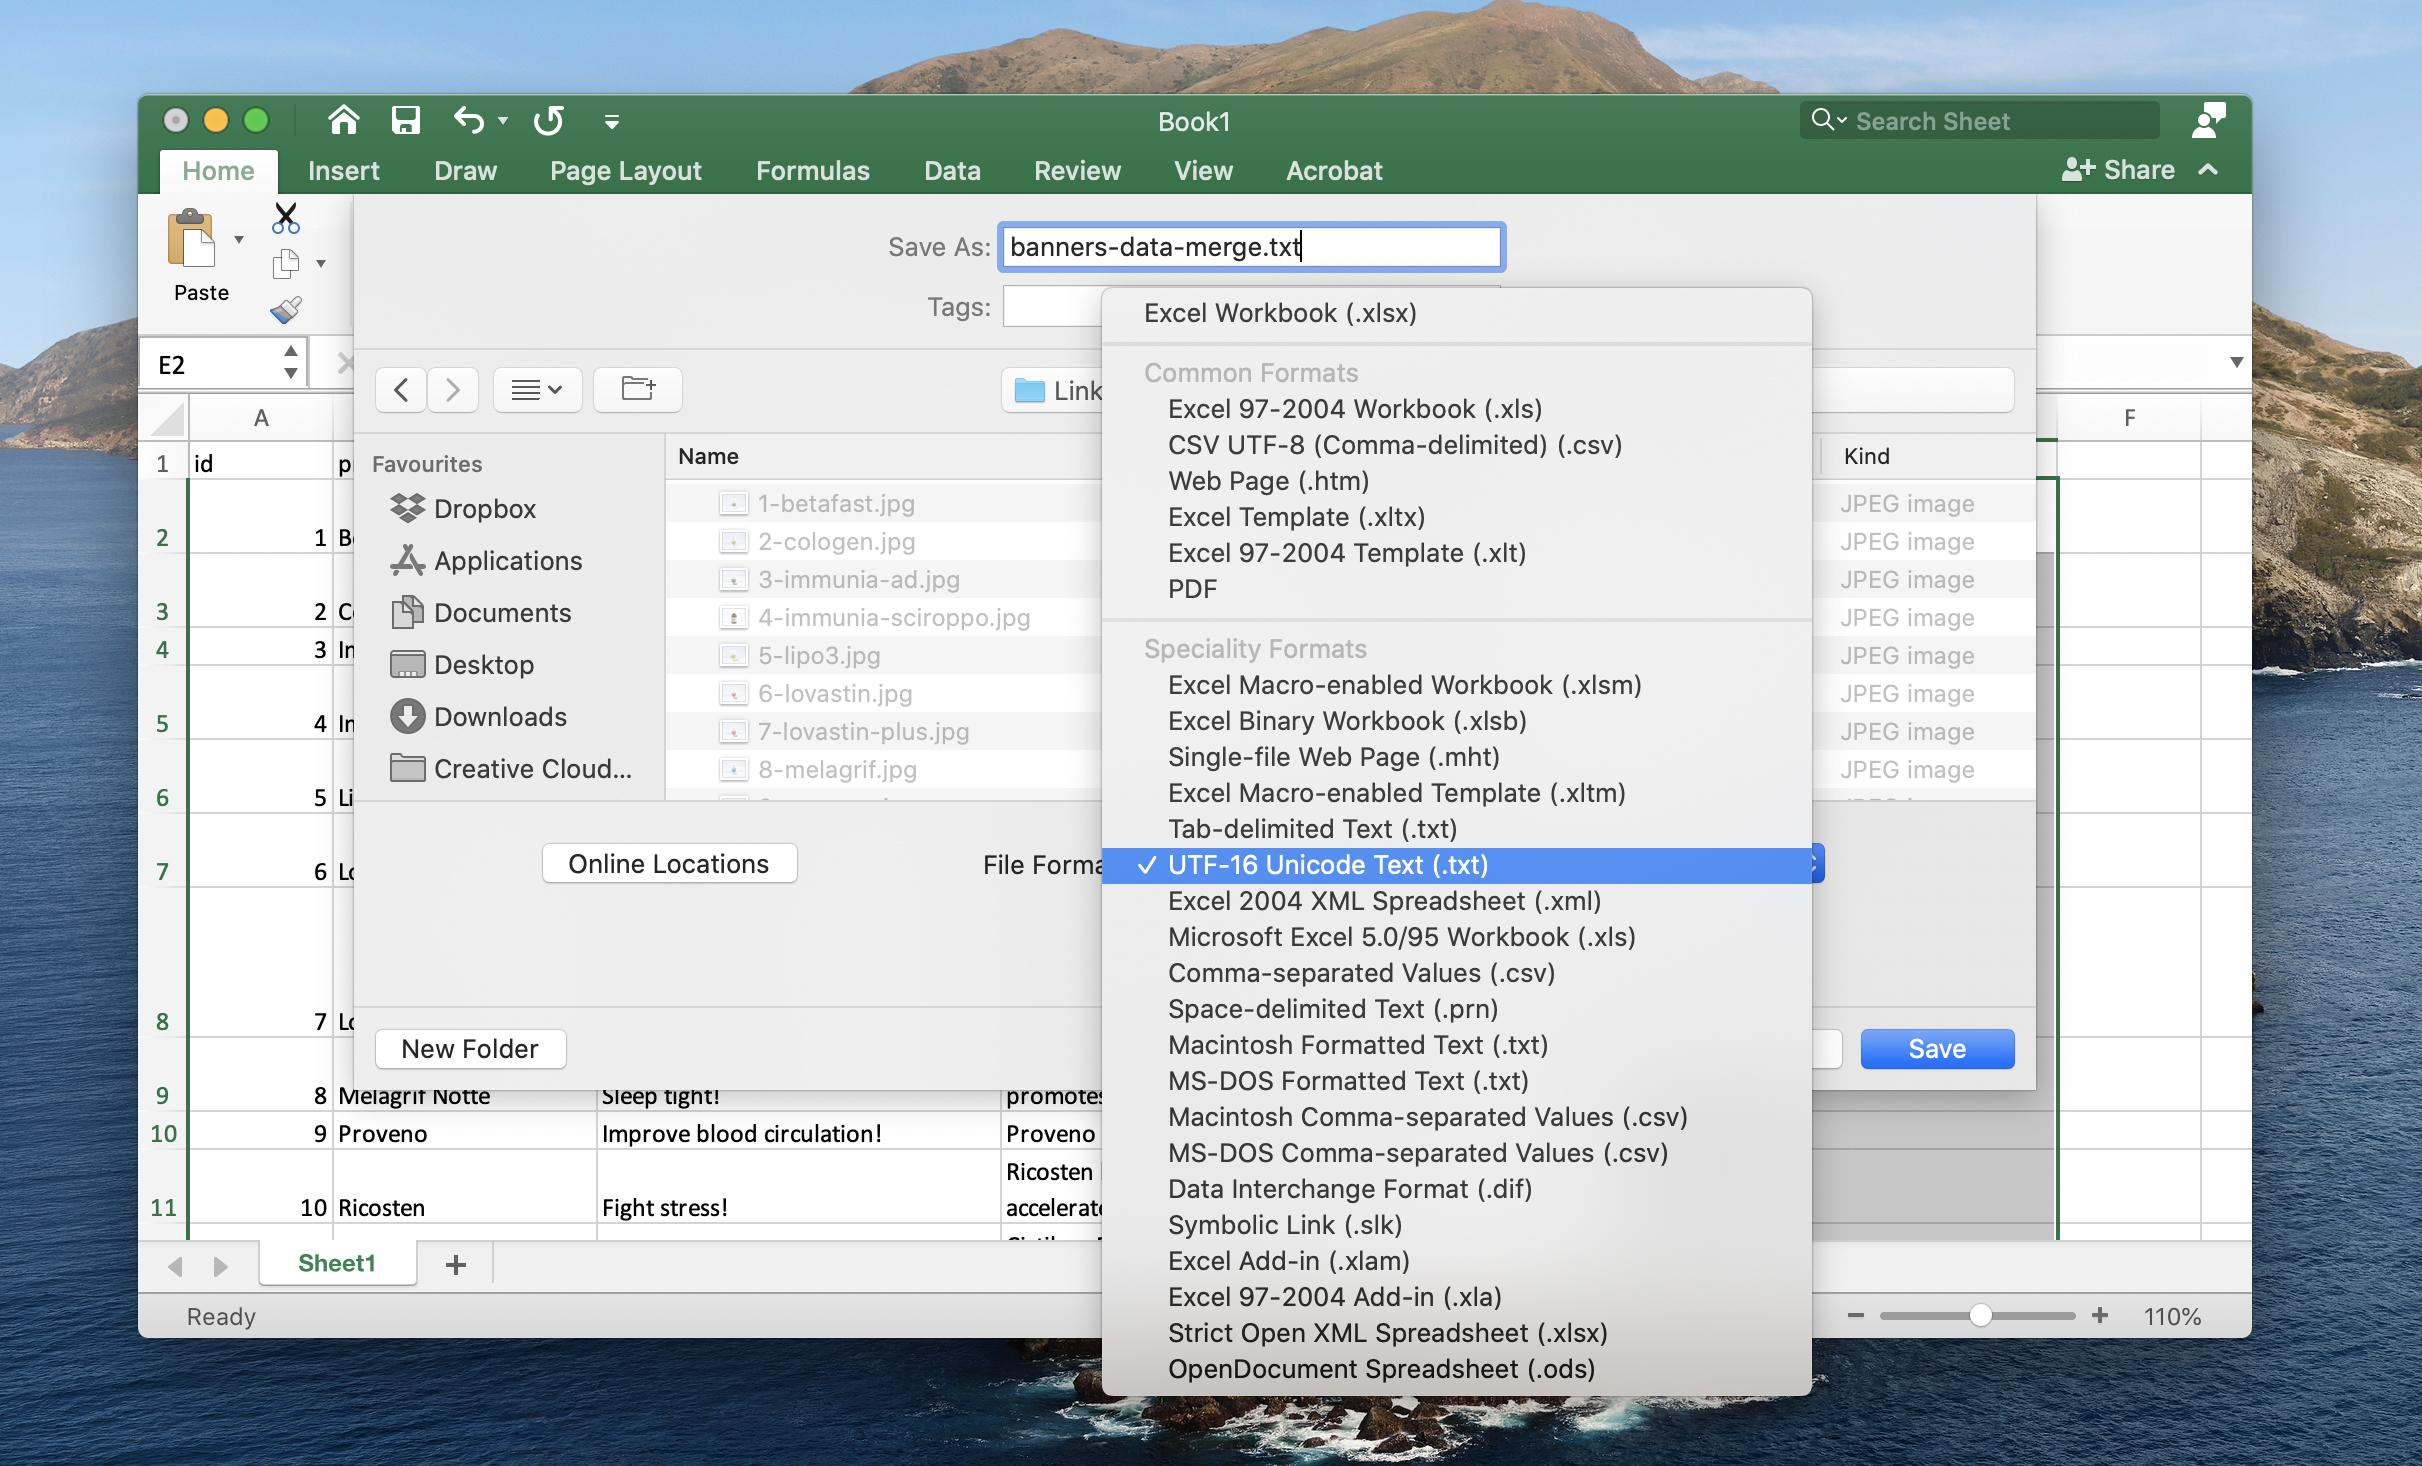
- Once you've filled up the Excel document with all the data, you can save it in UTF-16 Unistrong Text by clicking on File > Save As and selecting as File Format ****UTF-16 Unistrong Text (txt). To simplify things, save the file inside the Links folder.
Create the banners automatically
We created our prototype, we collected all the data, now it's time to have InDesign do the work.
Before proceeding, make sure the data you collected is confirmed and won't need edits!
If you need to produce the banners in more languages, you might want to read that part before launching the data merge — you'll find a few tips to improve further the level of automation.
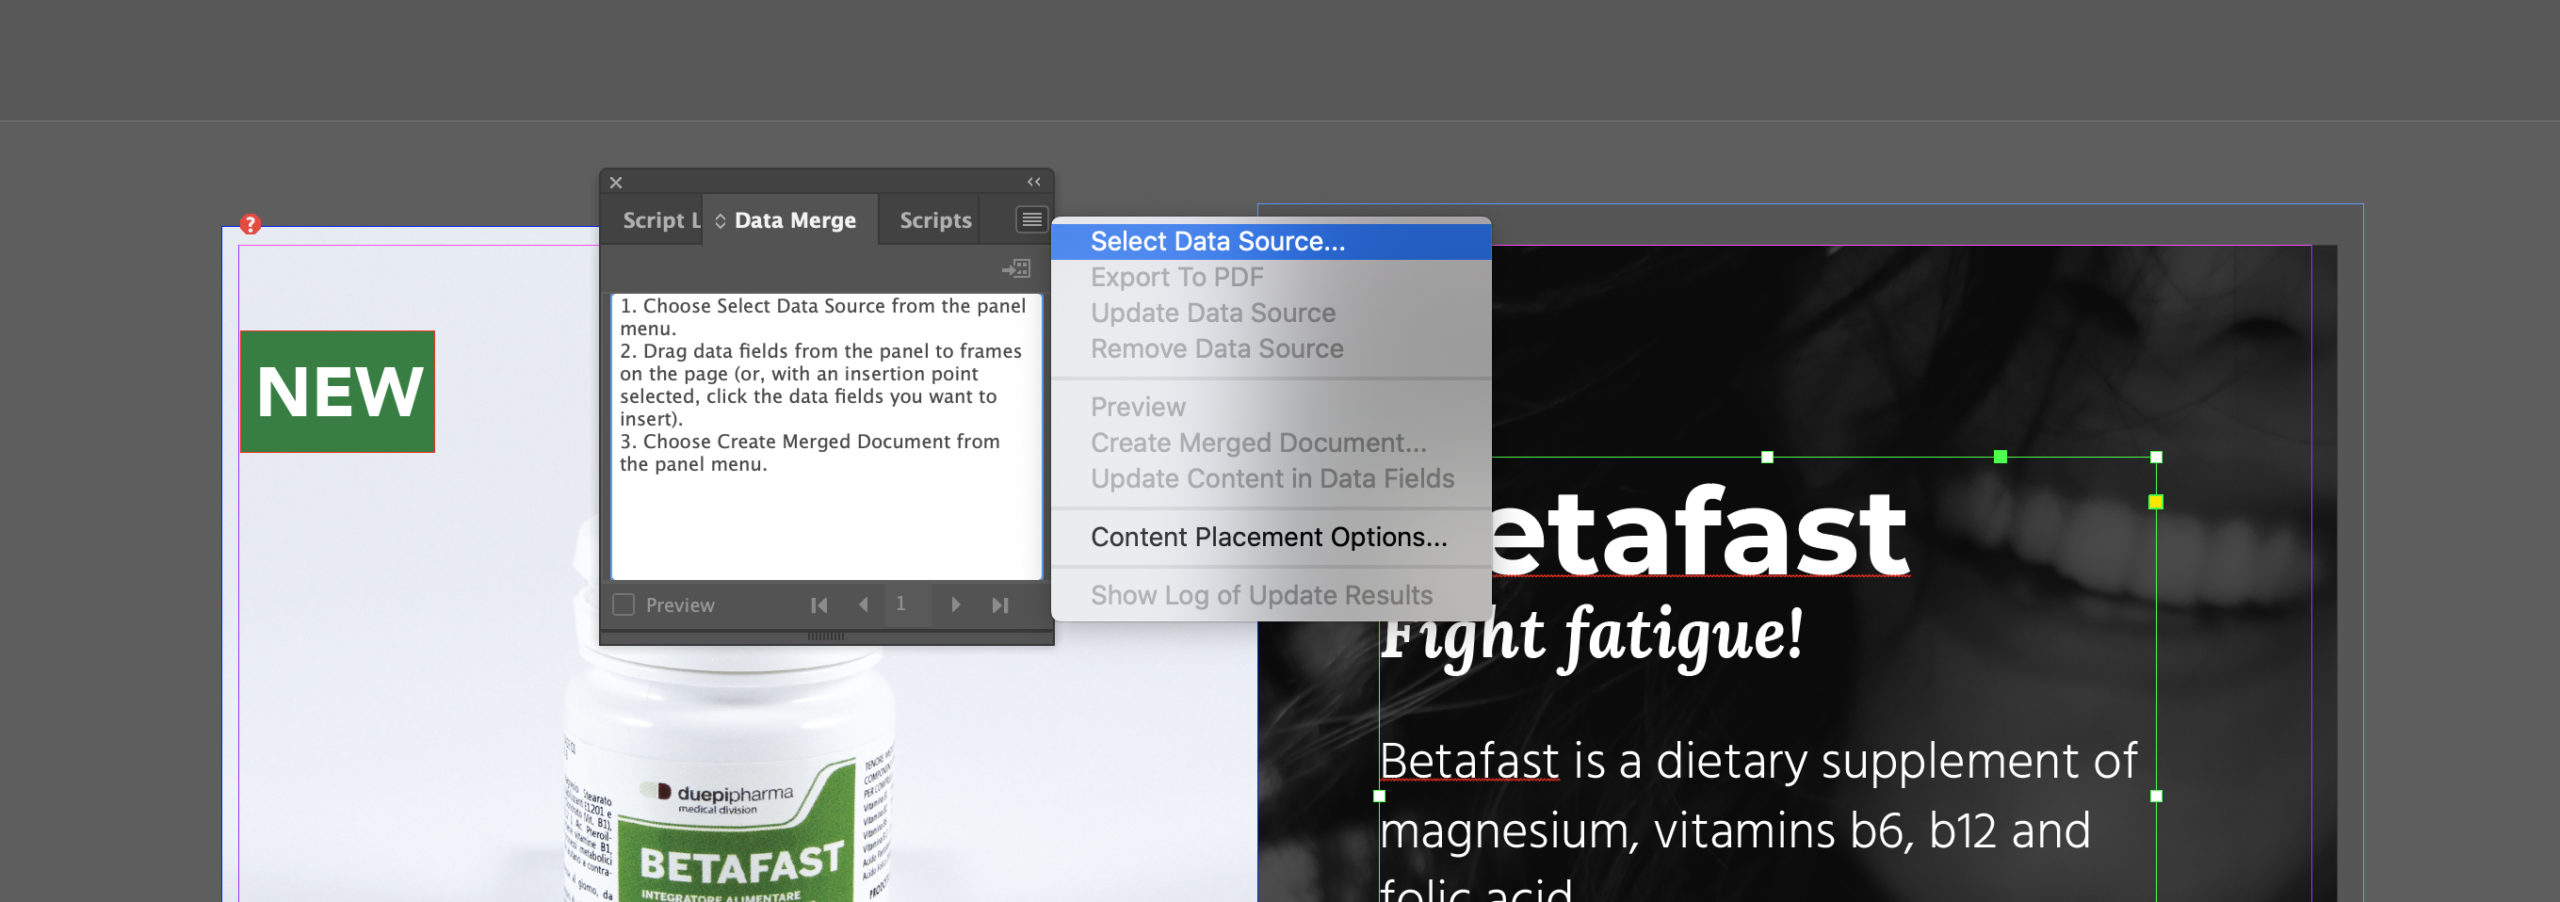
Now we have to tell InDesign where to place the data we just collected.
- Go back to InDesign, and open your Prototype document.
- Open the Data Merge panel (Window > Utilities > Data Merge).
- In the Data Merge panel, click on the top-right icon (the one with 4 parallel lines), and then click on Select Data Source.... Go and select the .txt document we just created in Excel as a data source.
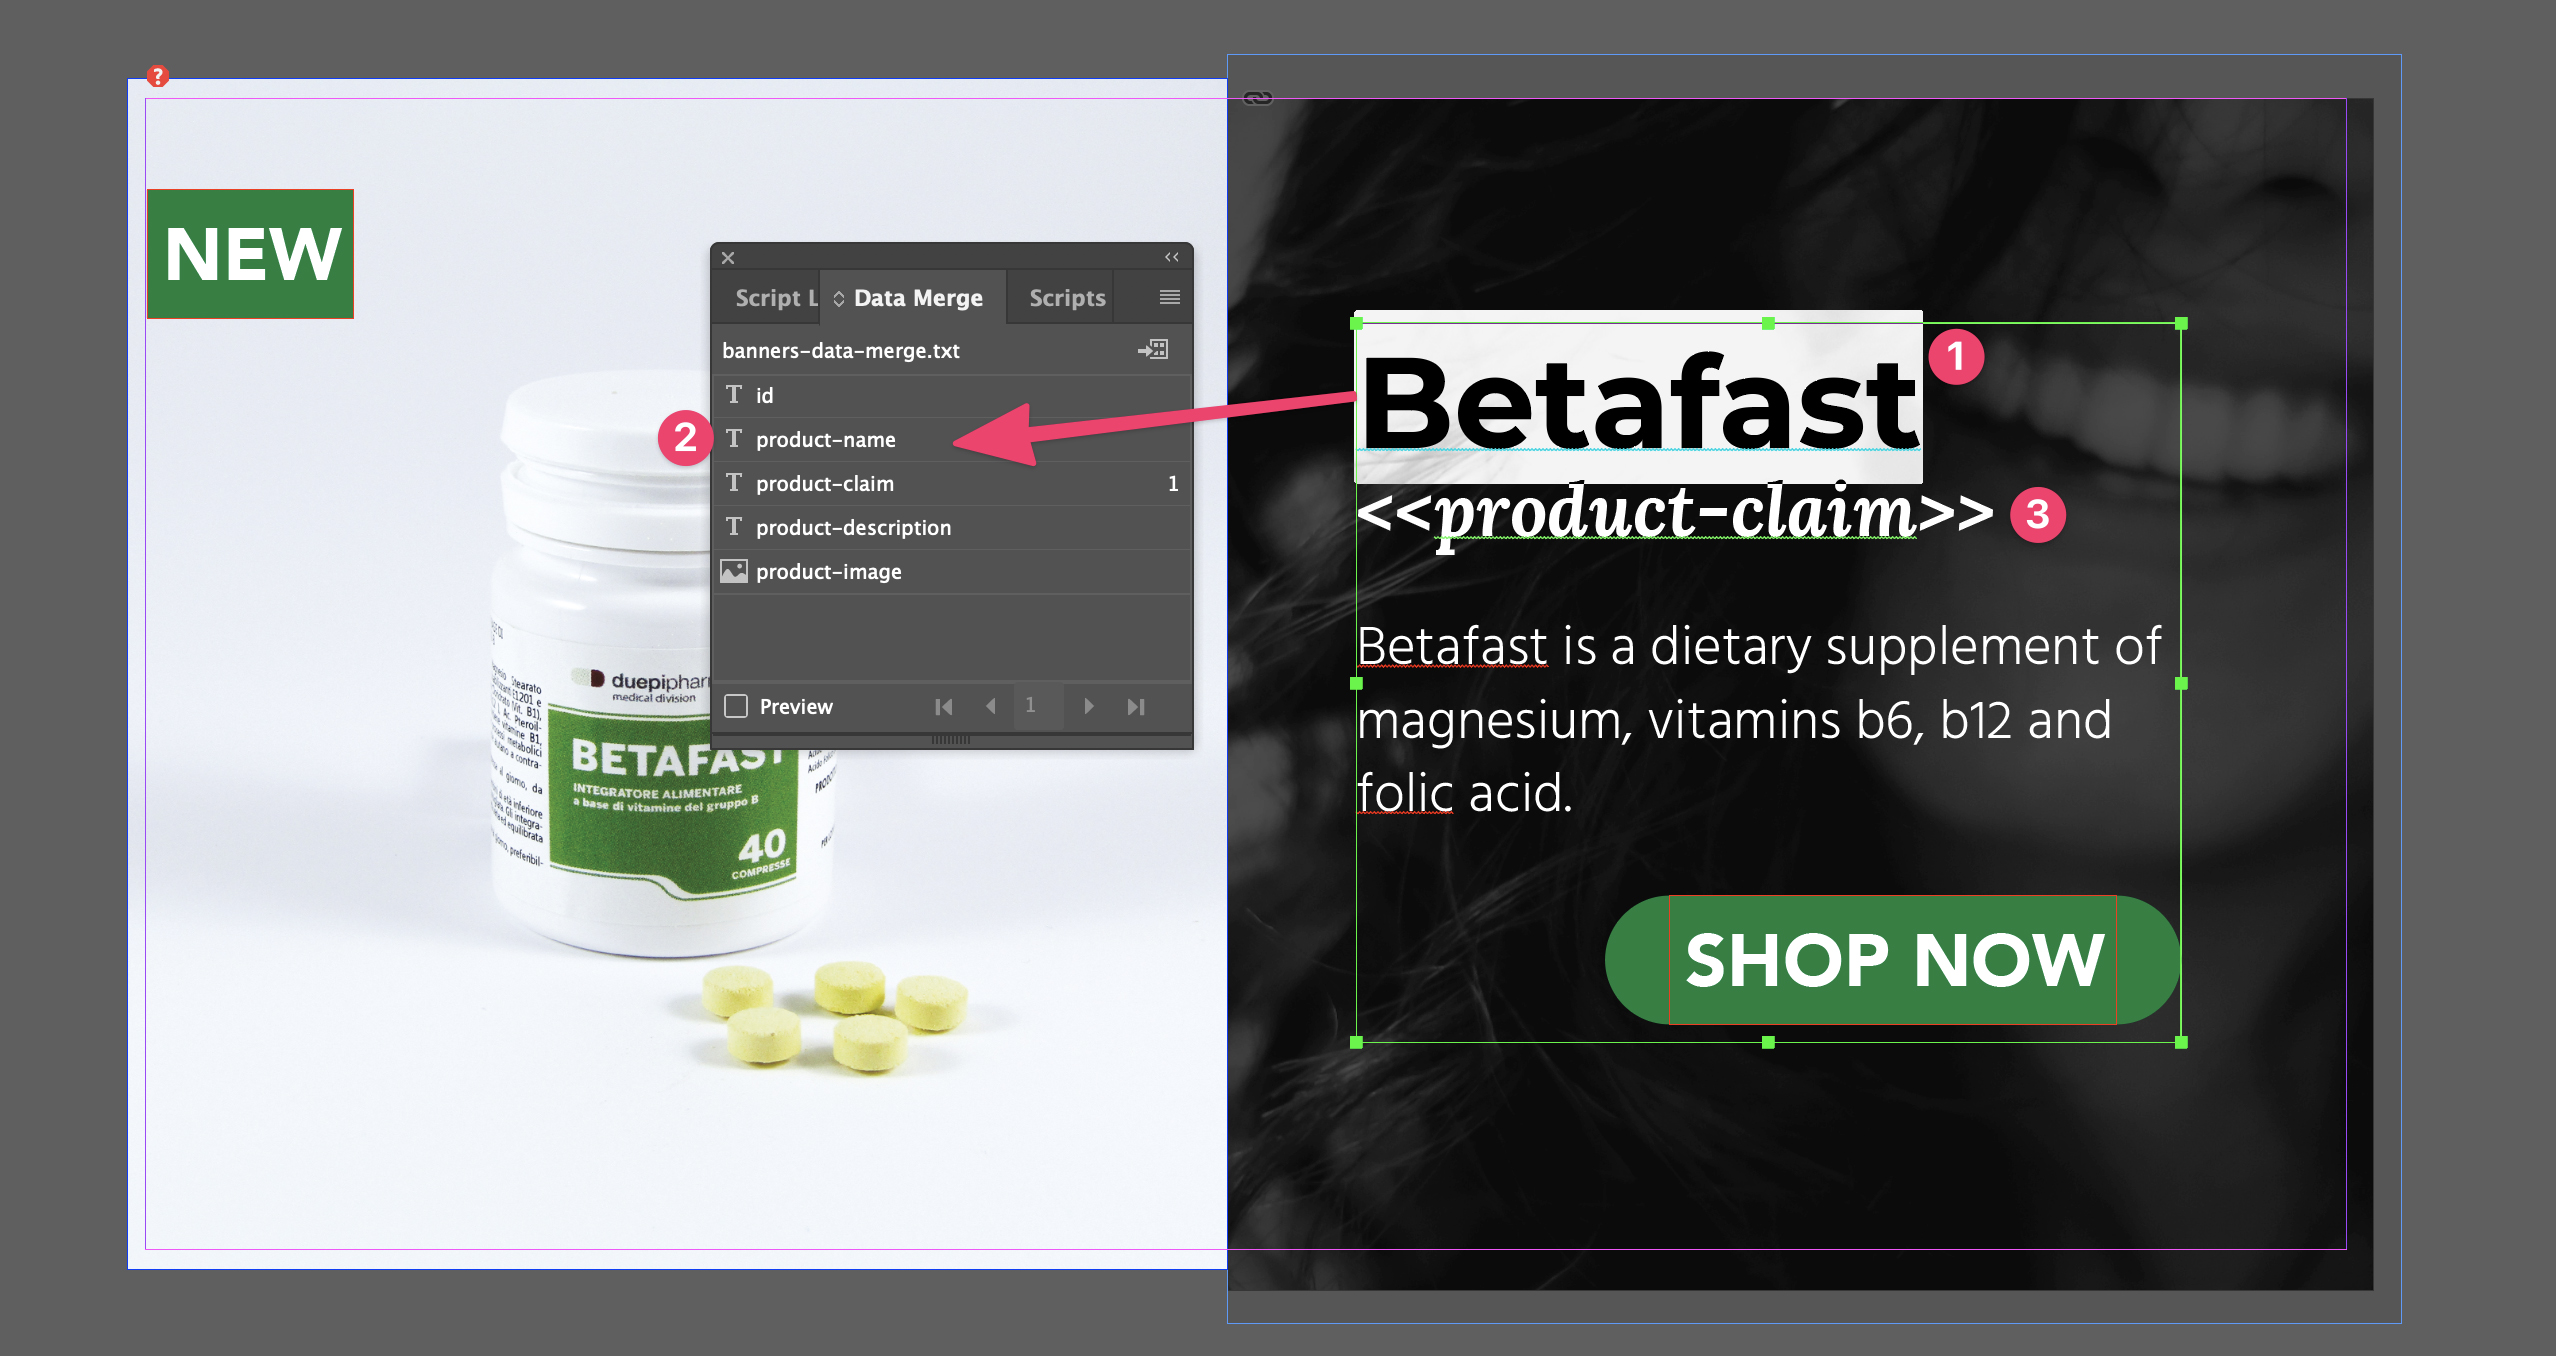
- Now, the Data Merge panel shows a list of variables. You might recognise the names since they are exaclty the name of the fields we created in the first row of the spreadsheet.
- We have to tell InDesign where to place those variables. It's really easy.
- Select the text you want to replace with the variable (1).
- With the text selected, click on the variable name (2).
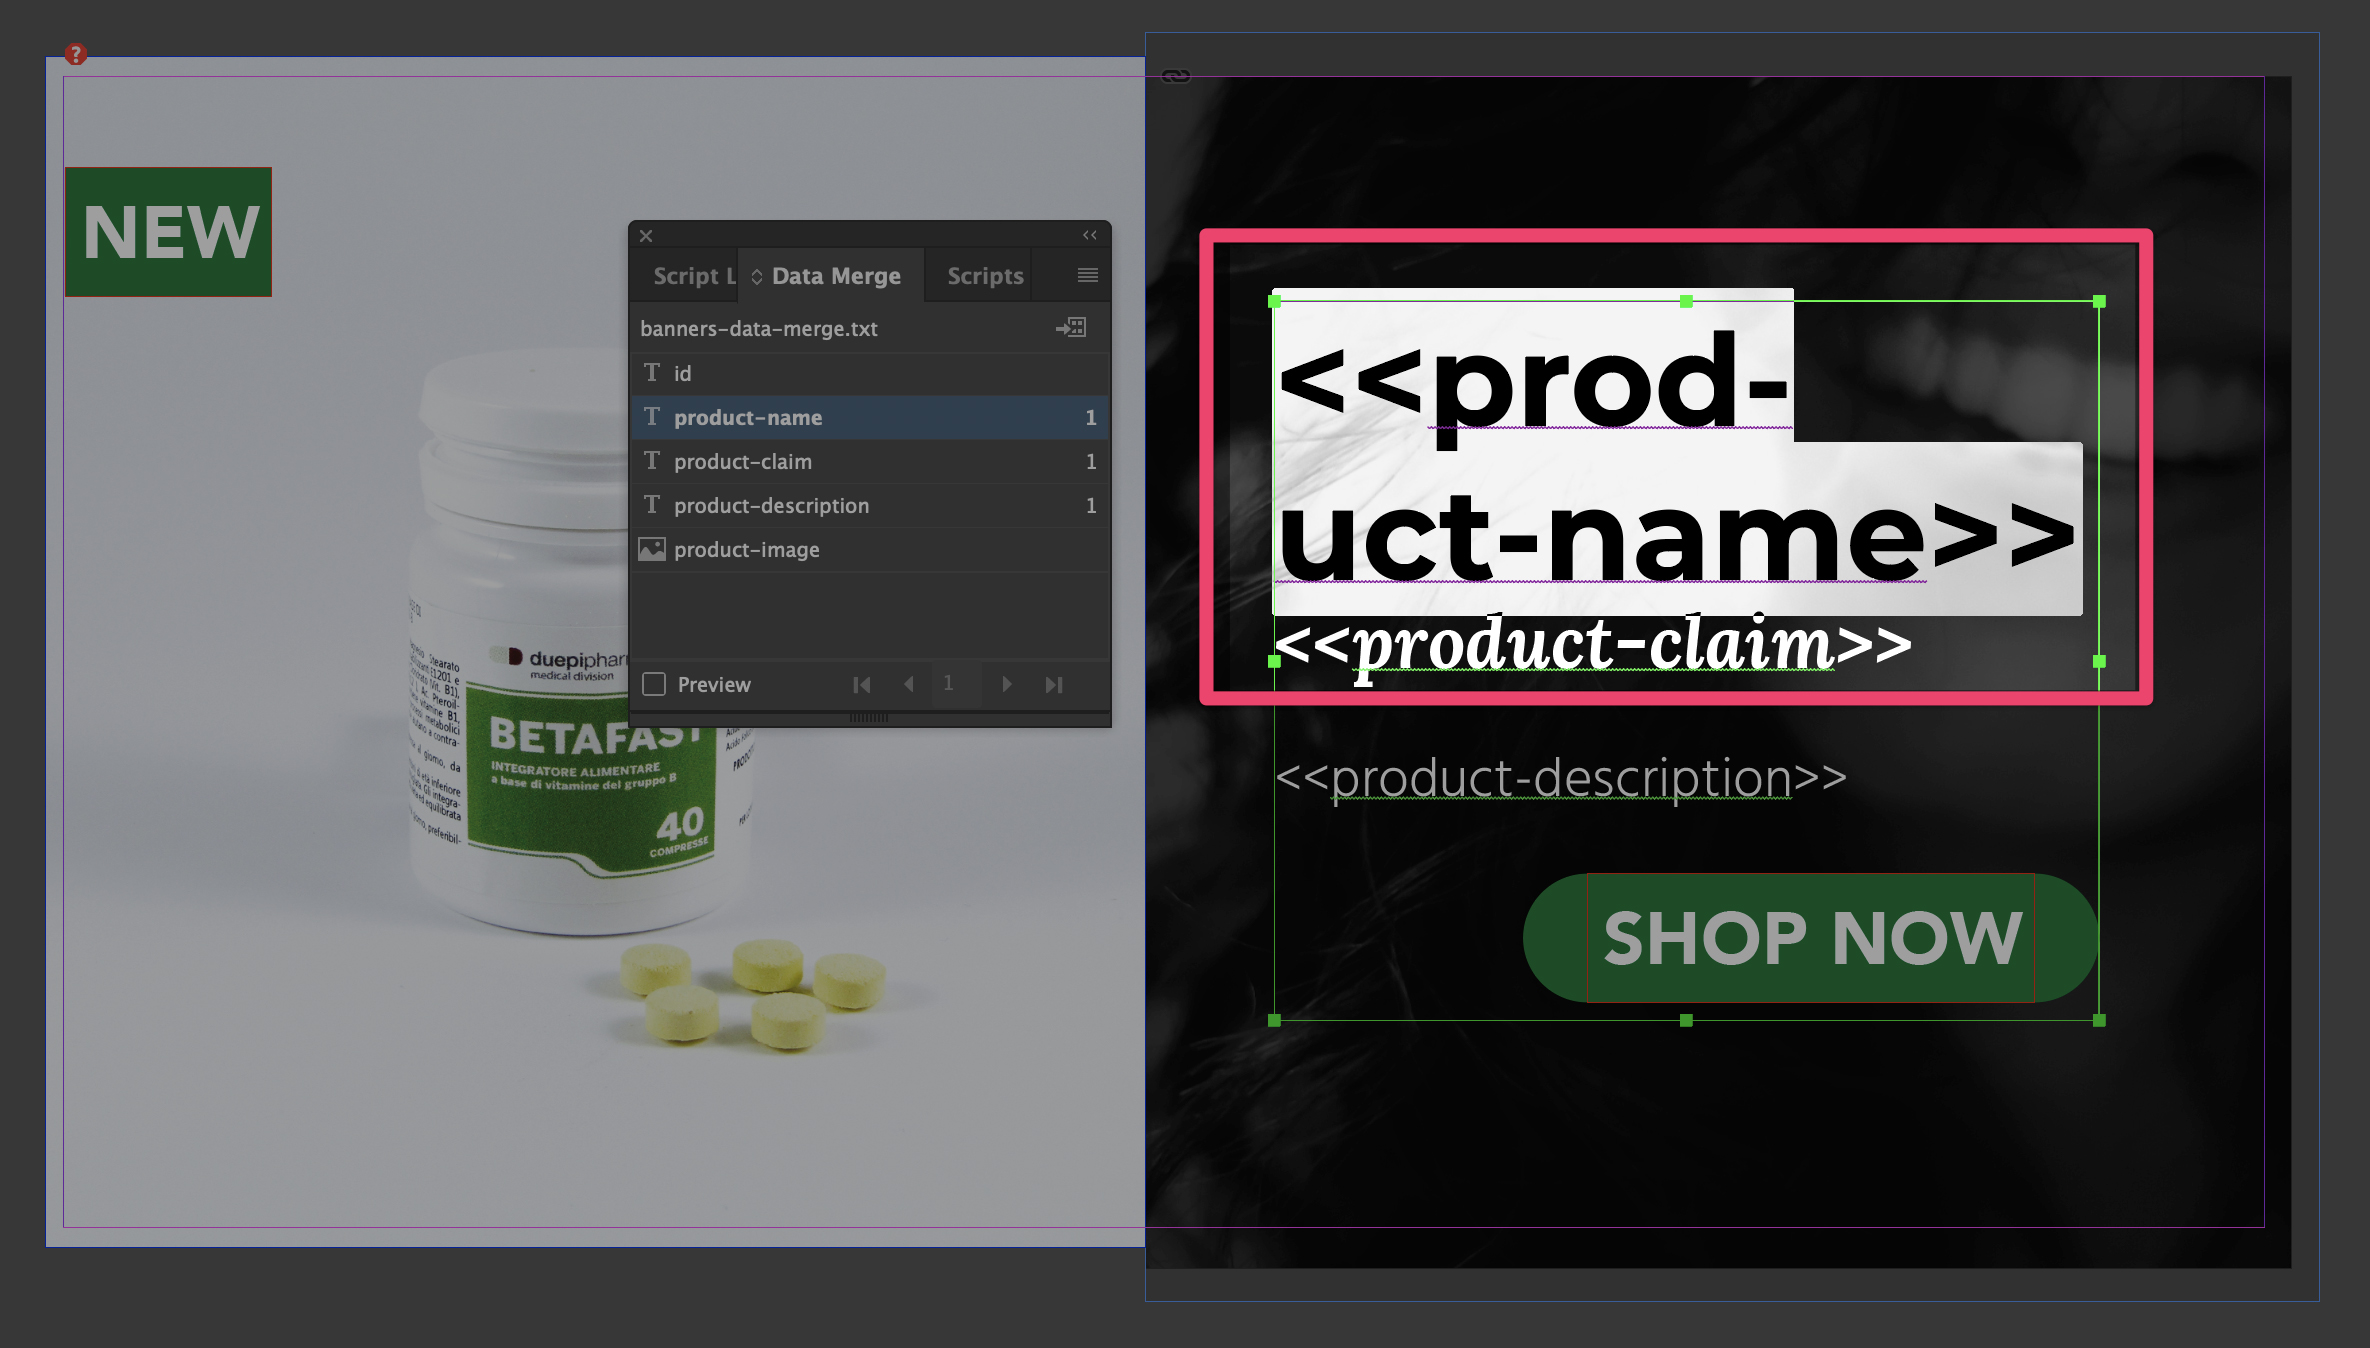
- After you click on the variable name, InDesign will replace the selected text with the variable, As shown in point (3).
- Don't bother if something like this happens to you. The Data Merge will fix it by replacing the name of your variable with its content. Also, we set up Paragraph Styles — we are fine!
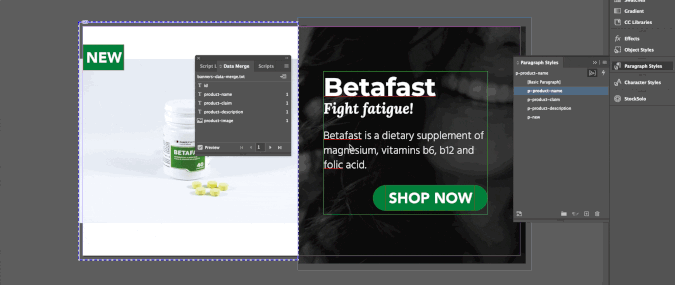
- You can use the Preview option to see how each banner will turn out.

- For now, don't bother with the images — we will fix them later. Focus on the textual part. With the Preview feature turned on, you can edit the Paragraph Styles and see how that will impact all the banners. Of course, you can also change the banner in other ways (you can for example make the picture a bit smaller and the textual part a bit bigger).
- Launch the creation of the banners. Click on the Create Merged Document icon (1) on the top-right side of the Data Merge panel. And in the Create Merged Document make sure you select Single Record.
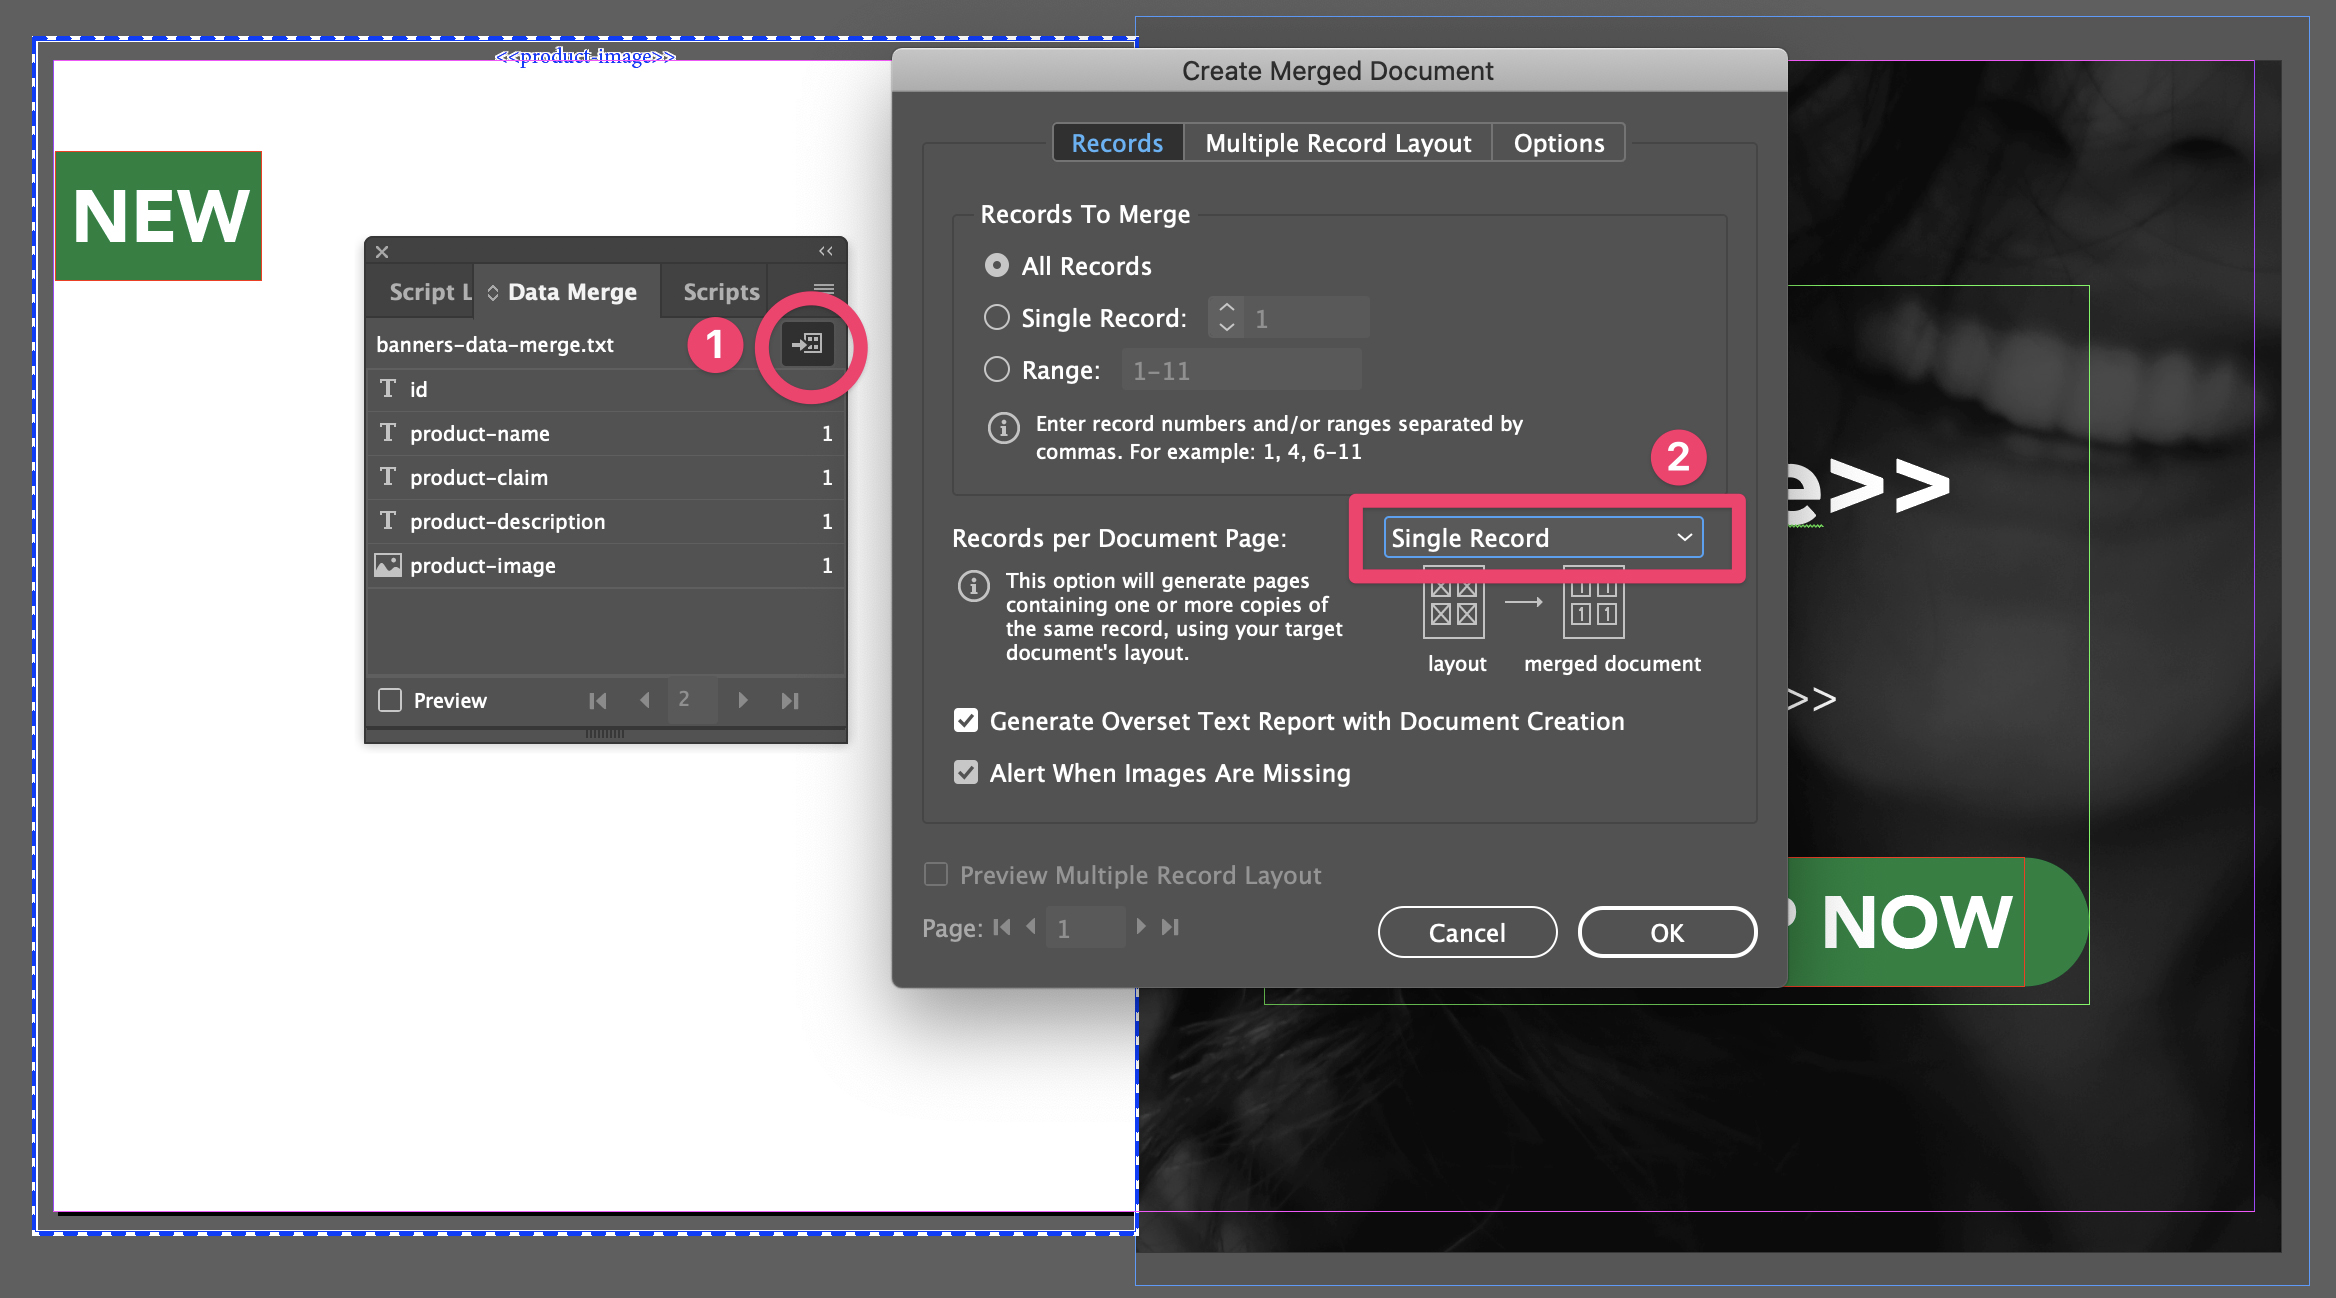
- Before clicking on OK and starting the Data Merge. Go to Options and tell InDesign how to fit the images.
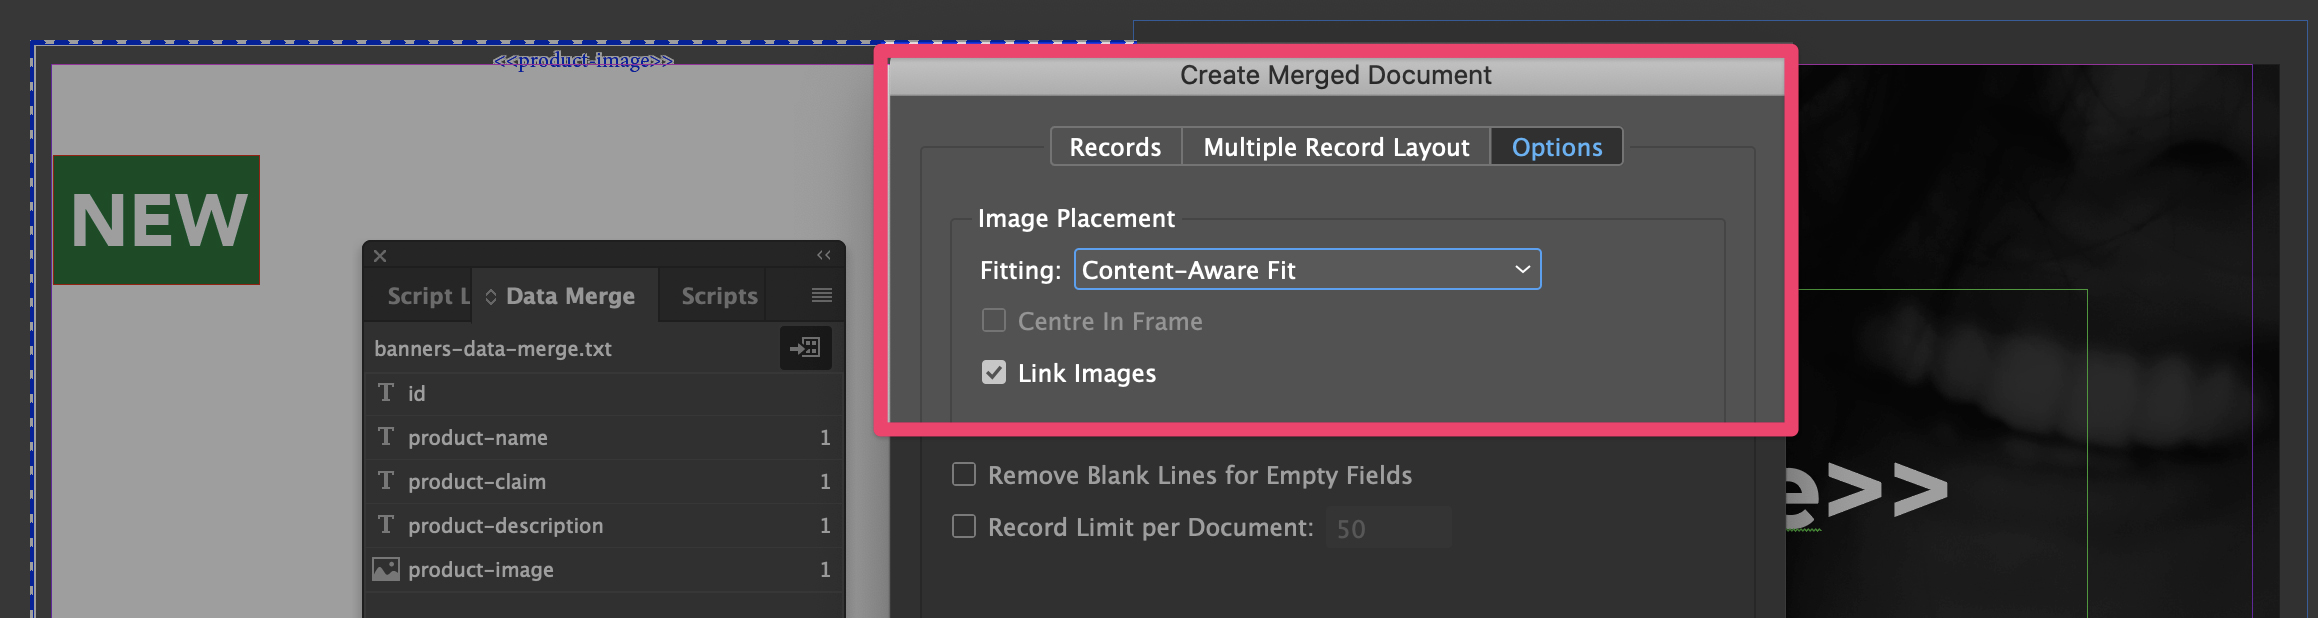
- Click Ok. InDesign will create a new document with all your banners. So, if you make any mistakes in setting up the data merge, don't worry, you can close the new document and launch the data merge again.
Perfect! You have just created all the banners!
Keep reading to learn more advanced tips and improve your workflow further.
Explore a few issues and see how to solve them
What we have seen up to this point is probably enough for many people.
But if you want to go the extra mile and make the process perfect (or you have to translate the banners) you should follow also this second part.
Here you will learn how to prepare the prototype so that it adjusts automatically based on the content we feed into it during the data merge.
I've broken this part down into:
Deal with layout adjustments automatically
Descriptions with more paragraphs
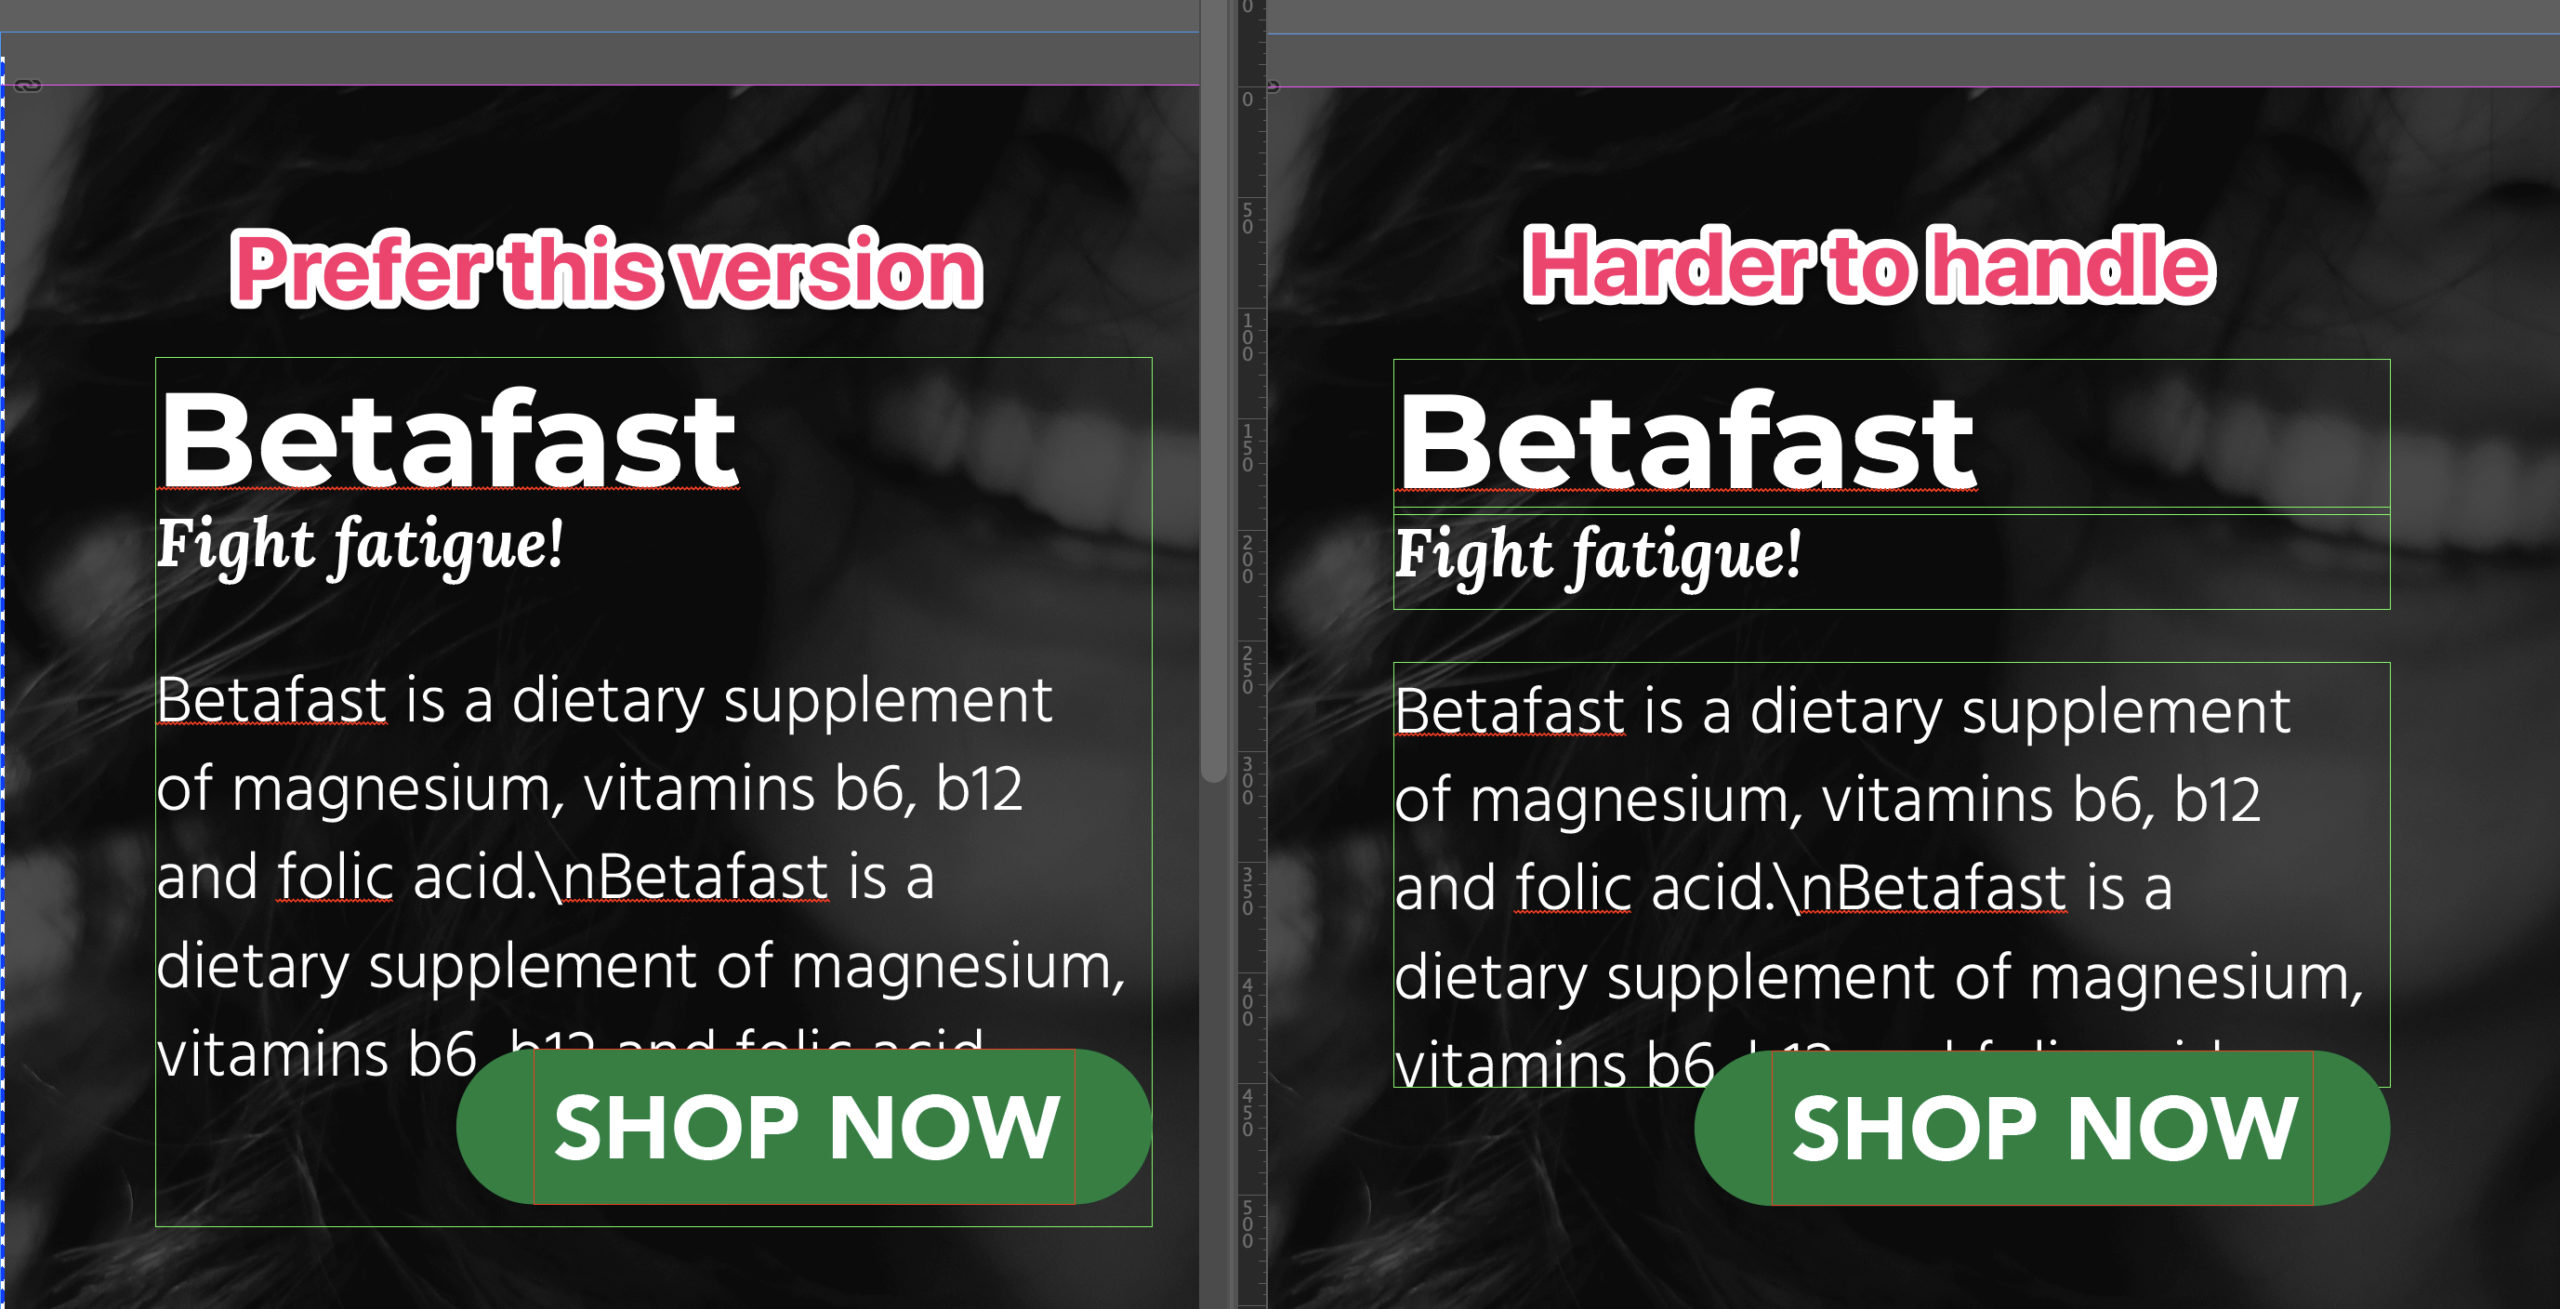
The data merge feature allow us to add only 1 single paragraph in 1 single field. If you need a longer description, you'll have to find a way around it.
This is what I usually do:
- In the description inside the Excel document, where a new paragraph should start, add these two characters \\n.
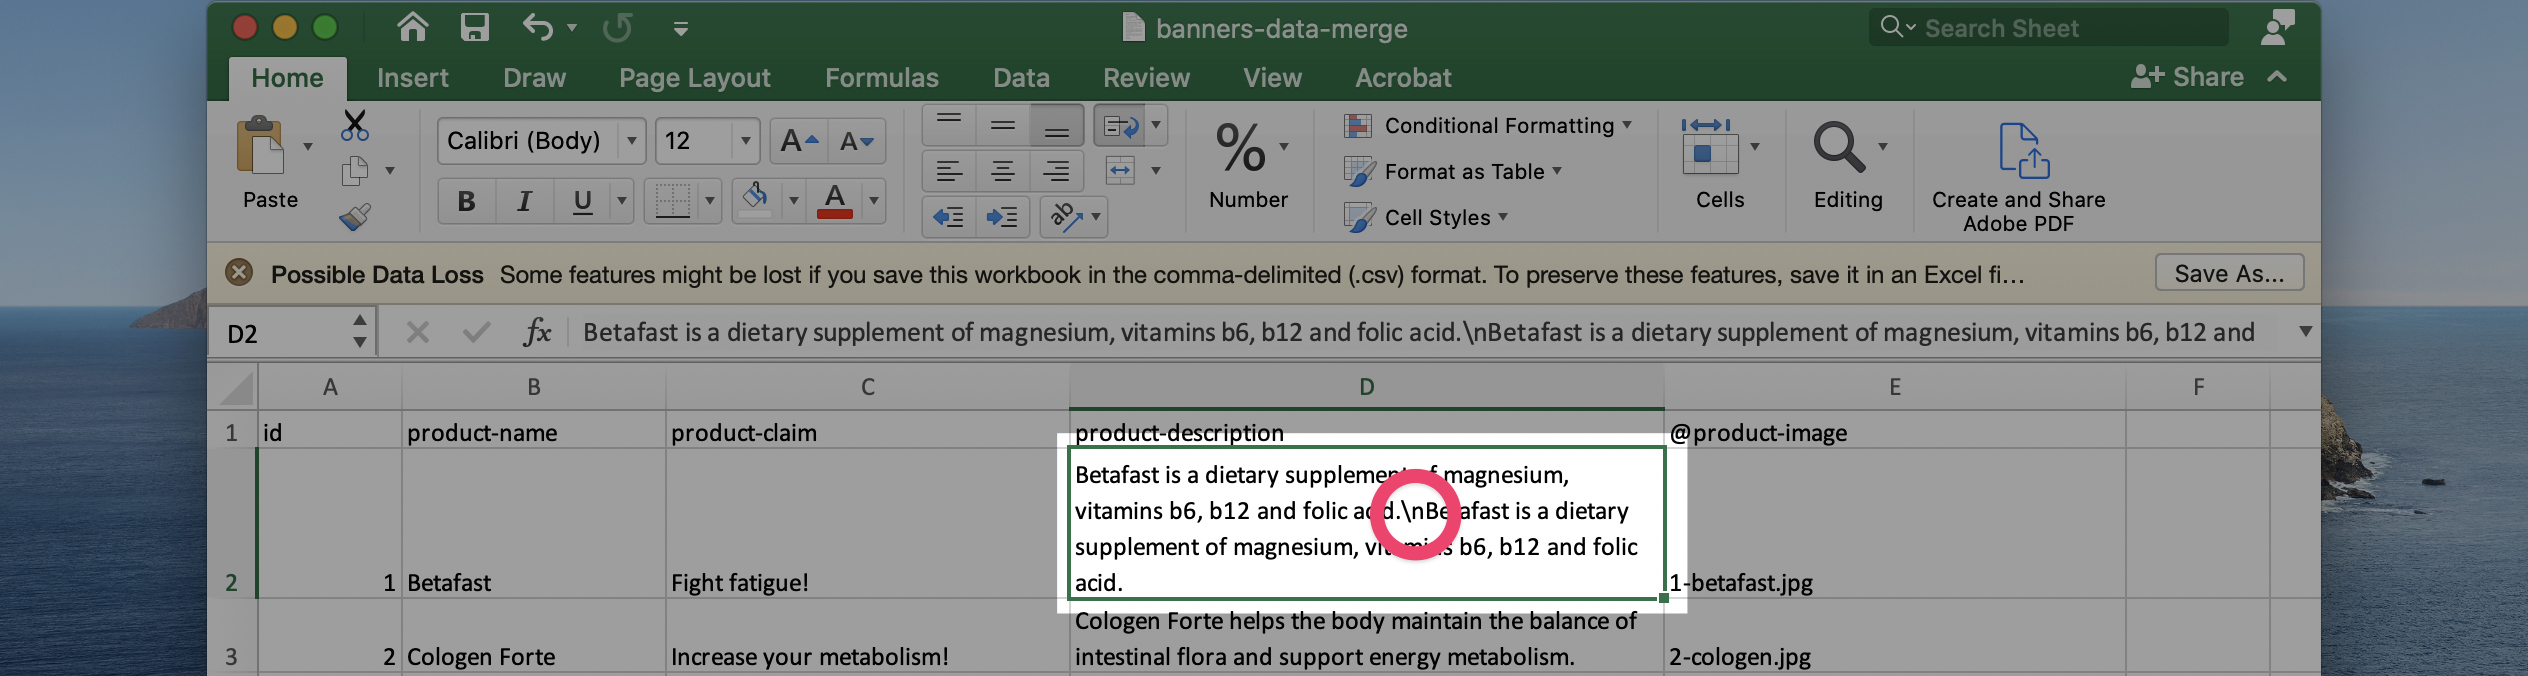
- Complete the data merge.
- Open the InDesign Find/Change (Edit > Find/Change). In Find what: type \\n and in Change to: type ^p. Click on Change All. InDesign will replace each \\n with a new paragraph.

Use a single box of text (when possible)
You probably already noticed that I used one single box of text in my example.
Inside I pasted three different types of data. I did this for several reasons:
- One of the first two text could take more than 1 single line.
- I might want to edit the space between the different parts of my banner.
If you brake the text into many boxes of text, you won't have anymore the same level of control over your design.
Use "space before" and "space after"
Instead of creating many different boxes of text, you can use the Space Before and Space After of the Paragraph Style. You'll find them inside Indents and Spacing.

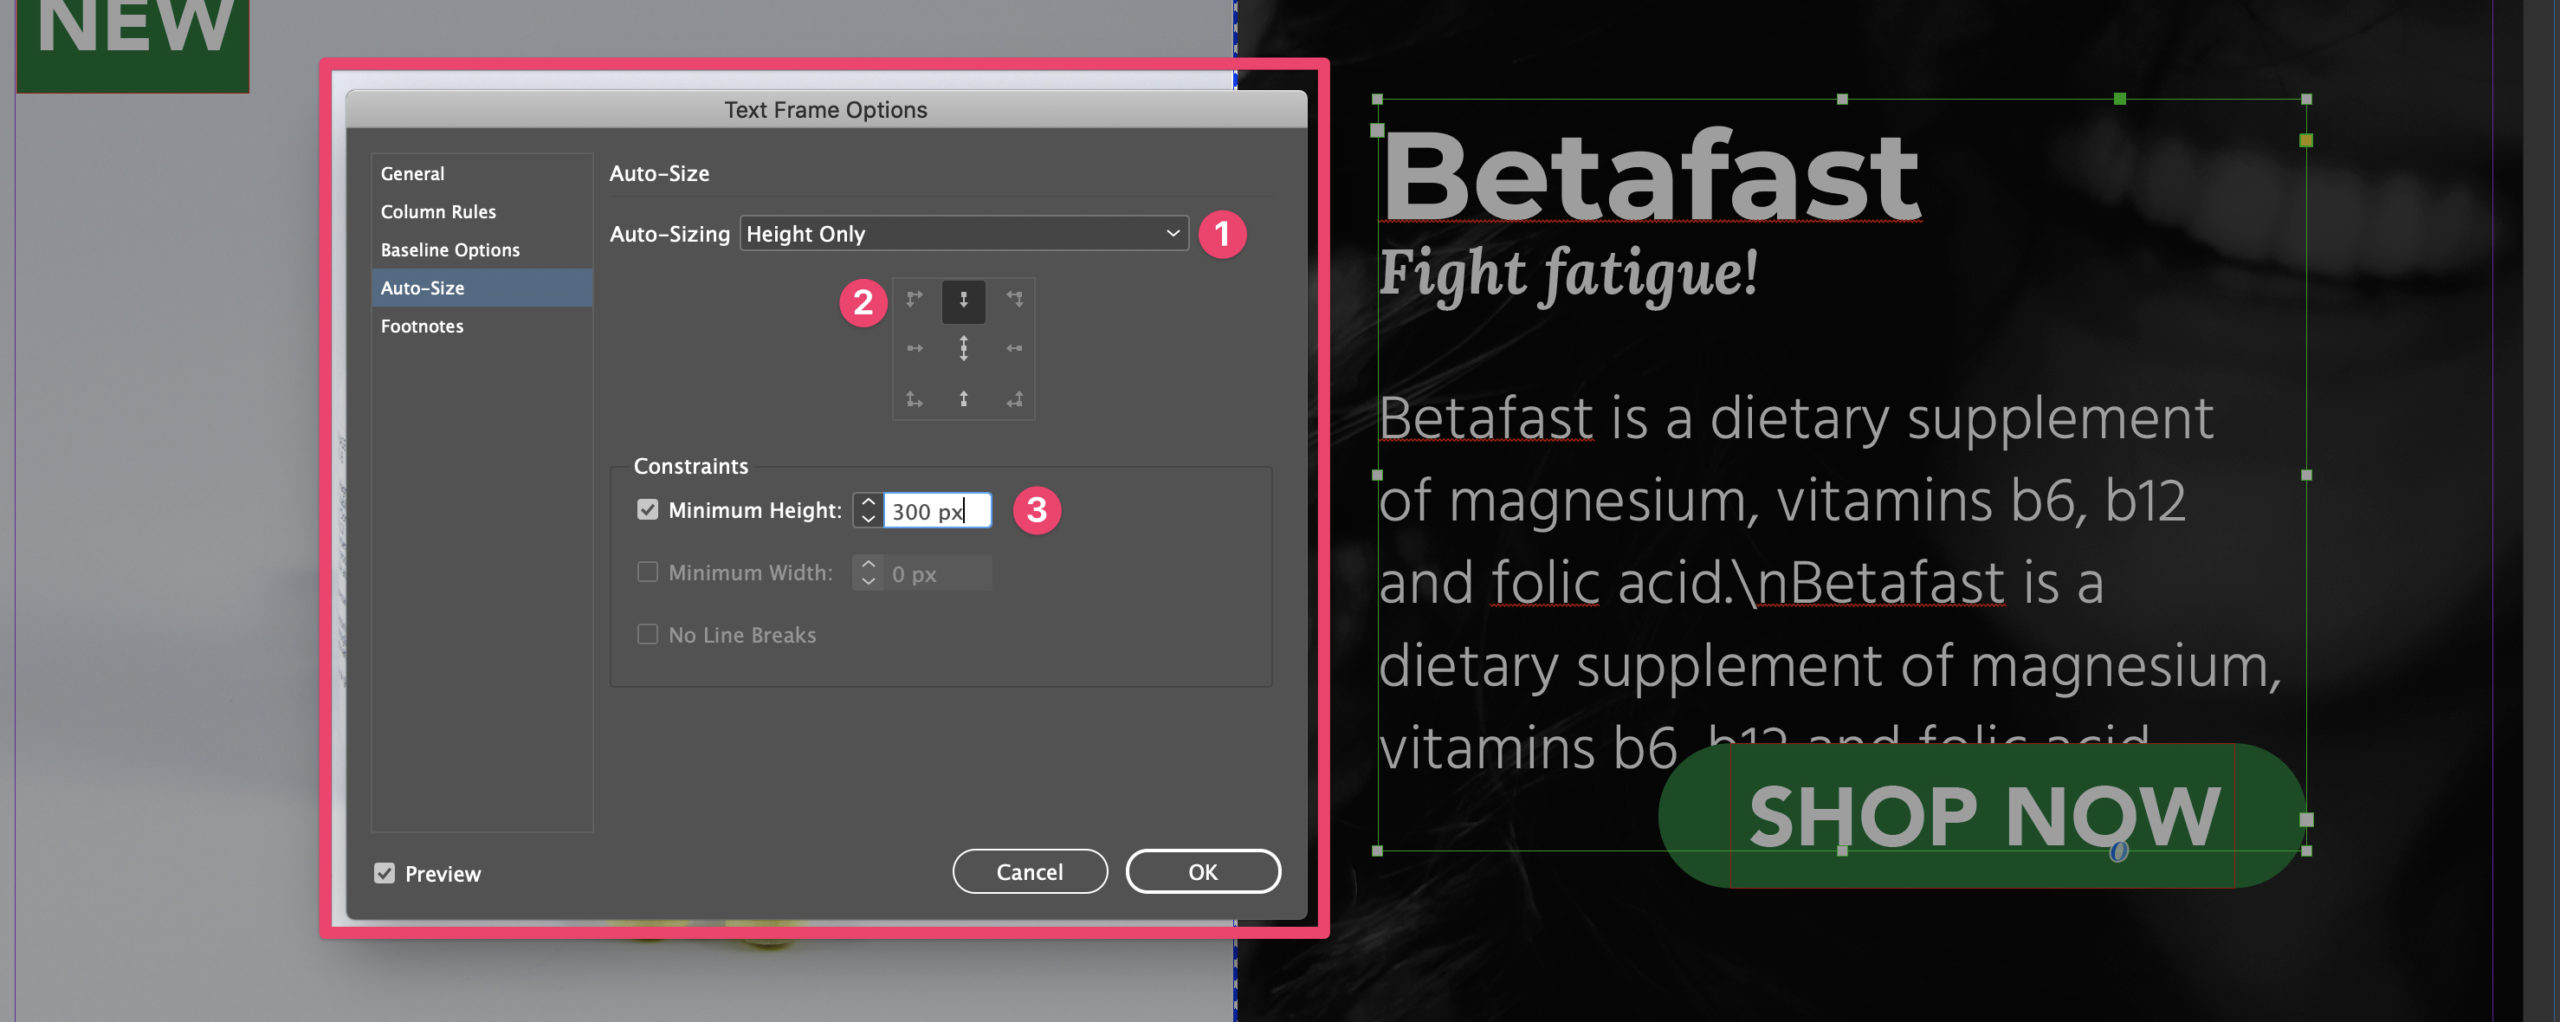
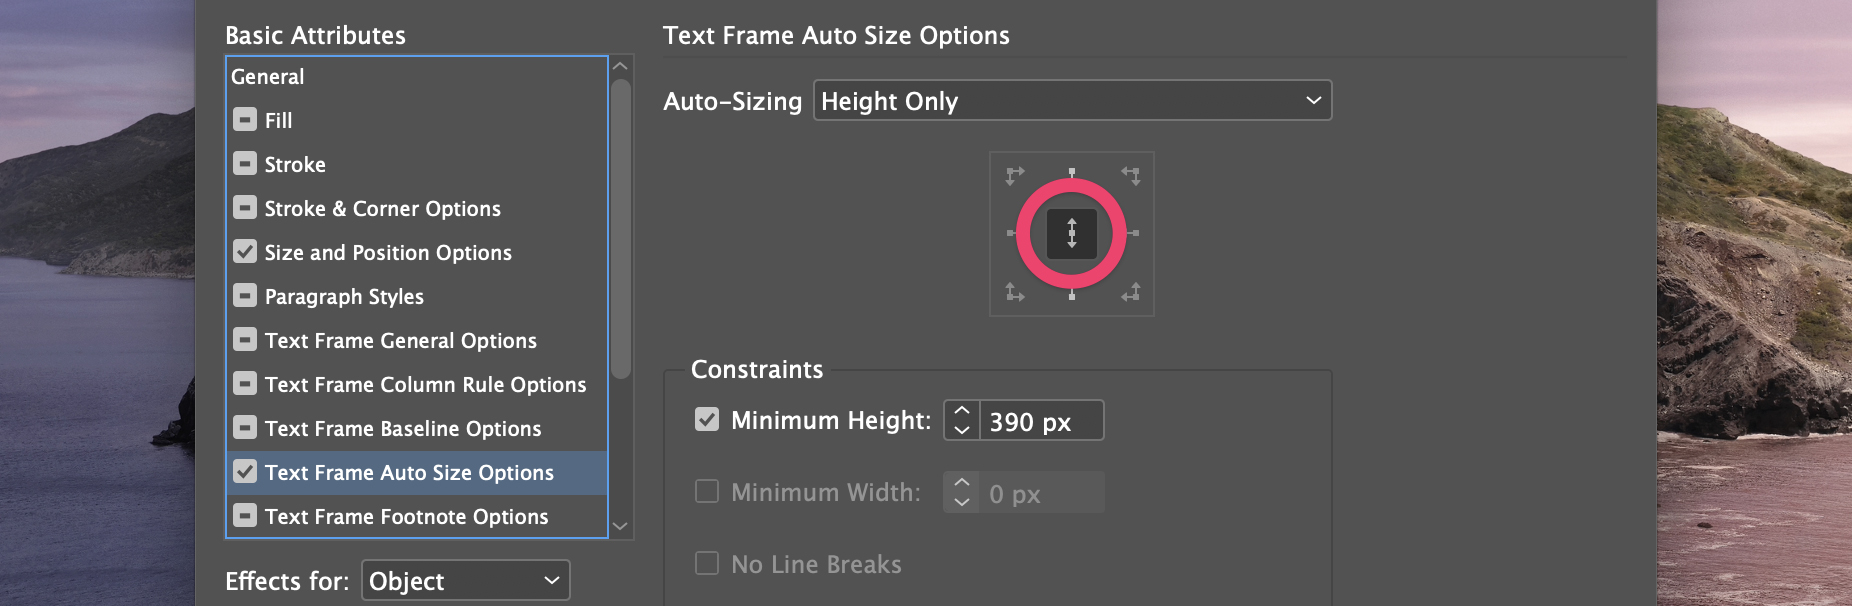
Automatically adjust the text box dimension
To automate the process even further, you can set up your text boxes to resize:
- Select the text box.
- Right-click an select Text Frame Options....
- Click on Auto-Size and edit the settings inside the window. You can select how you want to resize the text-box (1), you can set up the reference point (2), and in this case, I want to set up the Minimum Height as well (3).
Set position (and dimension)
This part is REALLY useful for the level of automation we want to achieve with this guide. But it requires you to deal with some advanced features. Don't worry! I'll try to make them very easy.
We just saw how you can tell InDesign to Auto-size a text-frame.
This is a great feature. But it becomes even better when you also set the position. Size + position is everything in a layout.
To do this, we need to create an Object Style (Yeah! InDesign is full of styles!).
The logic behind Object Styles is the same as the one behind Paragraph Styles. We saw at the beginning of the post how you can create a Style from scratch (click on the New Style icon) or starting from an already formatted element.
I'll start from my main text-box, so:
- Open the Object Styles panel (Window > Styles > Object Styles).
- Select the text-box (1) (if your layout is similar to mine) and click on the New Style icon (2).
- A new object style is created (3). Double click on its name to open the Object Style's settings (4).
- Deactivate all the attributes (5). Leave active only Size and Position Options and Text Frame Auto Size Options. These are the two features we will deal with.
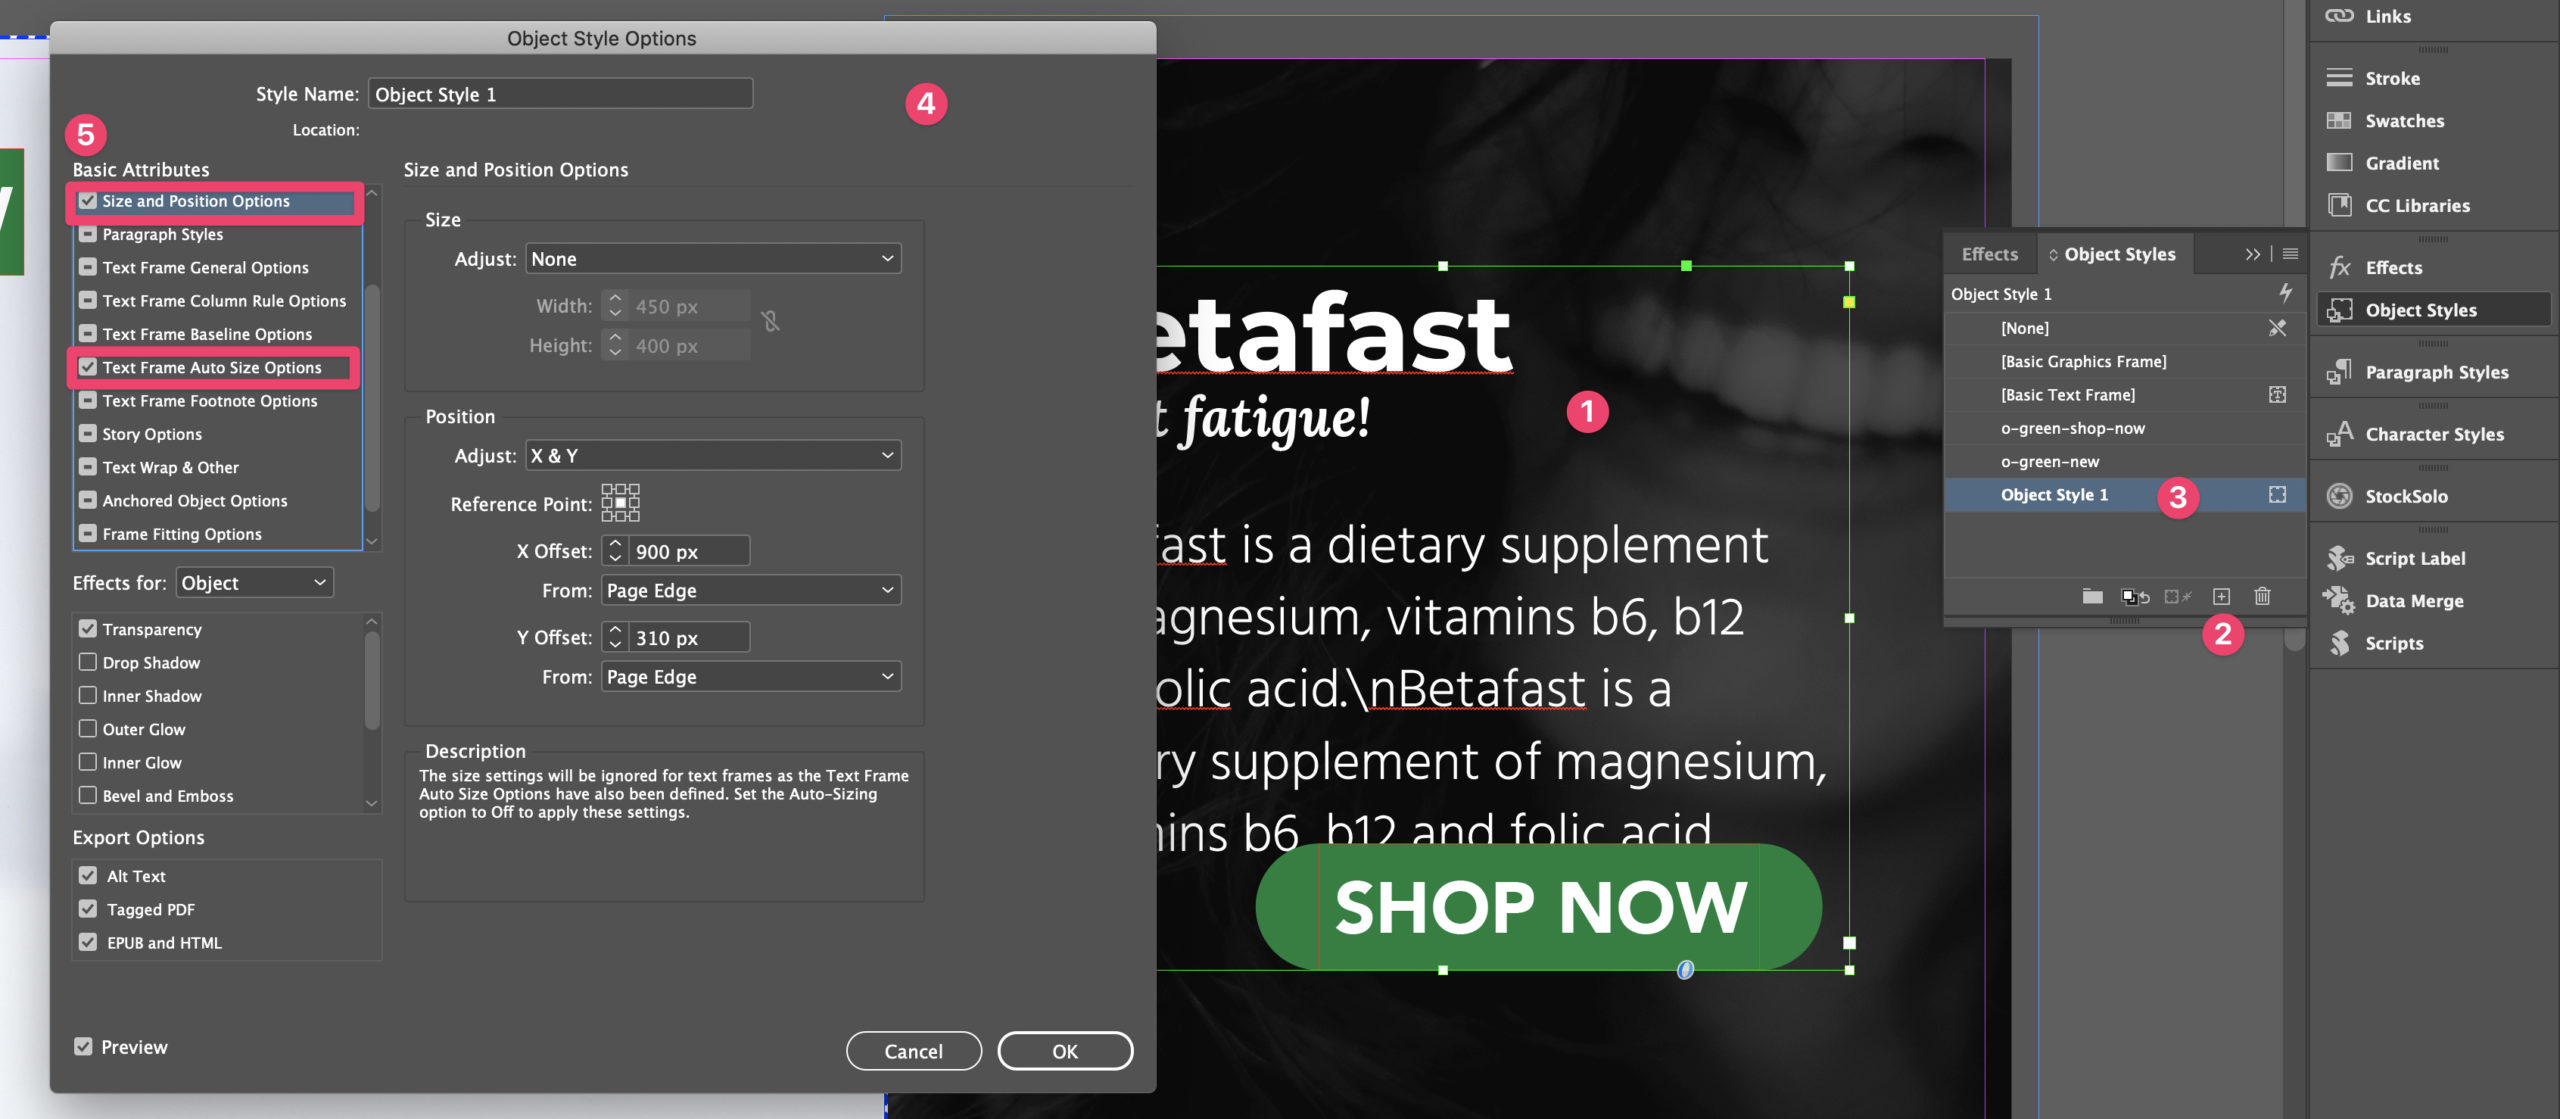
- Inside Text Frame Auto Size Options (that we already set up in the previous section), I suggest that you change the Reference Point so that the Text Frame resizes in both directions (top and bottom).
- Inside Size and Position Options, I suggest that you set the Reference Point in the Center (as it is in the screenshot), and play with the settings X Offset and Y Offset until the text-frame is placed in a position that allows it to expand to the top and to the bottom (I'd say slightly above the center).
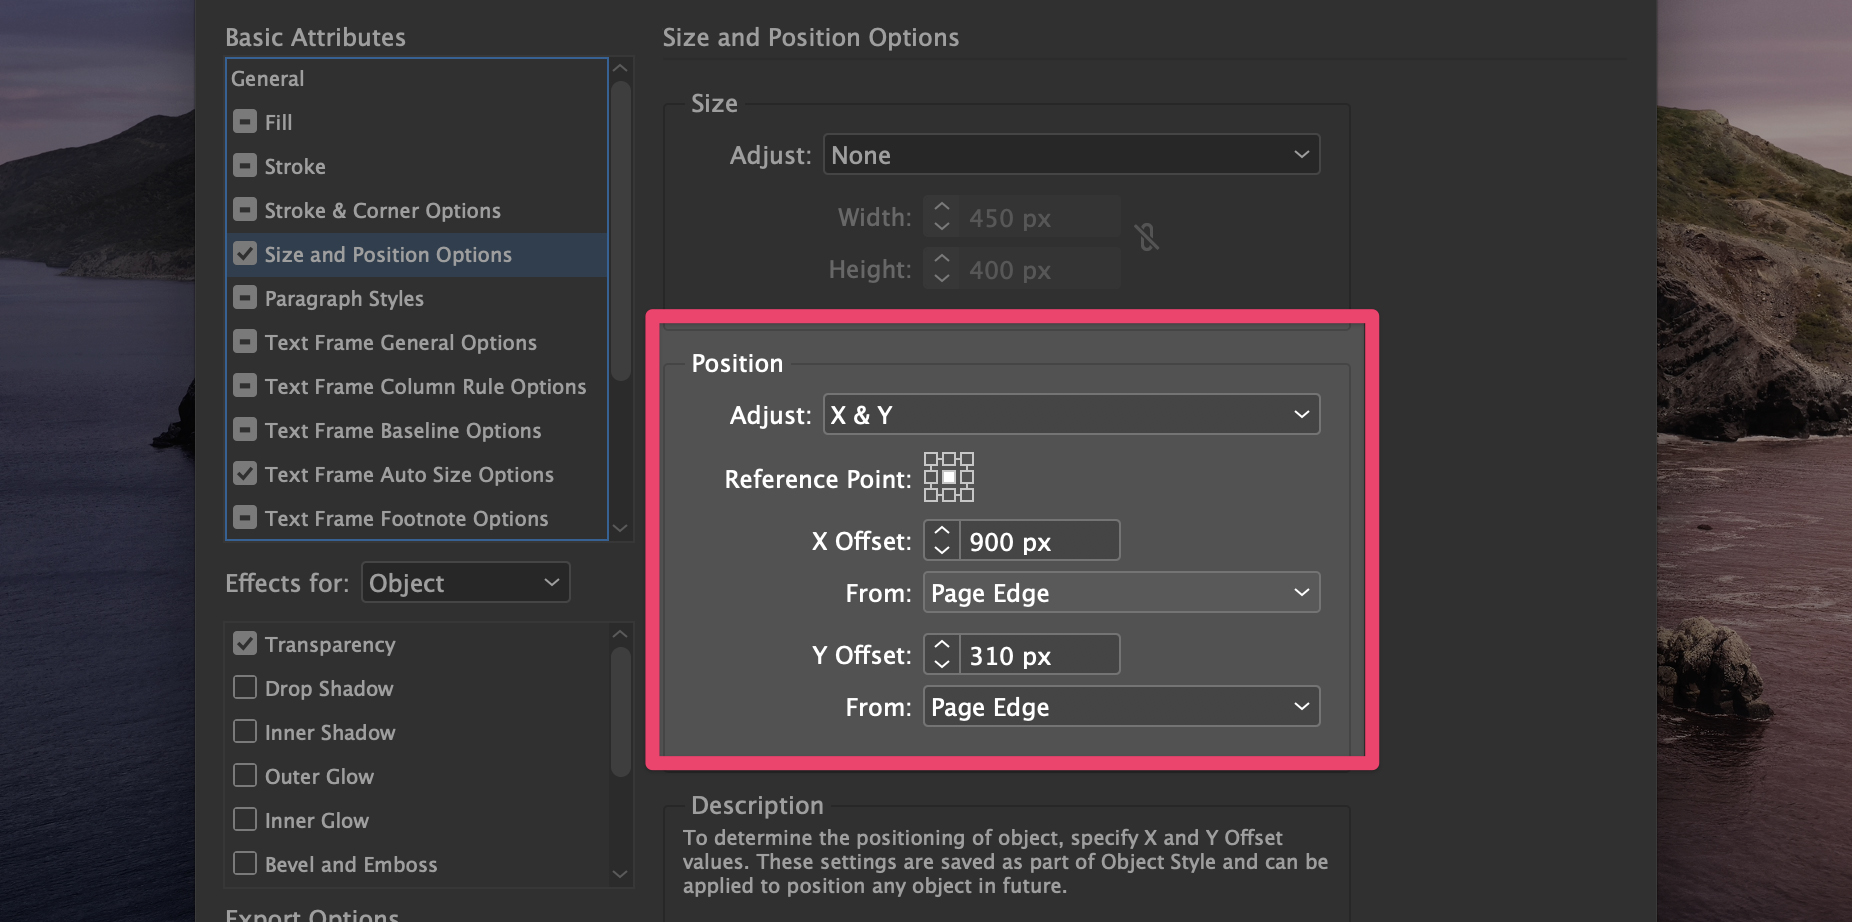
After you set up the Object Style in this way, you can click Ok to save these settings and you can apply the style to the text-frame (Select the text frame, click on the name of the Object Style).
This way, when you generate all the different banners with the Data Merge, InDesign will automatically center the text-box contained in each banner.
💪 Even cooler. The text-box in each banner will have this new Object Style applied. So, if you don't like the resulted banners (after the Data Merge) you can quickly edit the setting in Size and Position Options and update all the banners in seconds.
Deal with tags, labels and buttons
Ok. Let's deal with this immediately. A picture equals 1.000 words.

If you are anything like me, there was probably something that annoyed you throughout the entire guide. I am talking about the green button "Shop Now" I placed in my banner.
That button should somehow adapt its position based on the quantity of text in the text-box, shouldn't it?!
Well, this is what we are learning in this section.
This step should be done before launching the data merge.
My button is special, it can also do this!
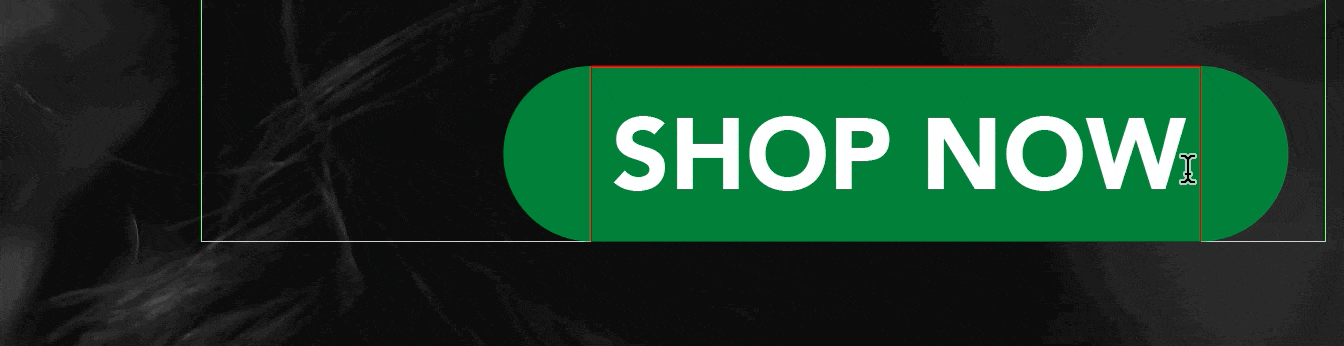
That's a really great trick if you need to:
- translate your document;
- you plan to change your call to action.
So, let's learn this first and then we will cover how to anchor the button to the text-frame as well.
Auto-adapting buttons and labels ("Shop now" and "New")
I already wrote a post on how to create a label that auto-sizes and if you are curious, there you can learn how I came to this solution (and the issues you might encounter with a different solution). Here I'll try to be quicker and give you to the working solution right away.
Let's start by creating a rectangle and then setting it up to auto-resize:
- First, create a rectangle of the right color (green in my case). The width is not important, but make sure the height is of the right dimension.
- Every shape in InDesign can be converted to a text-box. Select the Type tool and click on the rectangle.
- At this point, I suggest that you place some text inside and apply the correct Paragraph Style to the text.
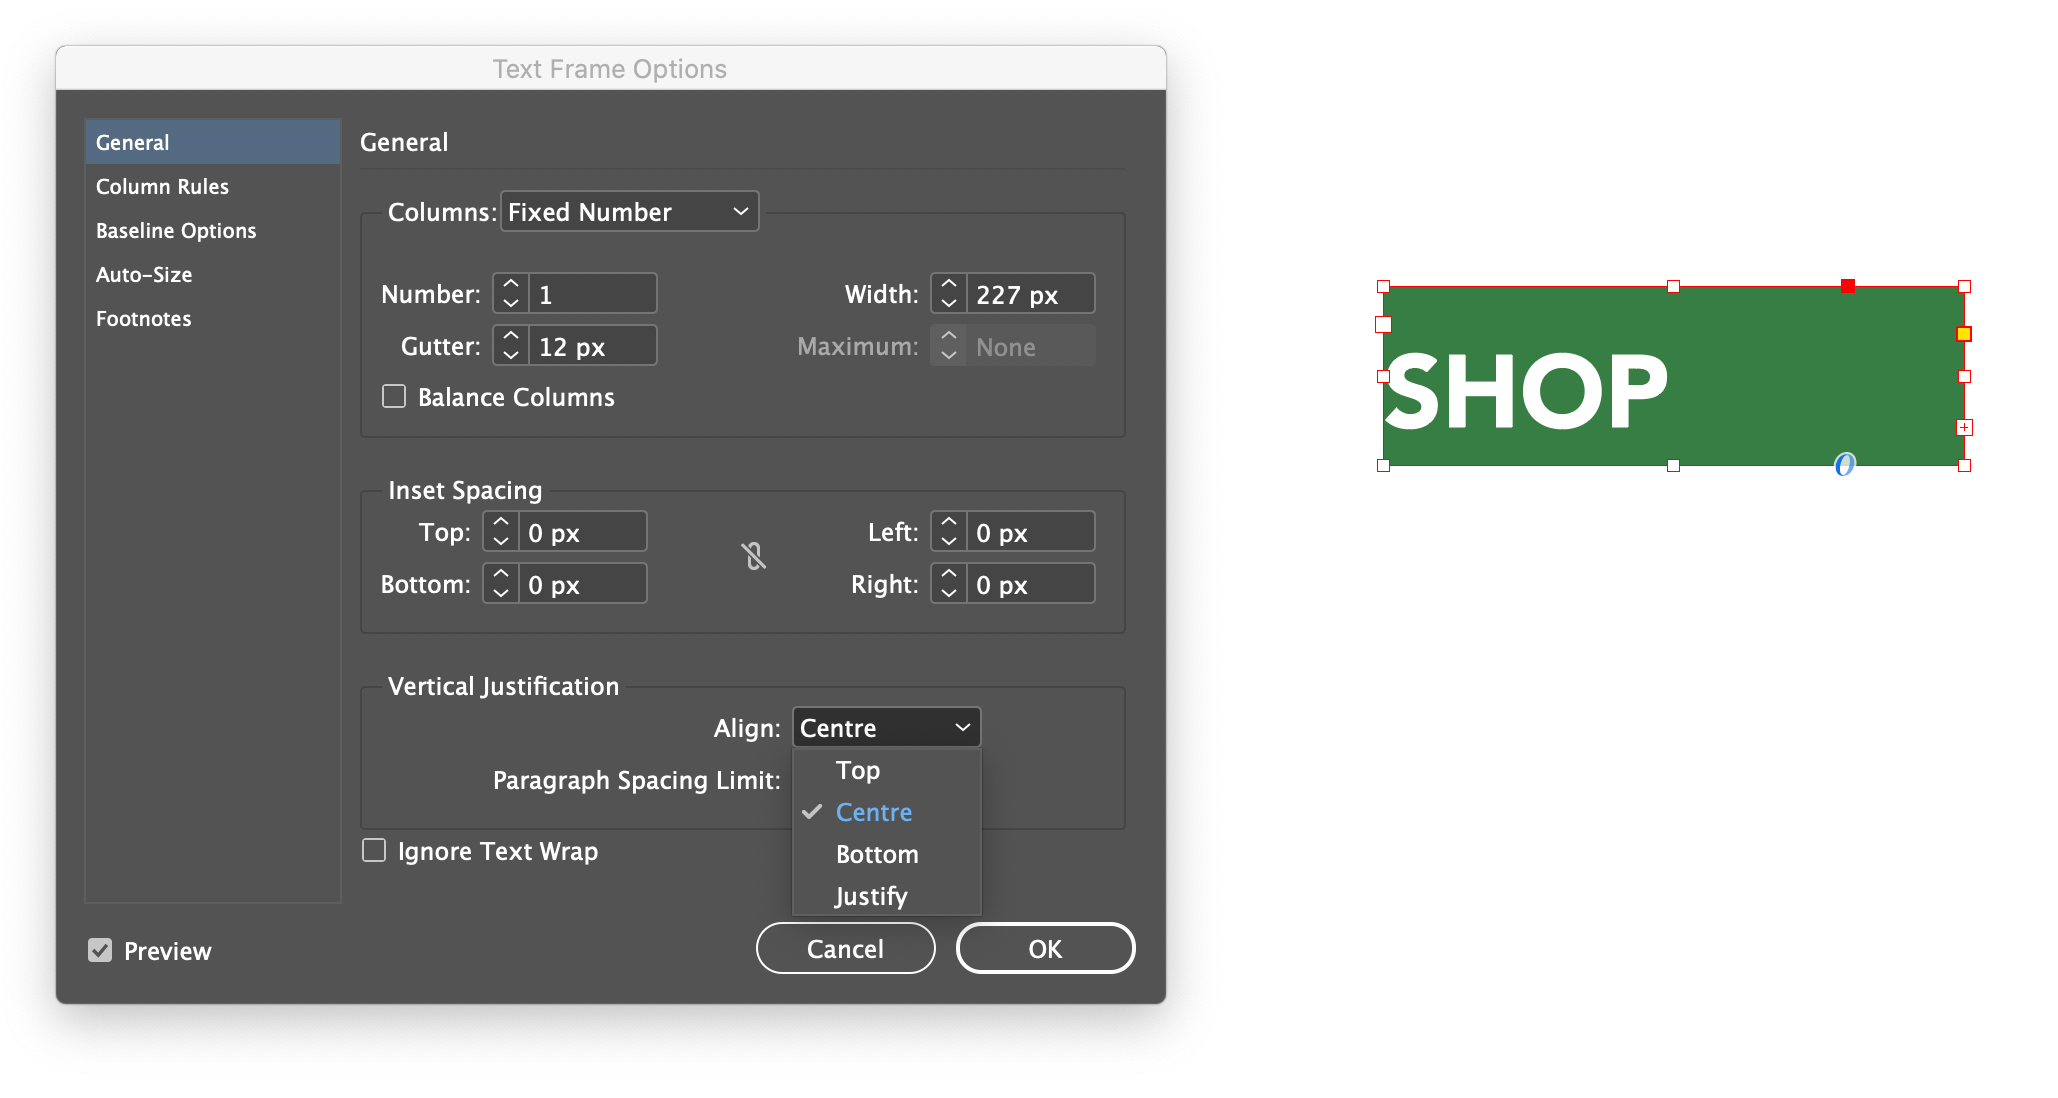
- The text will probably be aligned to the top (and maybe it doesn't even fit inside the rectangle — ignore this for now). Right-click on the rectangle and select Text Frame Options.
- In General set Vertical Justification to Centre. It might be that the text doens't look centred on this step. Don't worry. We will fix this soon.
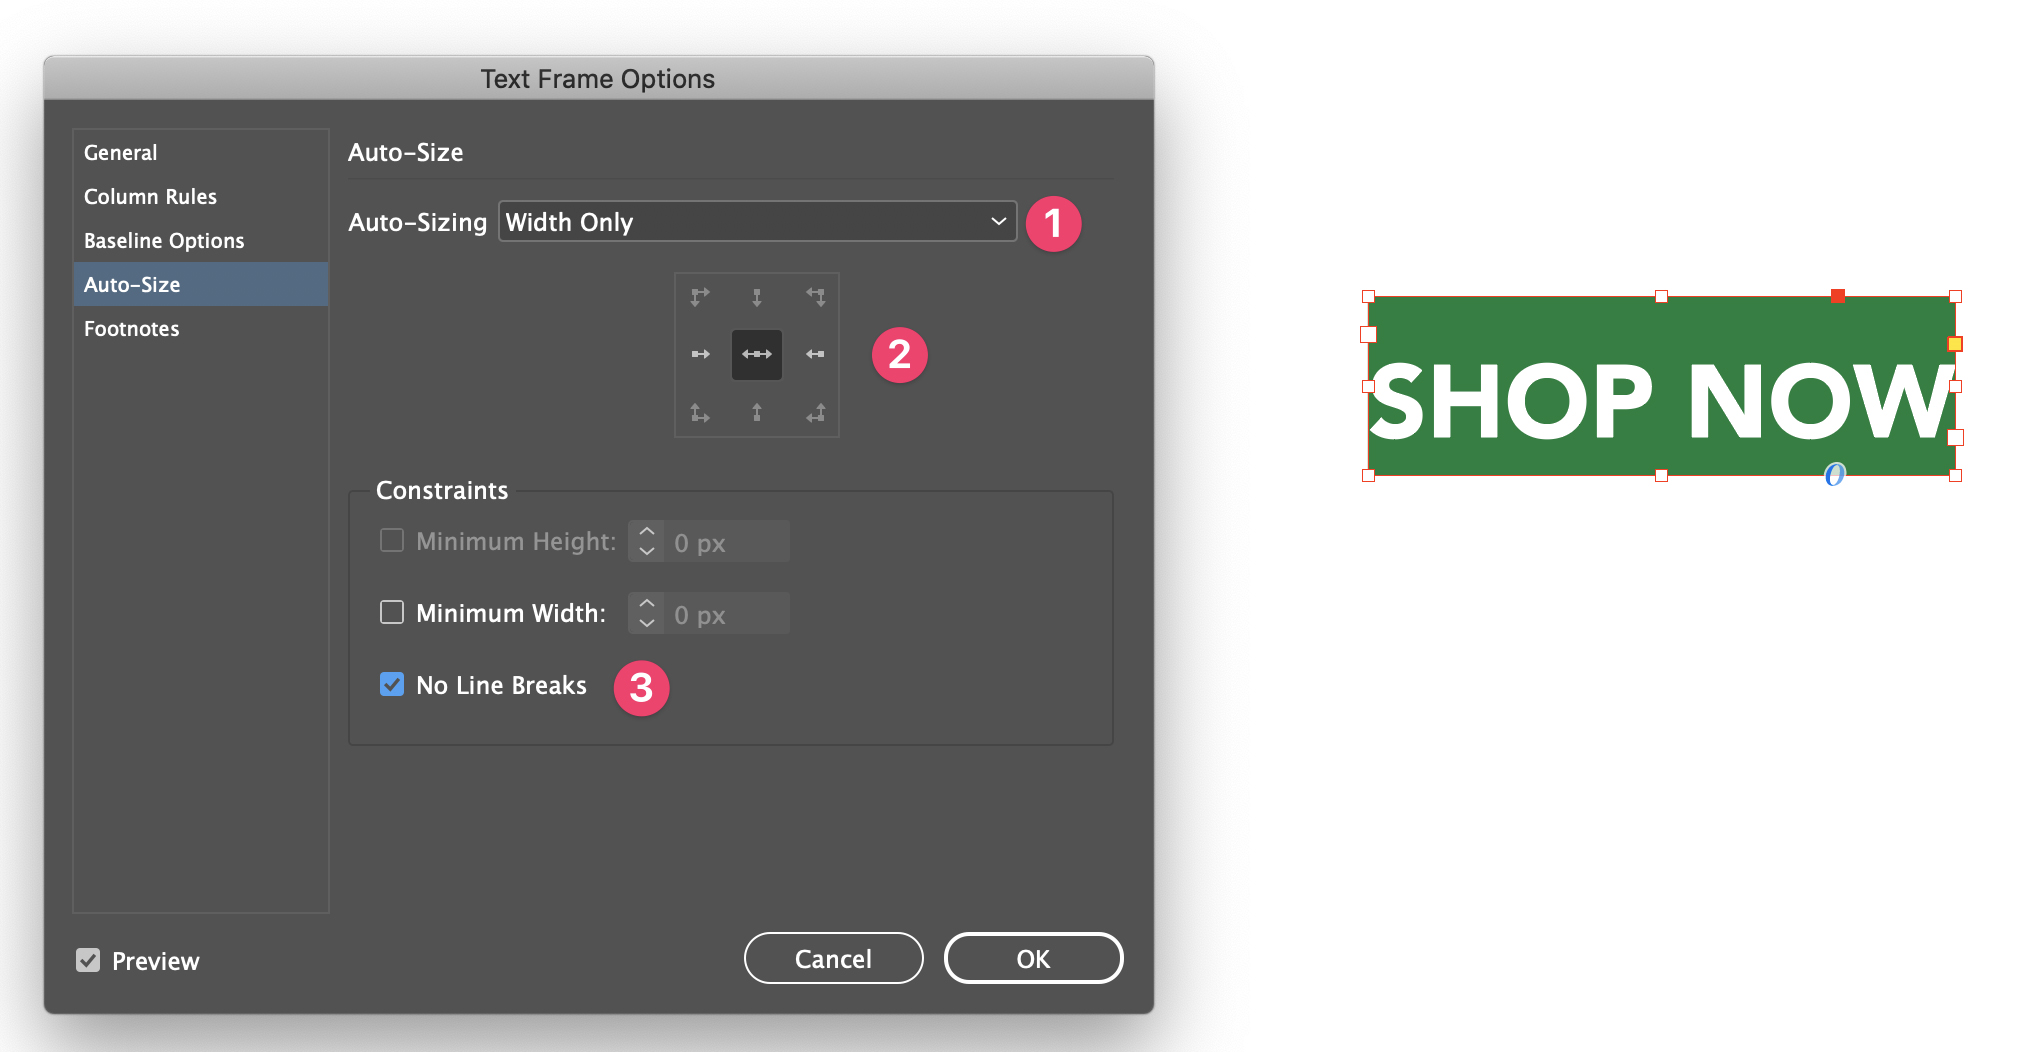
- In Auto-Size change Auto-Sizing to Width Only(1). Select the Reference Point (2). And activate No Line Breaks(3).
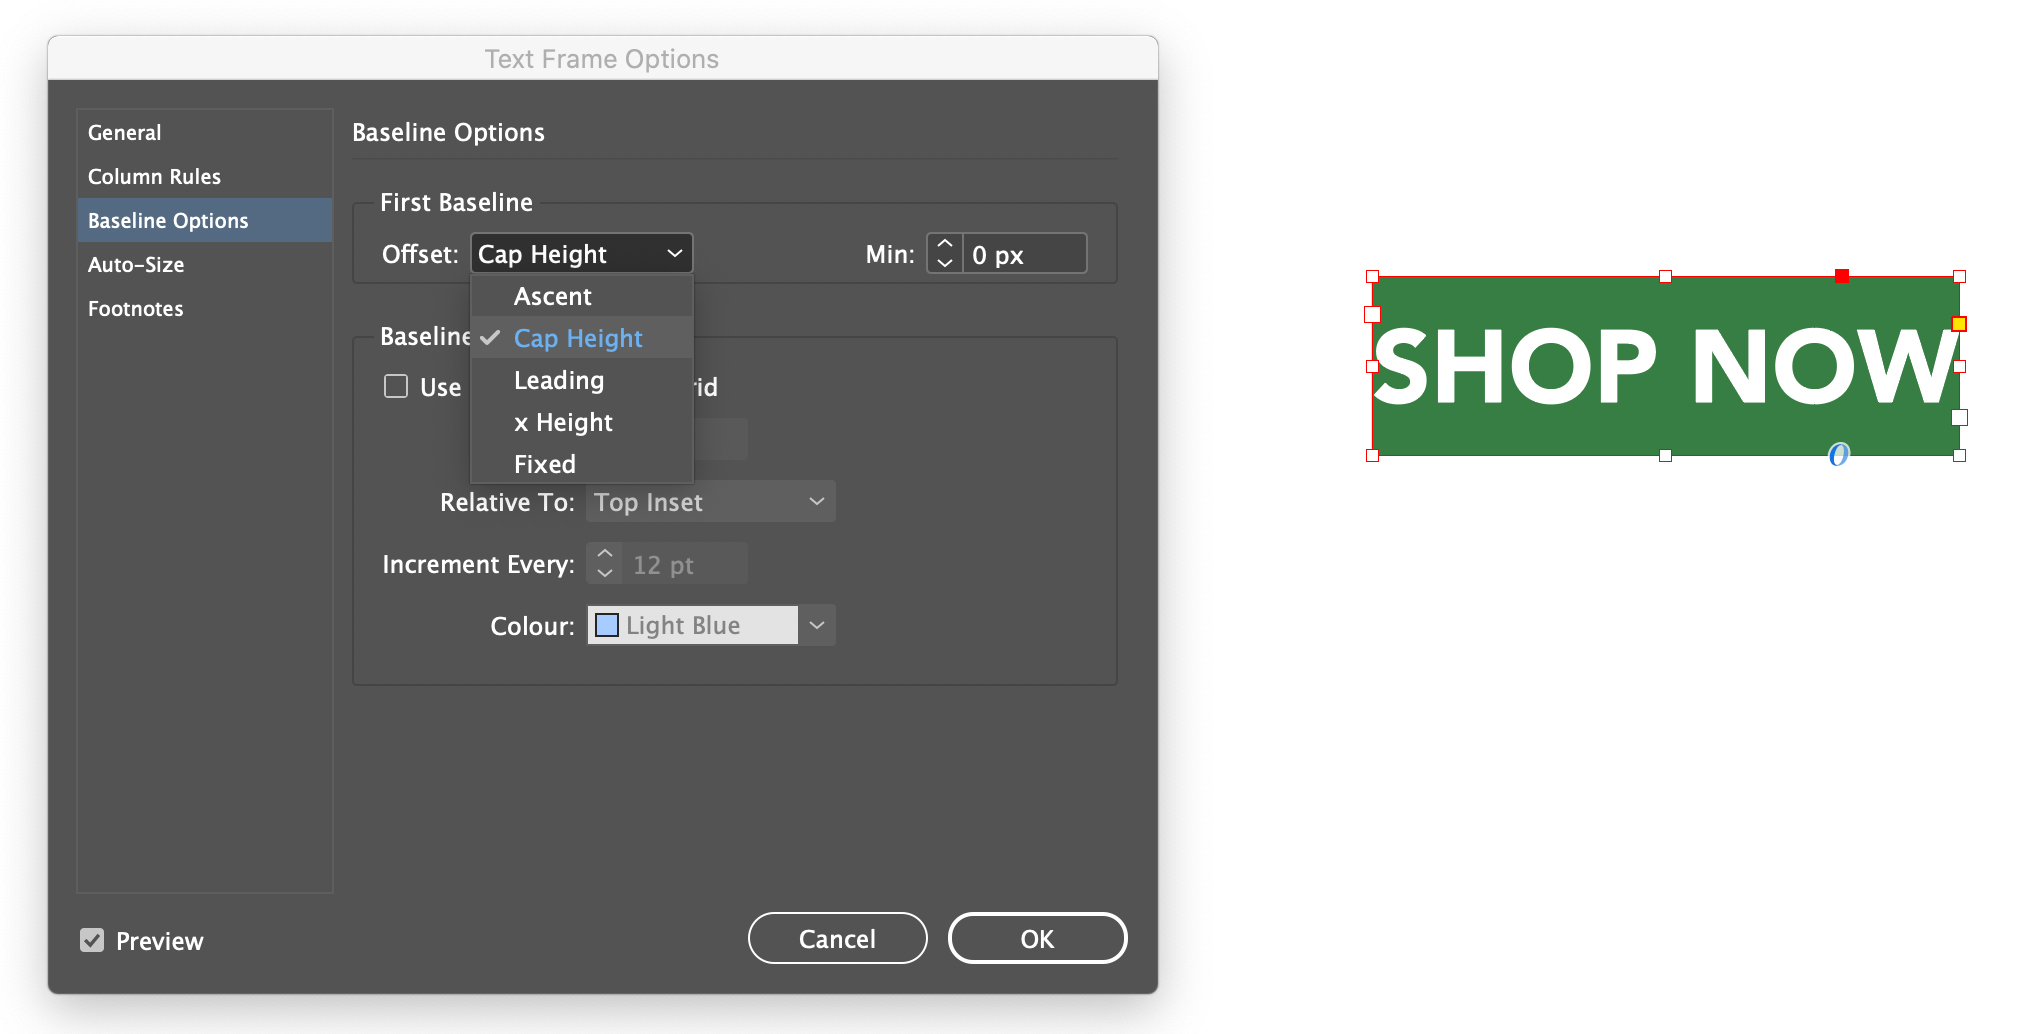
- Now we center the text vertically. Go to Baseline Options and select Cap Height.
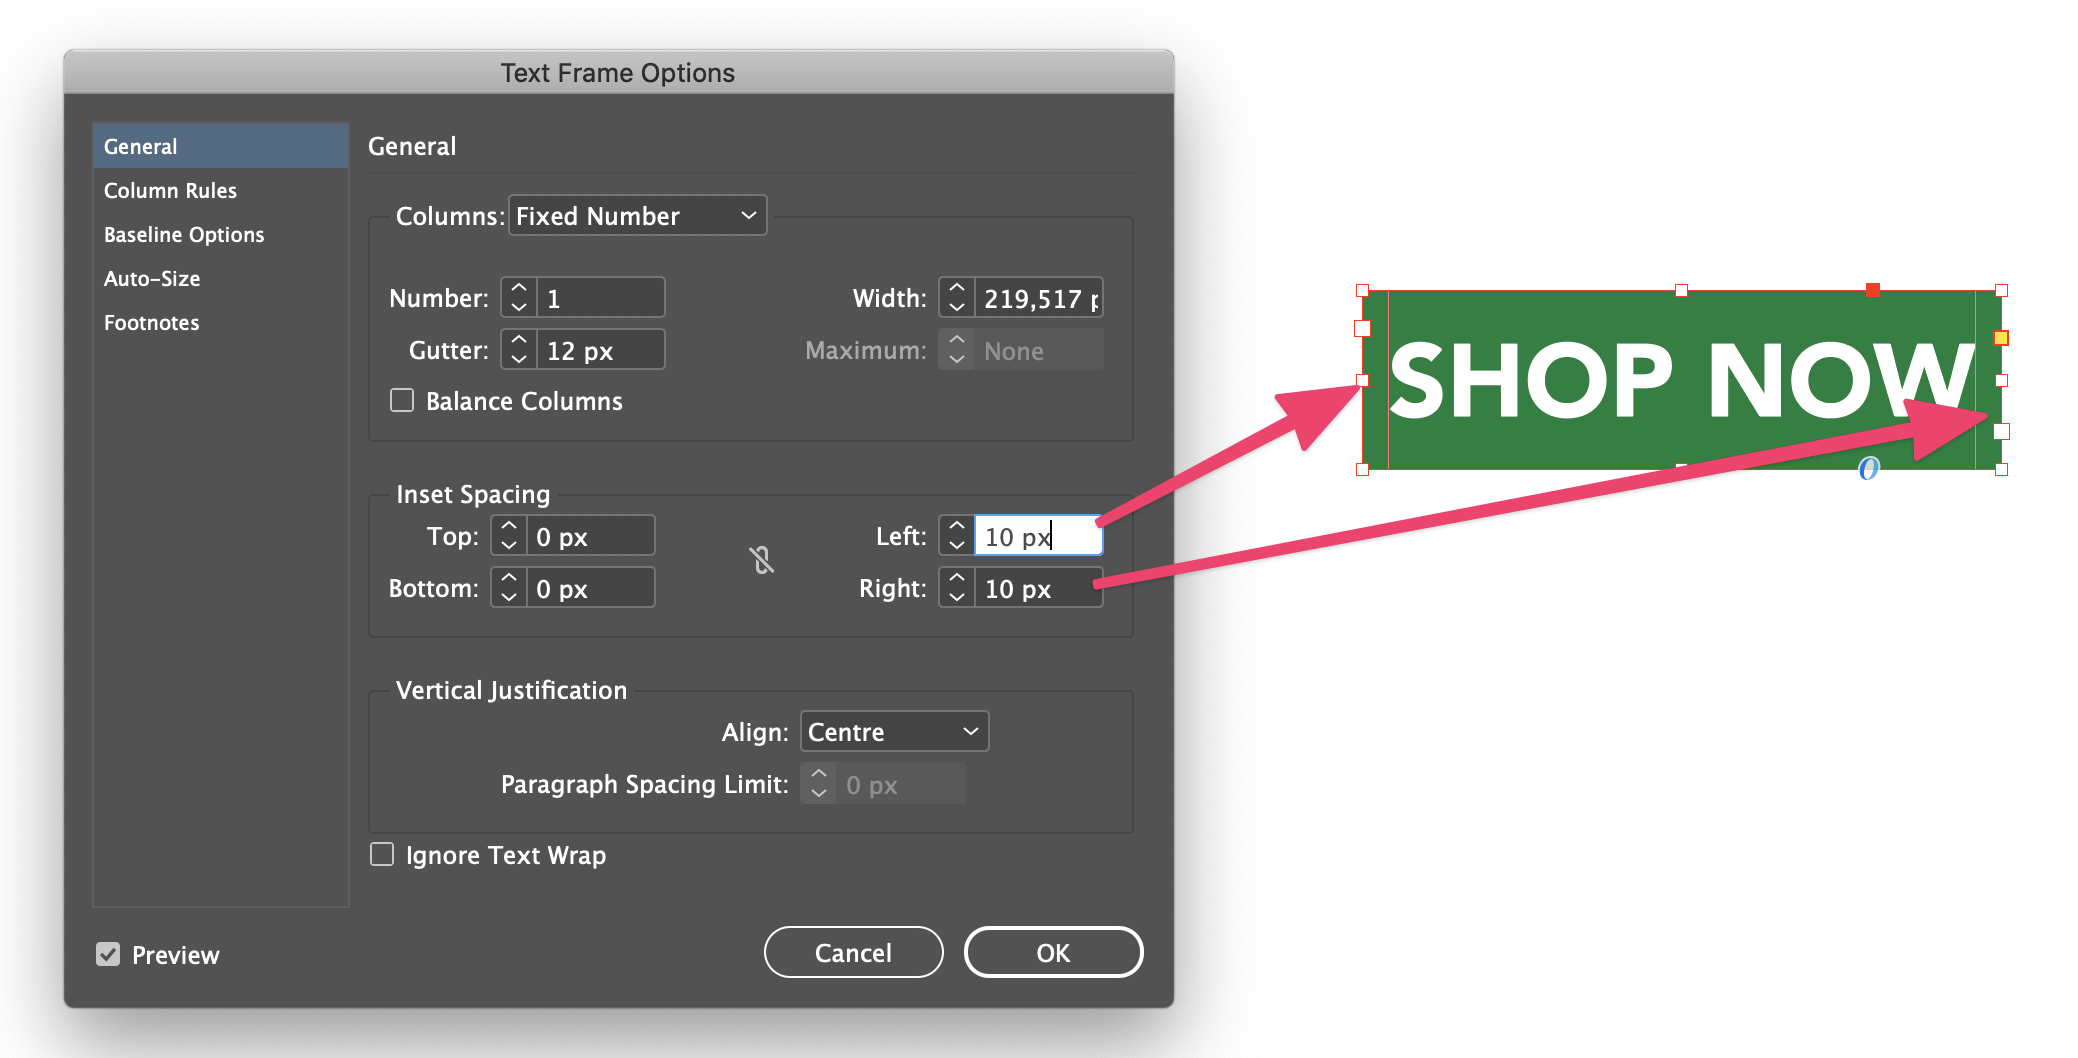
- Now, if you want to add some space on the left and on the right of the text, you can go back to General and edit the value in Inset Spacing.
Perfect. At this point, we have learned how to create the "New" label I placed in my banner layout. And we are half way to fixing the button-situation.
Add a personalized shape to the auto-resize button.
If your button looks like the one above, or you were just creating a label, you can probably stop here. But if you are wondering how you can create a button with a more interesting shape, here is how you do it. Again, for a more in-depth understanding look at how to create a label that auto-sizes.
- Create the shape you want to place on the two sides of the rectangle (in my case they are two semi-circles, but it could be a triangle, an arrow, anything.
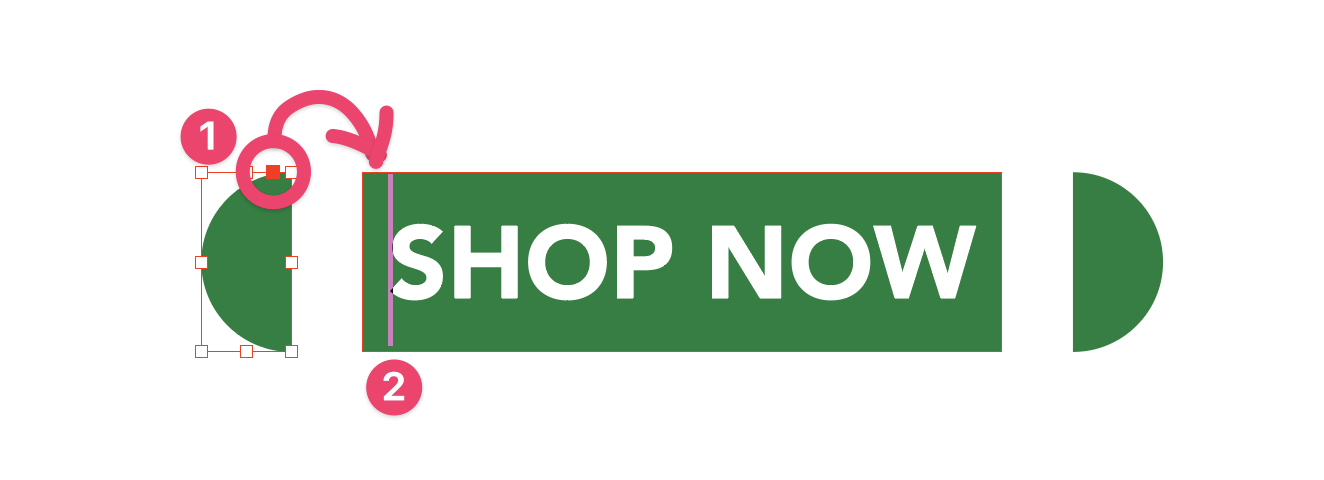
- Select one of the two shapes. At the top, you can see a little square (it's red in my case). Press the Alt key, click on the little square, and drag the square into the text-box.
- As soon as the mouse pointer meets the text-box, you'll see a black line that will follow your movements. That black line indicates where you are placing the anchor. Make sure to place it right at the beginning or right after the text (NOT in the middle).
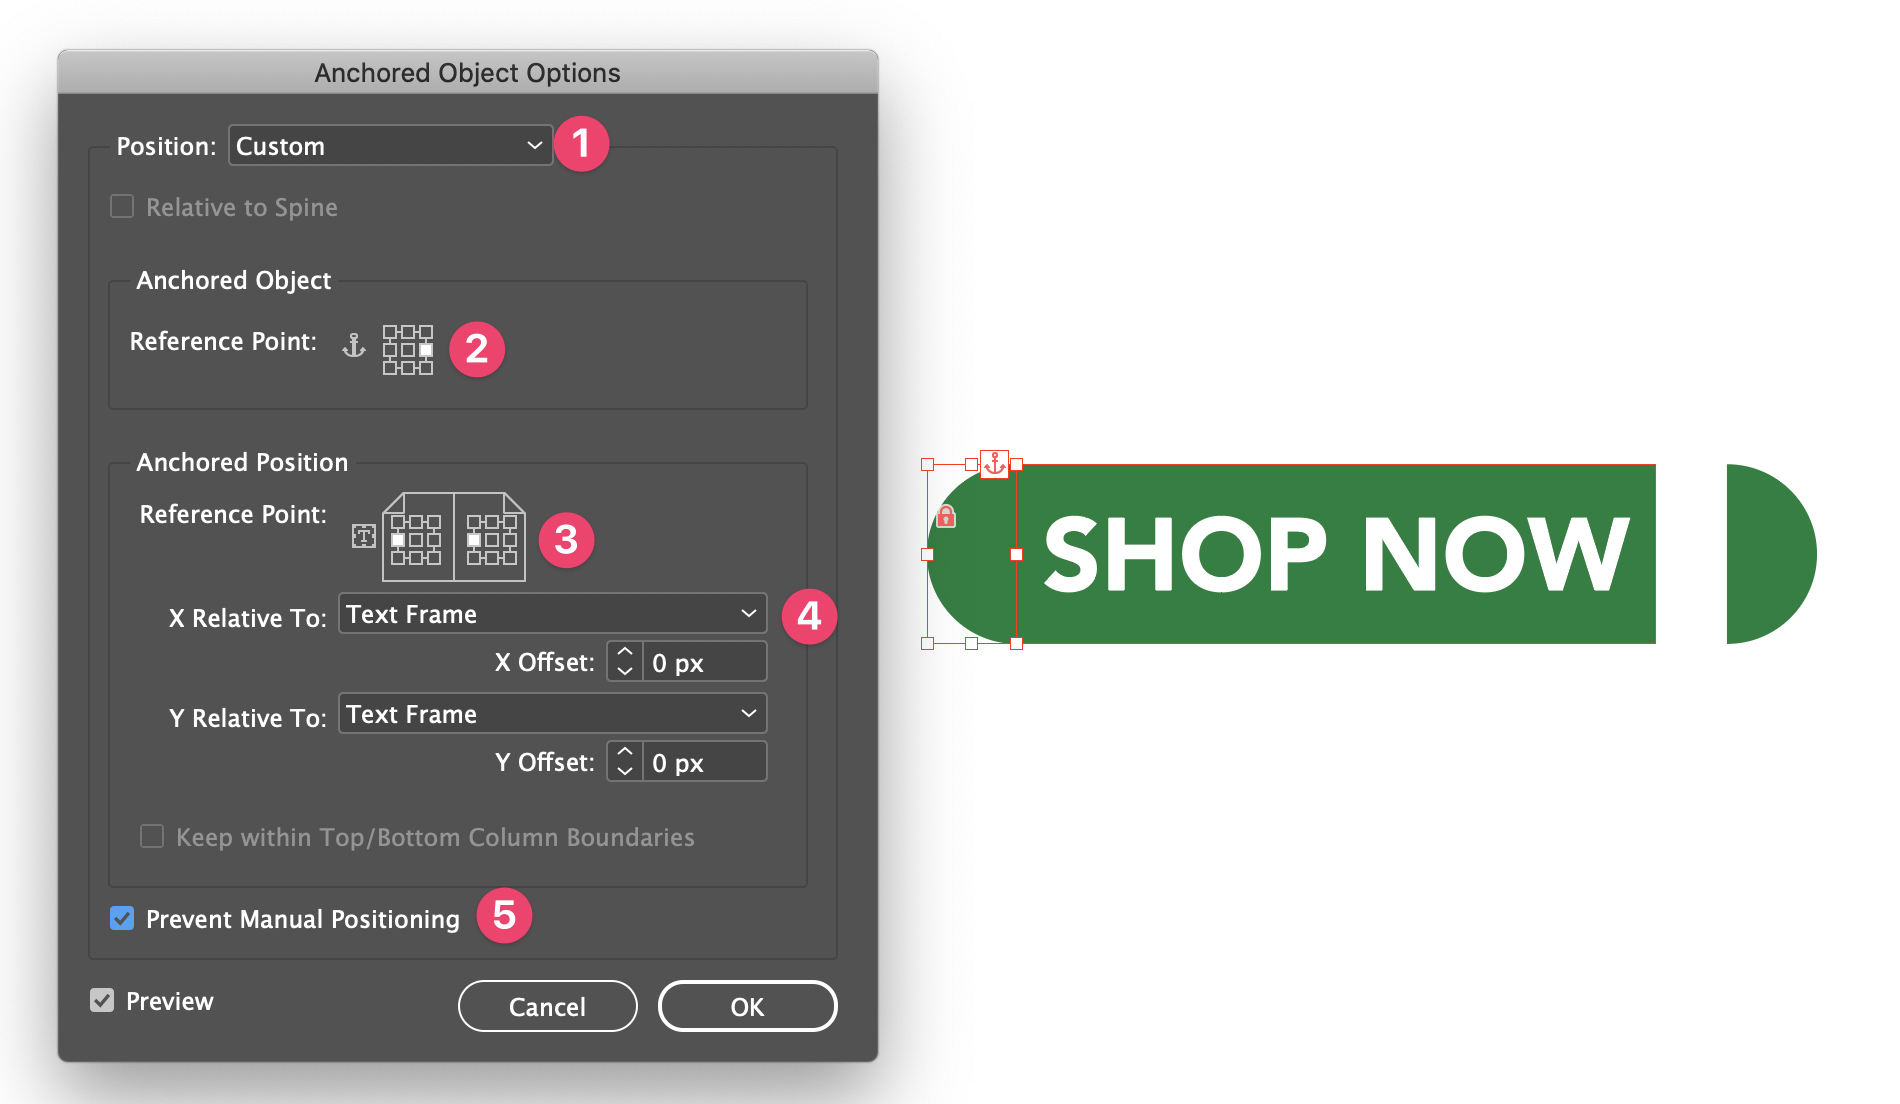
- When you let the click go, InDesign opens a new pop-up. This pop-up allows you to adjust how the anchored object (the triangle) should behave when the text-box changes size or position.
- Let's change the options.
- (1) Set Position to Custom.
- (2) In Anchored Object change the Reference point so that InDesign will use the right-center point of the triangle. On the other side of the button you will probably need to select the left-center (it depends on how you created the shape).
- (3) In Anchored Position change the Reference point so that InDesign will use the left-center point of the rectangle to position the triangle. On the other side of the button it might be different (it depends on how you created the shape).
- (4) Change both the options for X Offset and Y Offset to Text Frame and 0 mm, in this way, the triangle will be attached to the text-box.
- (5) Finally, activate Prevent Manual Positioning to make sure nobody can manually change the position of the triangle.
- Do the same on the other side and here you have created the same button I used in my example!
Here is also another solution inspired by my post and beautifully excecuted by Roland Dreger.
Anchor a button
Let's solve the button-situation.
- Position the button where you would like it to be.
- Keep it selected. At the top, you can see a little square. Press the Alt key, click on the little square and drag the square into the text-box.
- As soon as the mouse pointer meets the text-box, you'll see a black line that will follow your movements. That black line indicates where you are placing the anchor. Make sure to place it right right after the text (NOT in the middle).
- When you let the click go, InDesign opens a new pop-up. Click OK.
- Move the button where you would like it to be. Done!

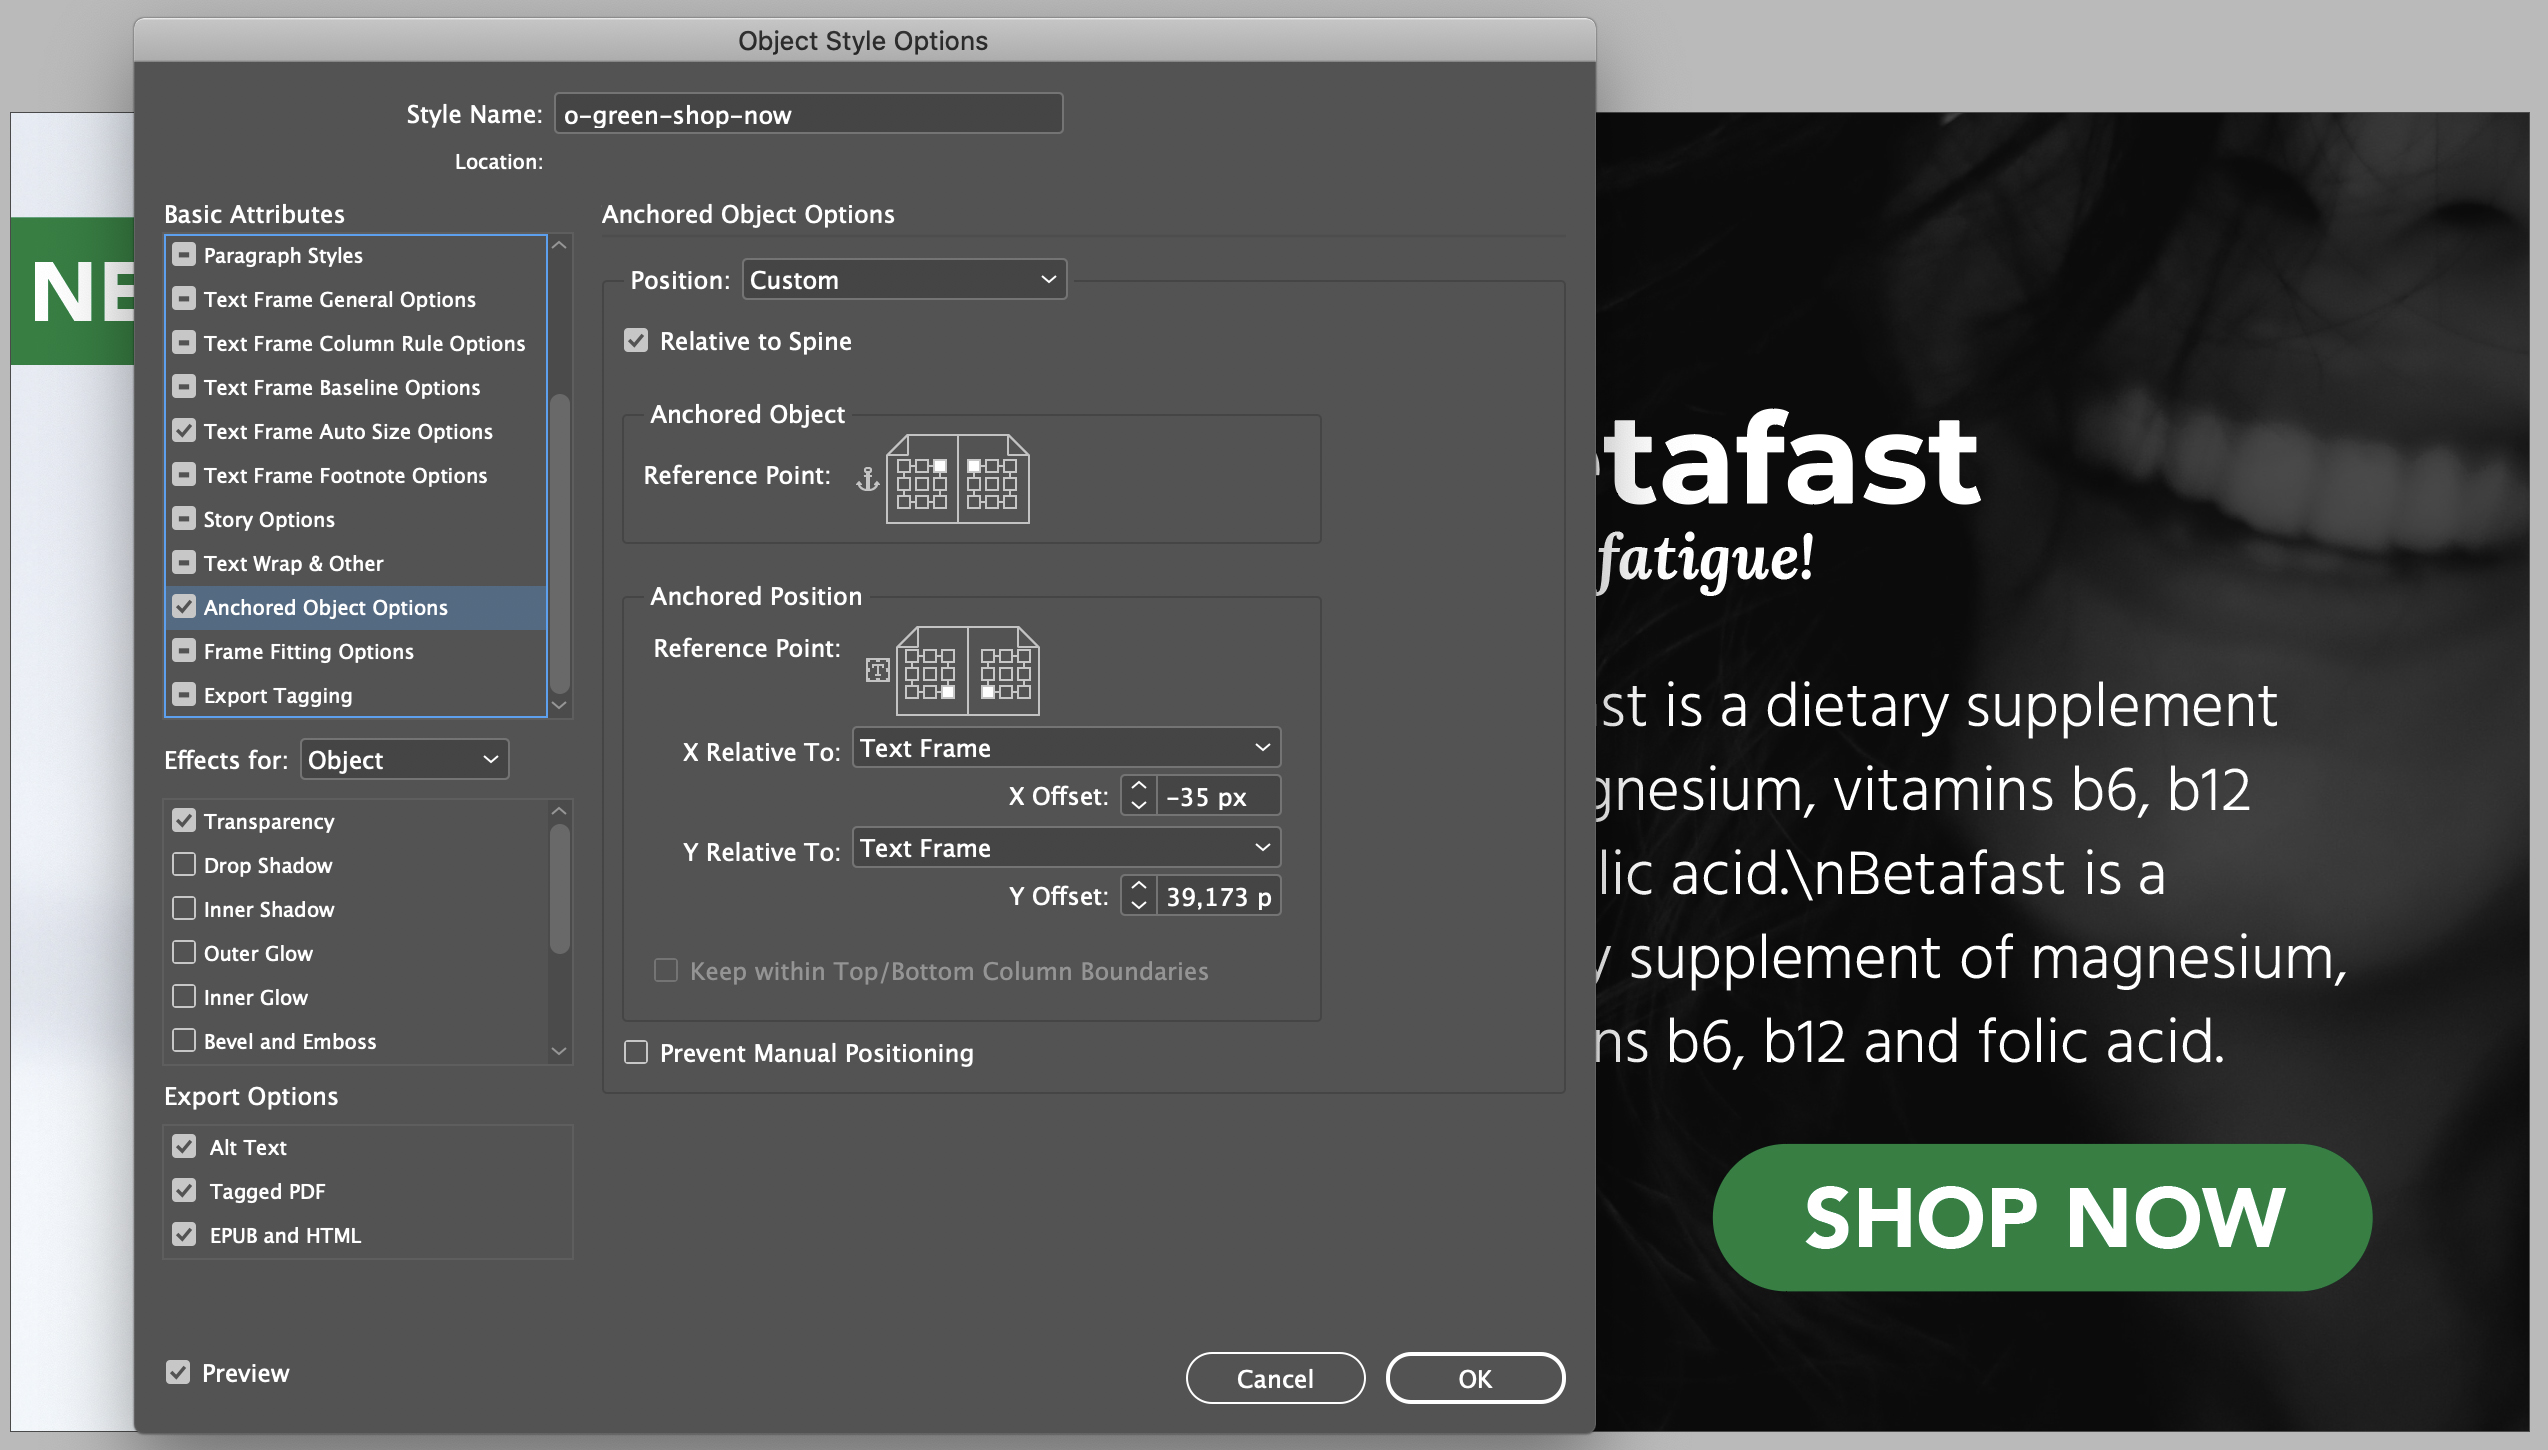
💪 Now, if you want to be a real PRO. Select the button and create an Object Style (we saw how to do that but the next two lines are just about that)
- Open the Object Styles panel (Window > Styles > Object Styles).
- Select the button. In theObject Styles panel click on the New Style icon. Now you have full control of those buttons. You can even change the position of one that bothers you a bit and use the Redefine Style functionality to update the position of all the buttons in all the banners. As a reference, I'll leave below the button's settings.
Create banners in many languages
Everything we talked about before this section is fundamental if you want to structure an efficient workflow. This is especially true when you are going to produce these banners in several languages.
Why is that?
Pretty simple. Either you do the translation manually and waste days — or you automate it.
And as we've seen in the first part, automation requires that the InDesign file is set up in the proper way.
So, everything you've read and learned above is extremely useful when you plan to automate the translation part as well.
Why should you automate the translation process?
Besides making everything faster, automation helps you:
- avoid mistakes! (copy/paste is the worst);
- re-use the same translations / terminology;
- control / edit / update the terminology used;
- lower the cost;
- I'll say it again, in a better way — time-to-market!
Sounds amazing, right?! It is.
What's in this section?
In this part I'll show you:
- how your team can translate the documents online or offline;
- how to deal with edits and changes;
- how to control the terminology.
Translate the banners
At Redokun, we built a tool that makes it easy to produce InDesign documents in many languages.
The best part is that it's super easy to use and it integrates immediately into your workflow:
- Upload the banners we just created in Redokun.
- Invite your colleagues to translate the banner online.
You can also export the sentences, have them translated and then import the translation.
- Once the translation is complete, download the document and open it in InDesign.
I found a little bug in InDesign. When I opened the translated IDML file, the position of the "Shop now" button was not maintained. If that happen also to you, just quickly edit the Object Style by adding and removing 1 px to the Y Offset (like I did in the video).
How to deal with edits and changes
Edits and updates to already translated documents could take a long time.
Luckily with our new method everything will be handled extremely fast:
- Edit the Prototype.
- Launch again the Data Merge. This will create all the different banners in the base language (in my case English).
- Upload the document in Redokun as a Revision.
- Translate only new text.
- Export the translated IDML.
How to control the terminology
Terminology in marketing is extremely important.
You need to be able to see where you've used a translation and eventually change it locally or globally.
I'll give you a practical example so you can see if this is something that happens also to you.
During the translation of my banner into Italian, I translated "Shop now" with "Acquistare ora". Without giving you an Italian lesson, let's just say that I don't like this translation.
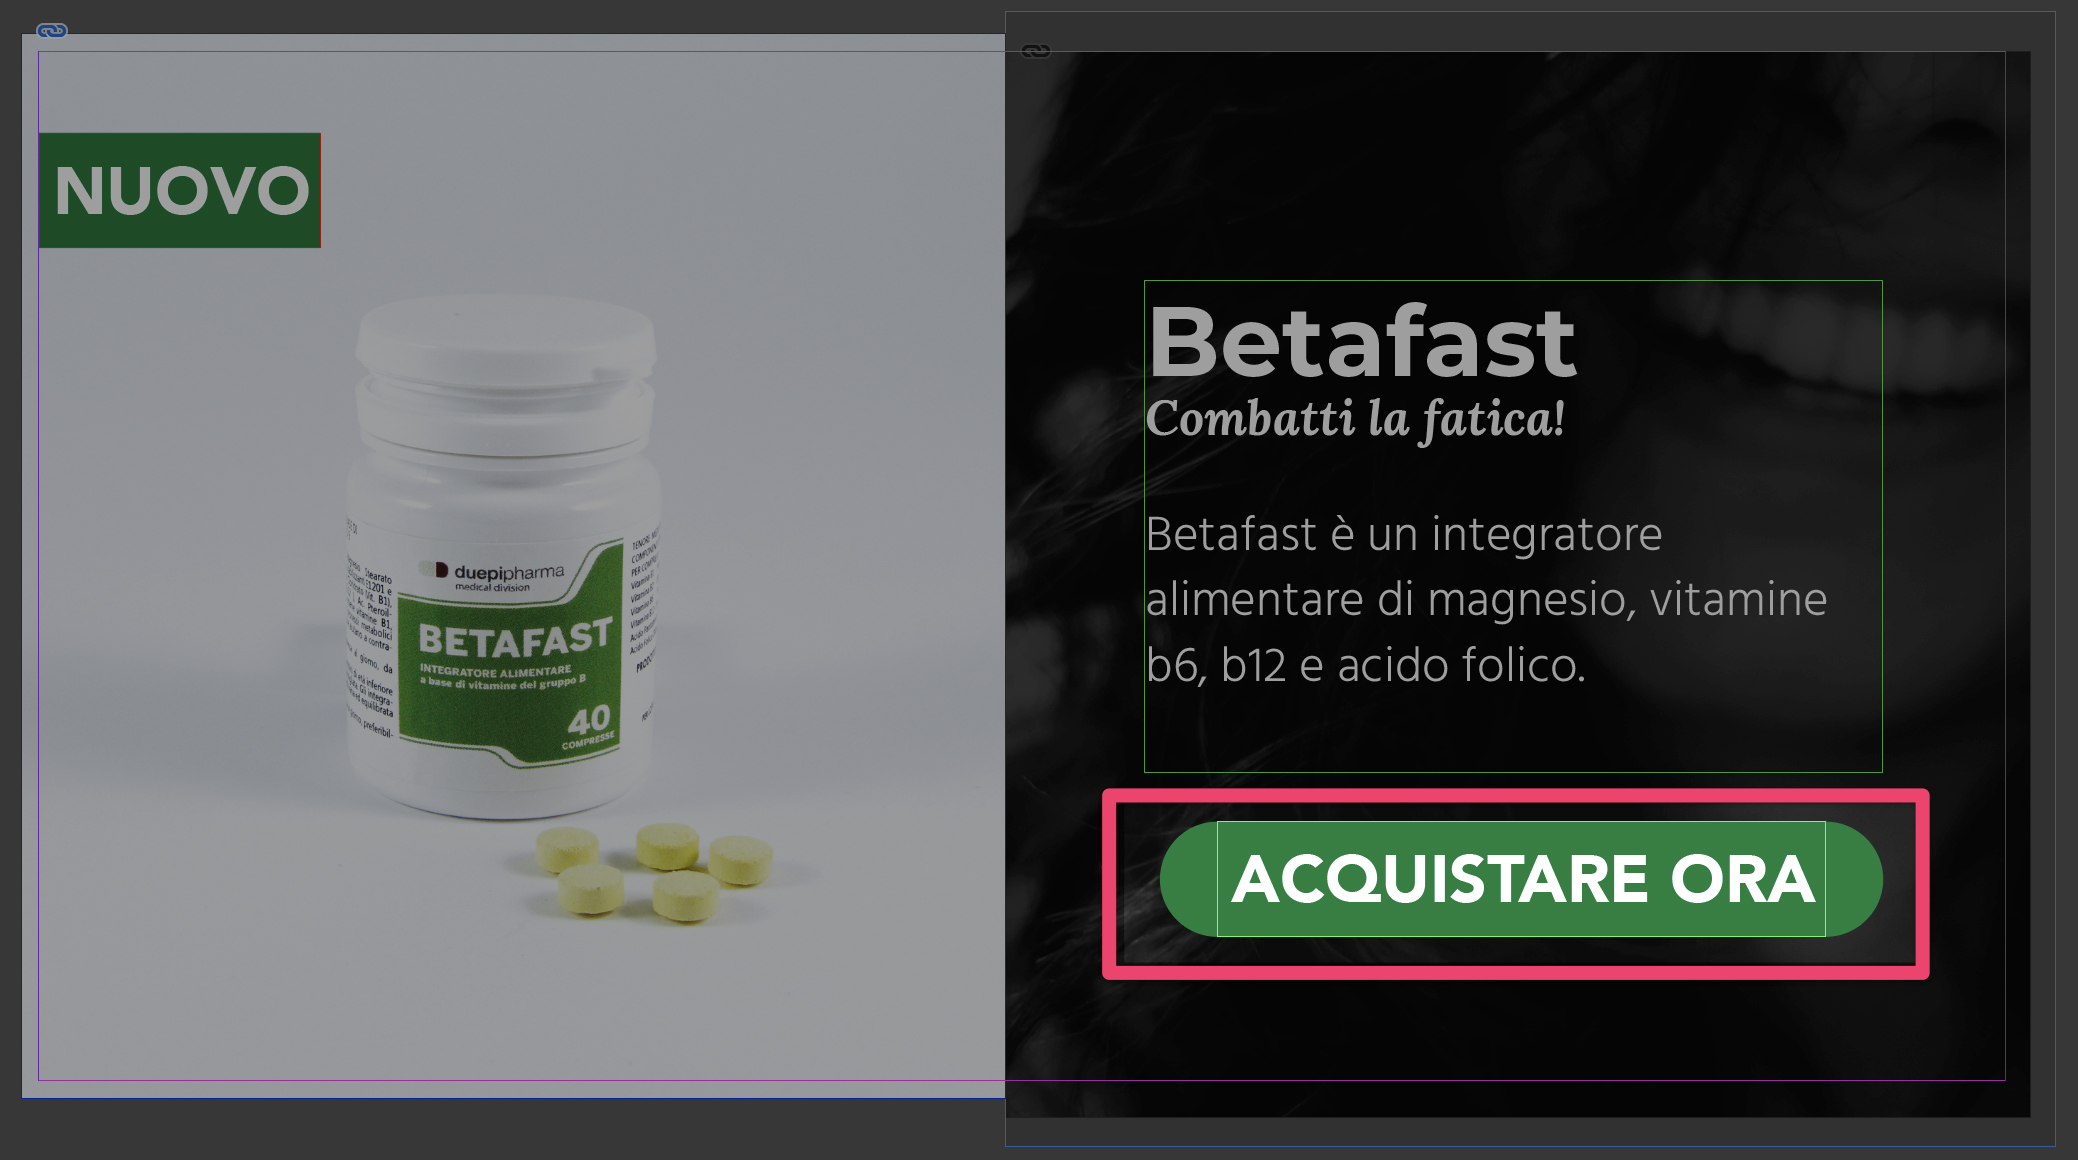
"Acquistare ora" should become "Acquista ora".
But here is a new challenge. Where did I use that translation? Is it limited to this document? Did I use in other banners?
Here is another way that Redokun can help your team.
- Search for a word or a sentence.
- Quickly see where it was used.
- Go and edit it locally or globally.
More info?
If you want to learn more about Redokun, you can start a 14-day free trial or get in touch directly with me and see how we can help your team.
Export the banners
In this section we will see how to quickly export your banners. We will see the manual process and I'll also introduce you to a script that can help you automate this task.
- export the banners manually
- export the banners with a free script
Export the banners manually
When creating banners, you probably want to have each banner in one single document, so let's see how to do that:
- Click on File > Export.
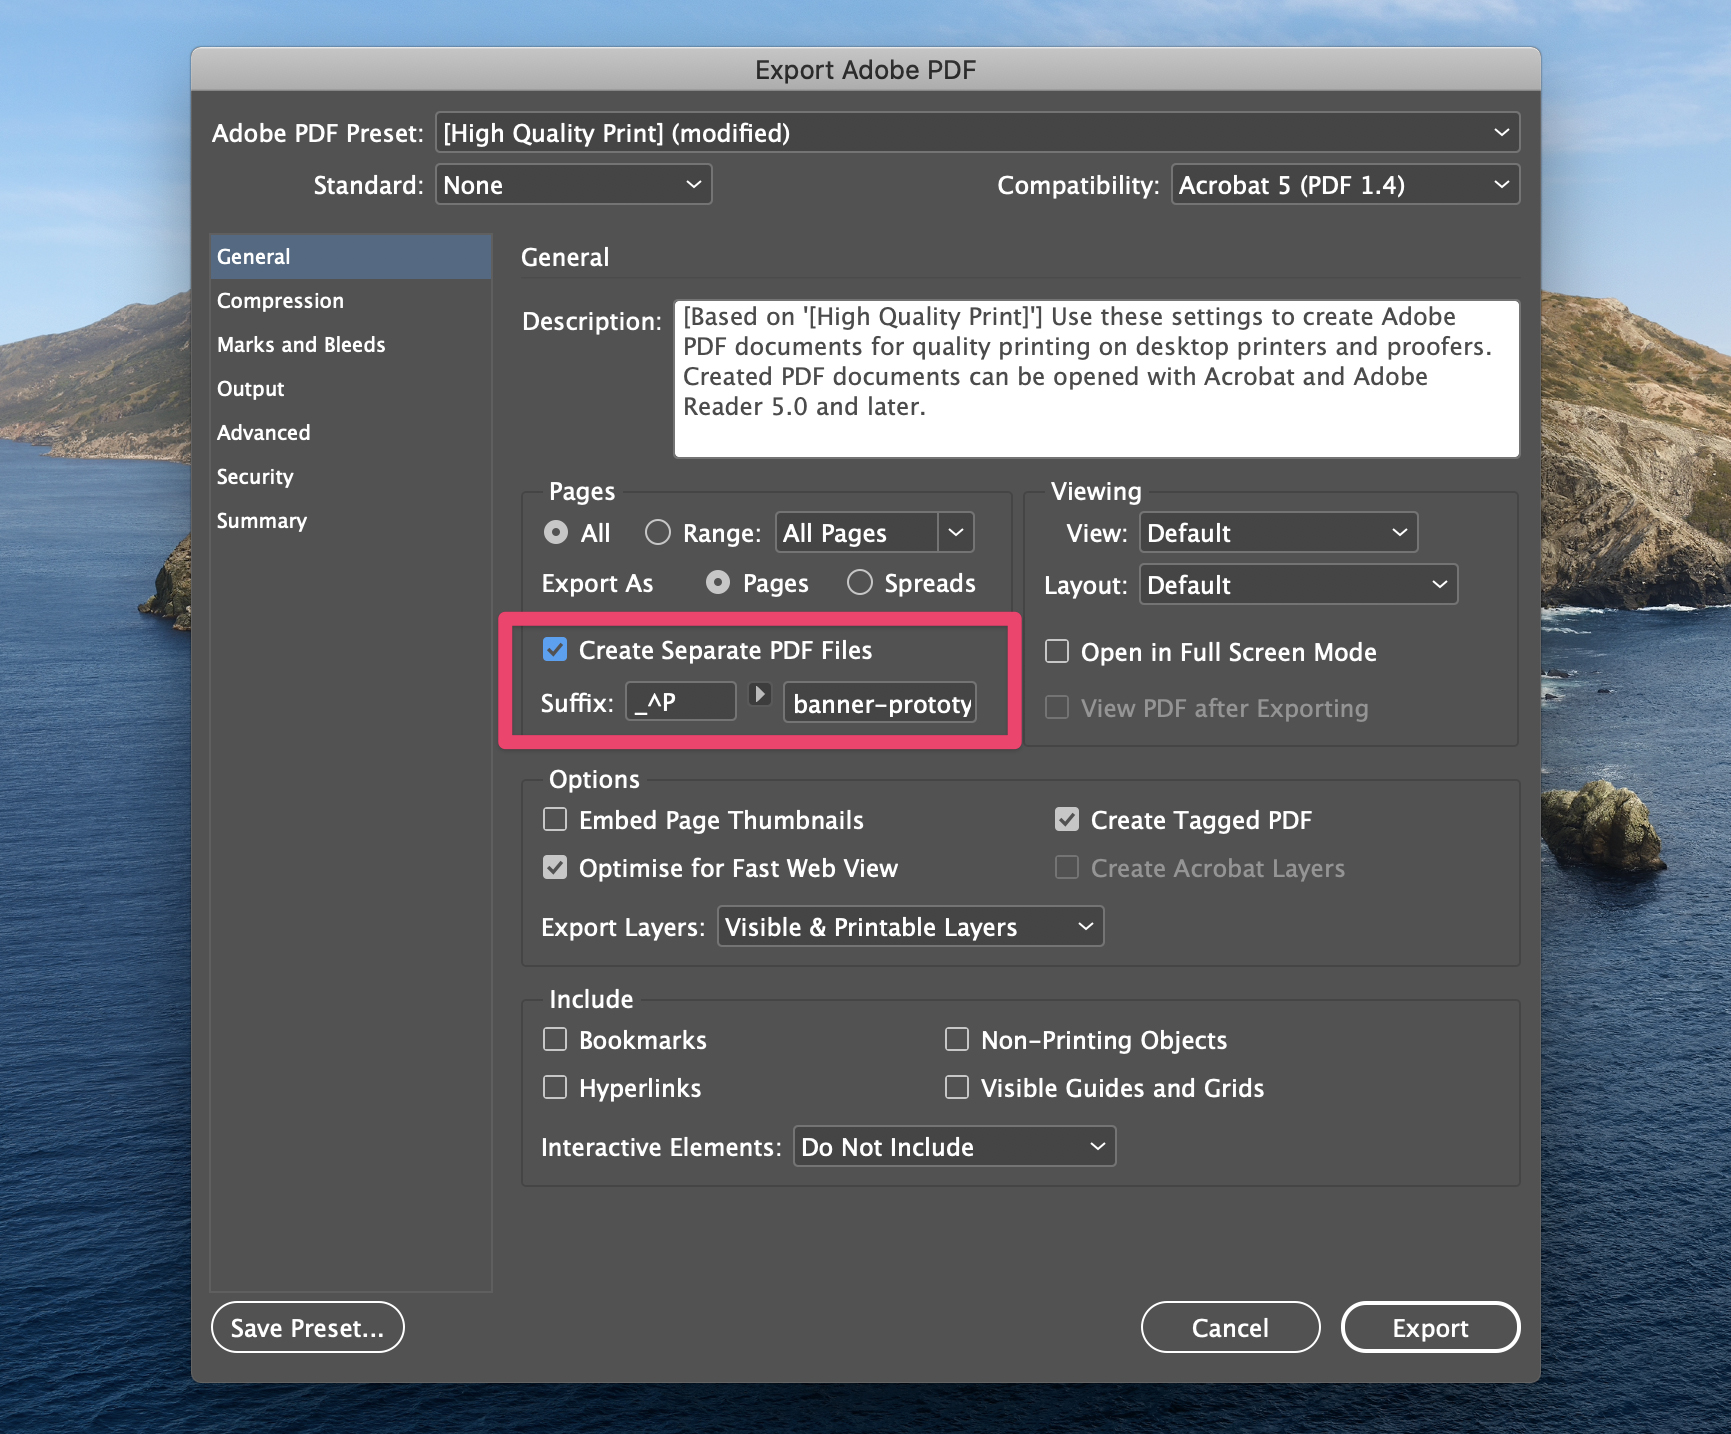
- Here you can select if you want to export your document to PDF or JPG/PNG
- export banner to JPG/PNG: InDesign already creates a file for each banner.
- export banner to PDF: the option you should activate is Create Separate PDF Files
Export the banners with a free script
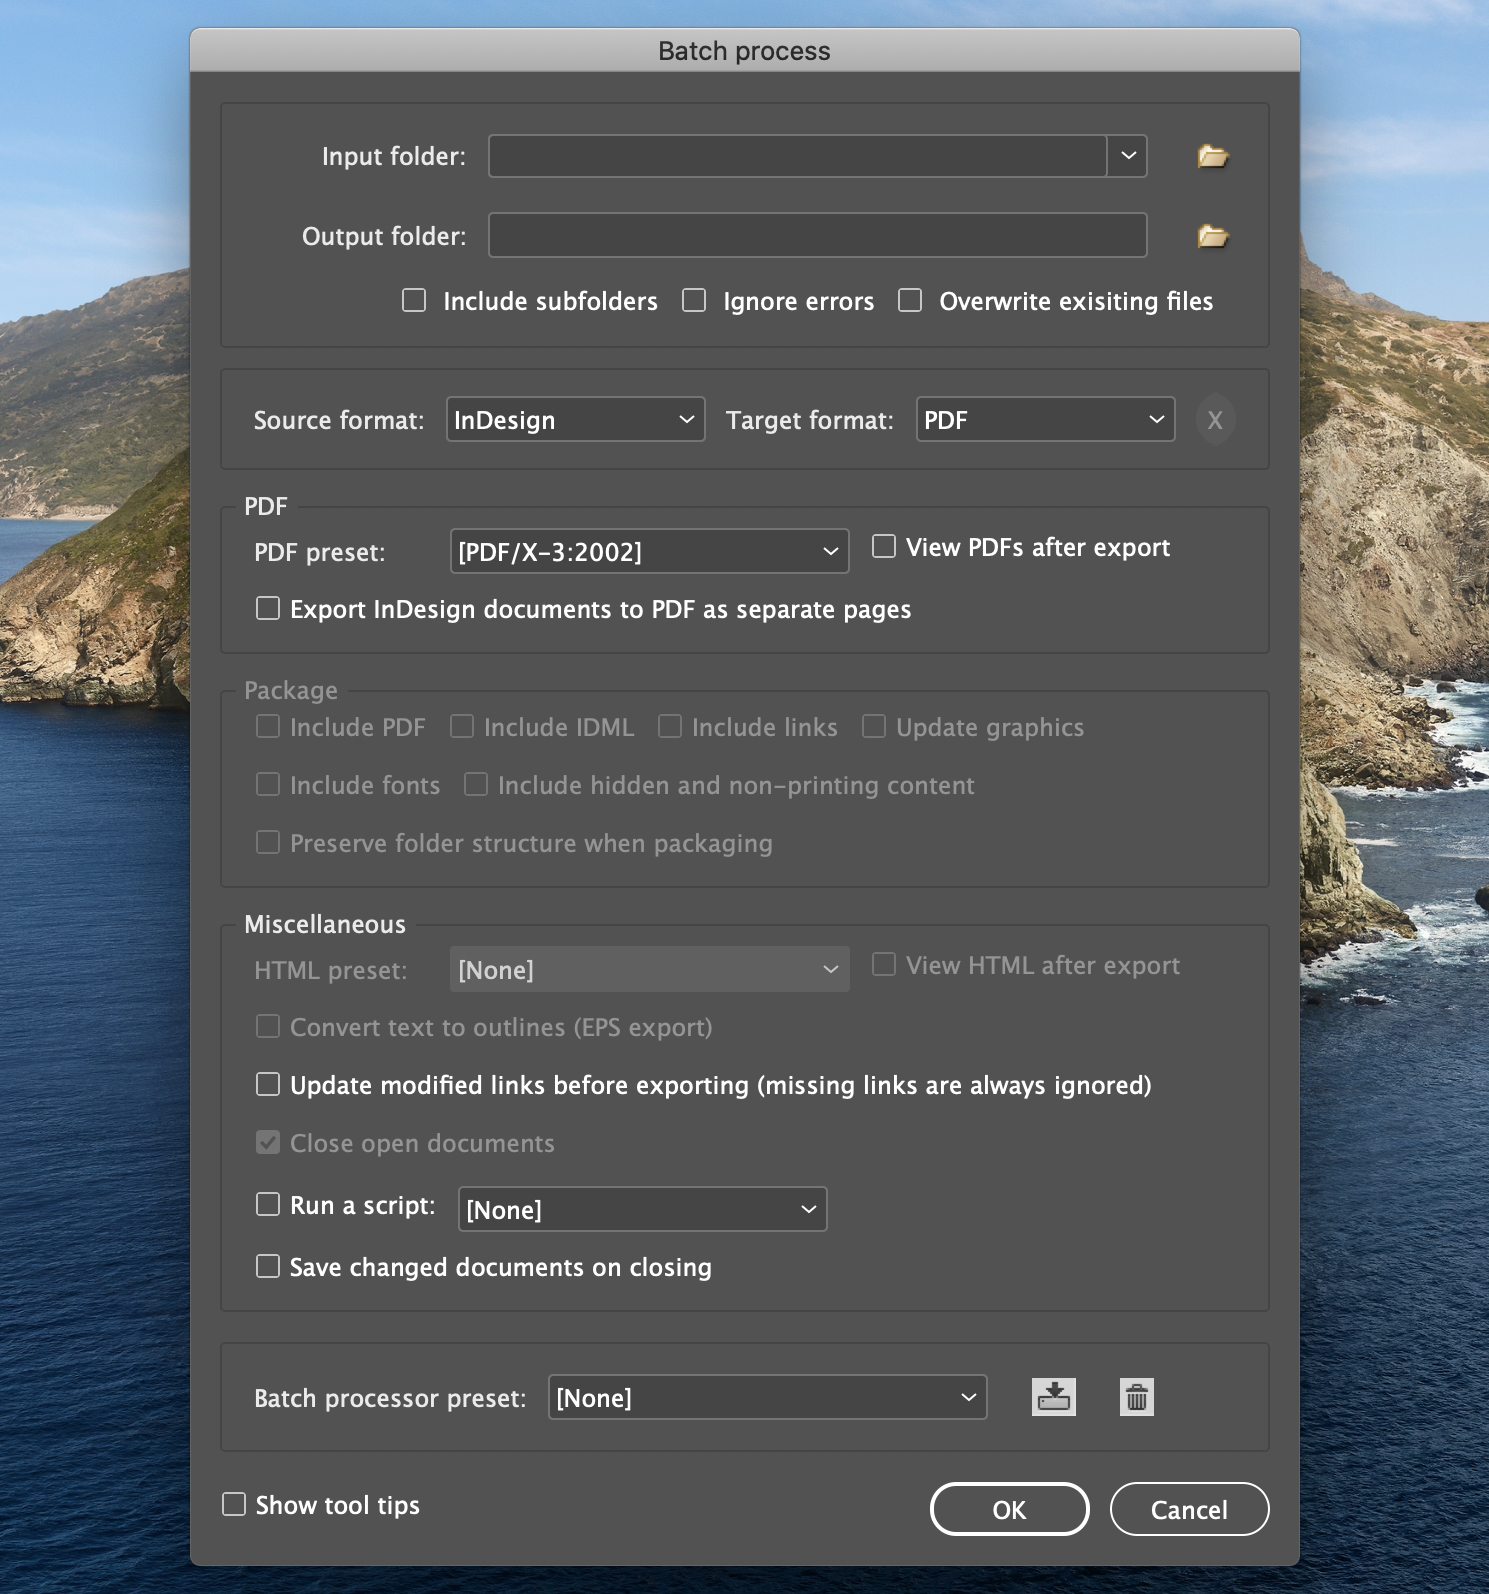
There is an amazing script I am always talking about, it's Peter Kahrel's batch converter.
The script is completely free, but if you'll download it, consider making a donation at the bottom of its page.
It lets you select an Input folder (and an output) and process all the documents inside. You can:
- convert all the documents into a specific file format;
- or even run a script for each document.
If you have many documents in many languages, you should definitely install this script as it will save you hours.
Conclusion
You reached the end of this guide. Congrats! It wasn't easy. I really hope it was helpful. However, I have two favours to ask you.
- Get in touch. Let me know what you think of the guide. Let me know if there is something else I can help you automate.
- Please share this guide with everybody who might find it useful.
- Check Redokun if your company works with InDesign documents that need to be translated.
Till next time,
Stefano


