


With data merge you can easily paginate text and images in InDesign in a matter of seconds by reading an external data source file in .csv or .txt file format.
Using data merge is not hard at all, but you might need a few attempts to get it right. So before jumping in and trying it out yourself, I’d suggest reading the whole tutorial and learning first about the limitations and errors that you may face later.
In this tutorial, I'll show you the basics and then I'll highlight possible issues you might encounter and their solutions, so that you can master this feature in no time.
Introduction
The basic workflow is:
- Create the data source file—in the first row, name the fields (use @ in front of the field name for images).
- Save the file as .csv delimited with comma, or .txt delimited with tabulation.
- Create a prototype in an InDesign document.
- Select the data source in InDesign using the Data Merge panel.
- Add the placeholders to the prototype design in your document.
- Run a preview to make sure of the result.
- Create the merged document.
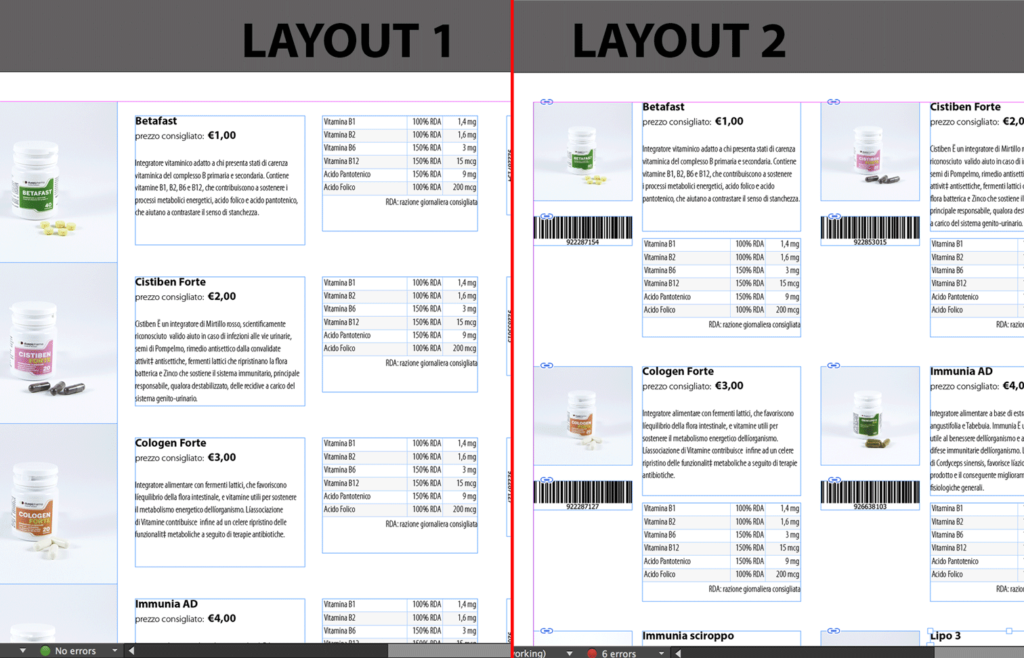
Read further in the tutorial to create documents with a structure-layout similar to these:
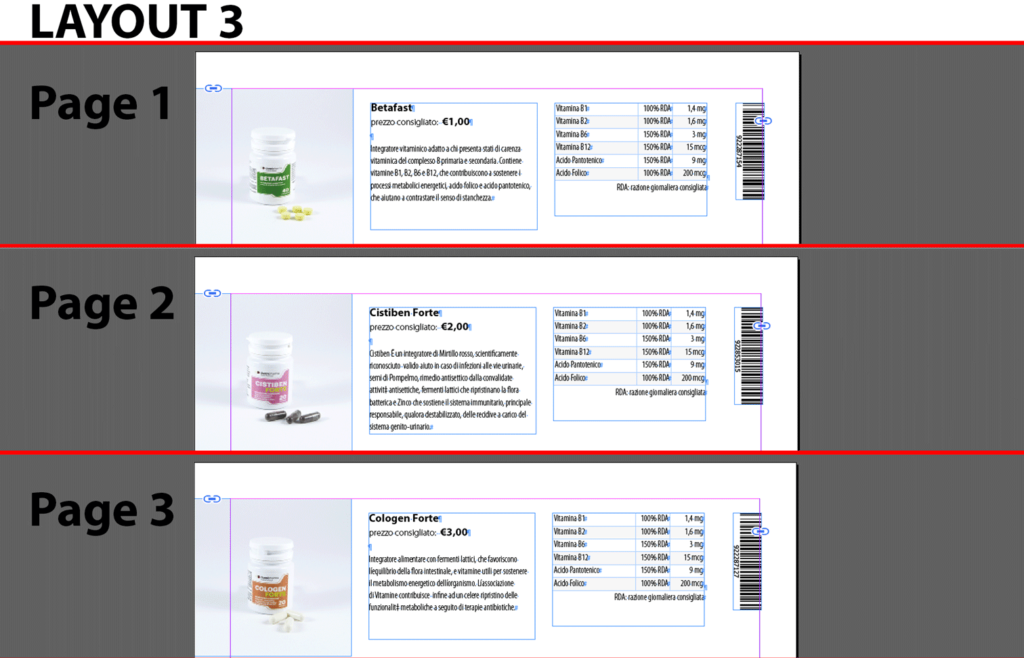
Or this:
If you prefer a video guide, see this video by Teela Cunningham. She explains in eight minutes how to create a certificate using data merge. It's great content, explained very well, and Teela’s voice is calm and clear. However, she doesn't talk about data merge with images, so for that (and because this guide goes more in depth), I invite you to keep reading even after you've seen the video.
When should you use data merge?
Data merge is great when you have to lay out a document (or part of a document) that has a "prototype example" (repetitive layout) that needs to be repeated in a grid or one record per page with different data.
Such documents could be:
- product catalogs
- envelopes
- certificates
- business cards
- etc.
Update 2020: I recently wrote a new tutorial on how to make several business cards using InDesign Data Merge. So, If you are looking for a way to create several business cards in just a few seconds, you should definitely read that post.
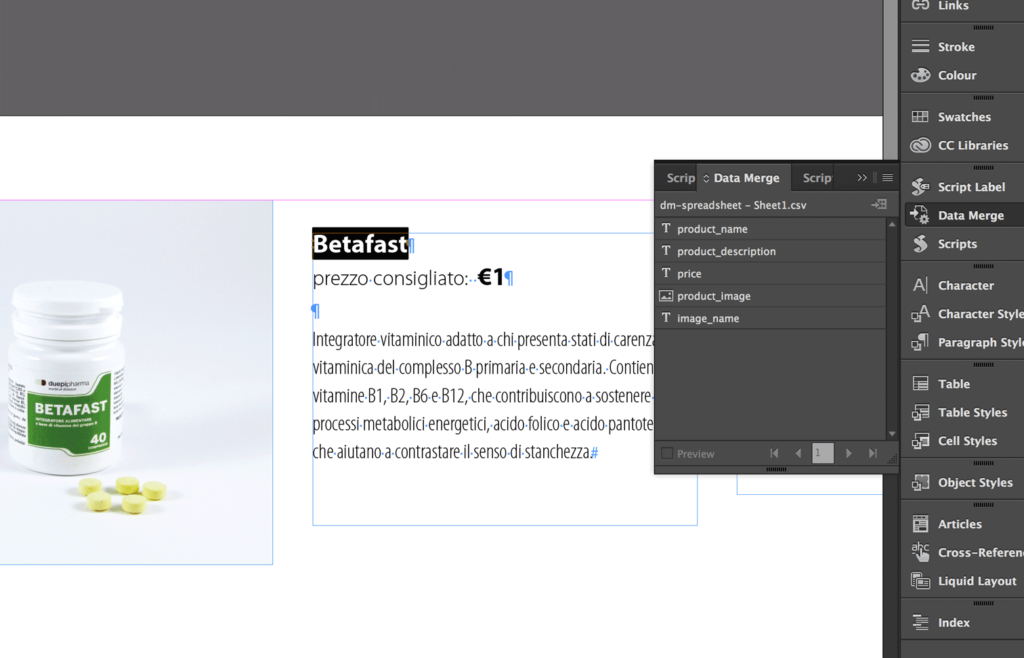
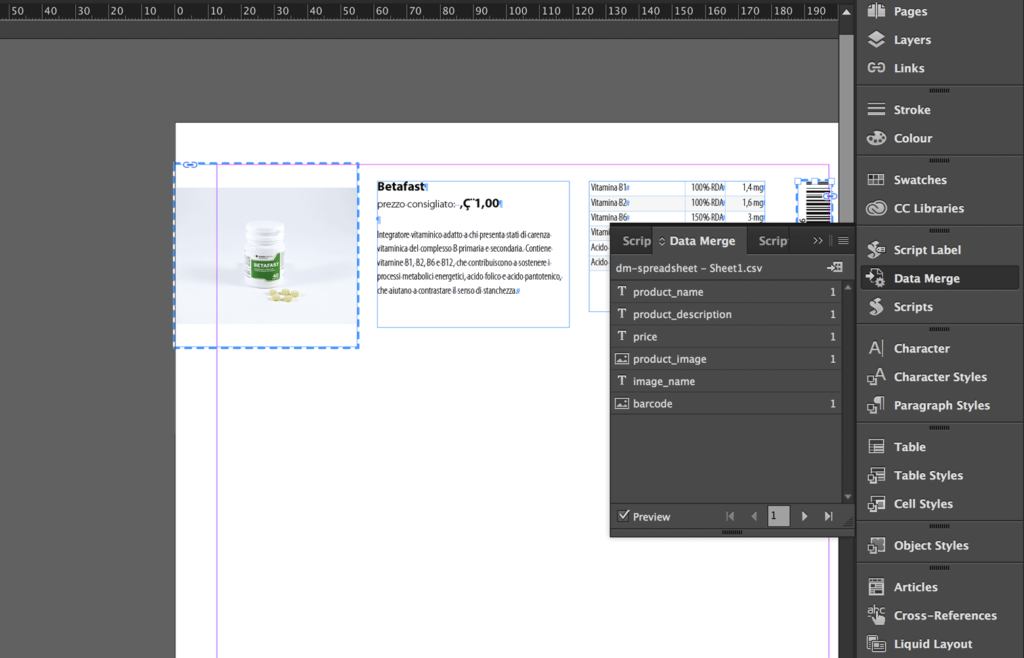
Prepare the layout of the InDesign file
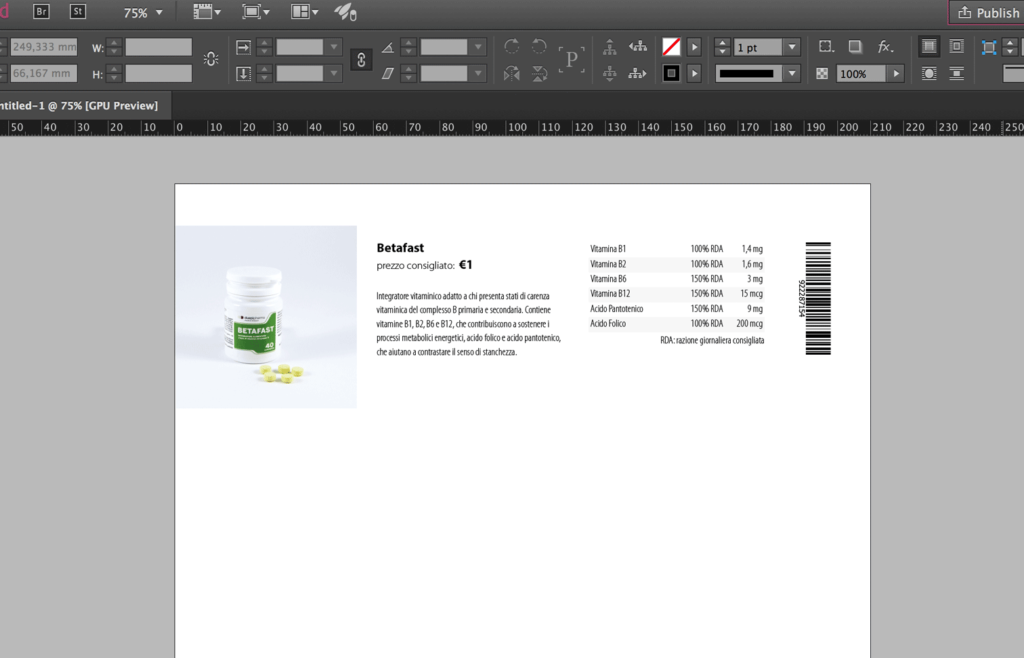
We need to create a prototype, in InDesign, of the layout we want to use in the data merge process. This is mine. It has the name of the product, its picture, a short description, the price, and a barcode.
You can automate many different types of documents, from business cards, to flyers, or catalogs. If you don't already have a layout in mind, you can start from a catalog template or any other InDesign template.
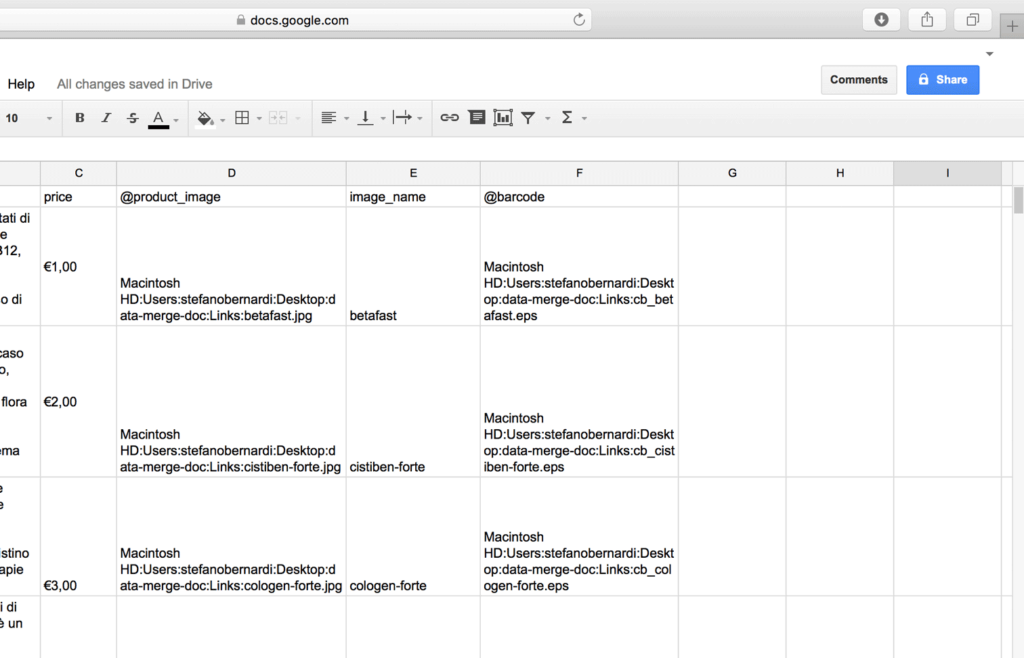
Prepare the data file for import (.csv or .txt)
The data source file should be a .csv or a .txt file. You can create it with Excel, Numbers, OpenOffice, or any similar application.
In the first row of the source file you should list all the fields you are going to use in your layout. Make their name descriptive (and understandable) because InDesign will use those name to indicate the sets of data inside its interface.
Textual data
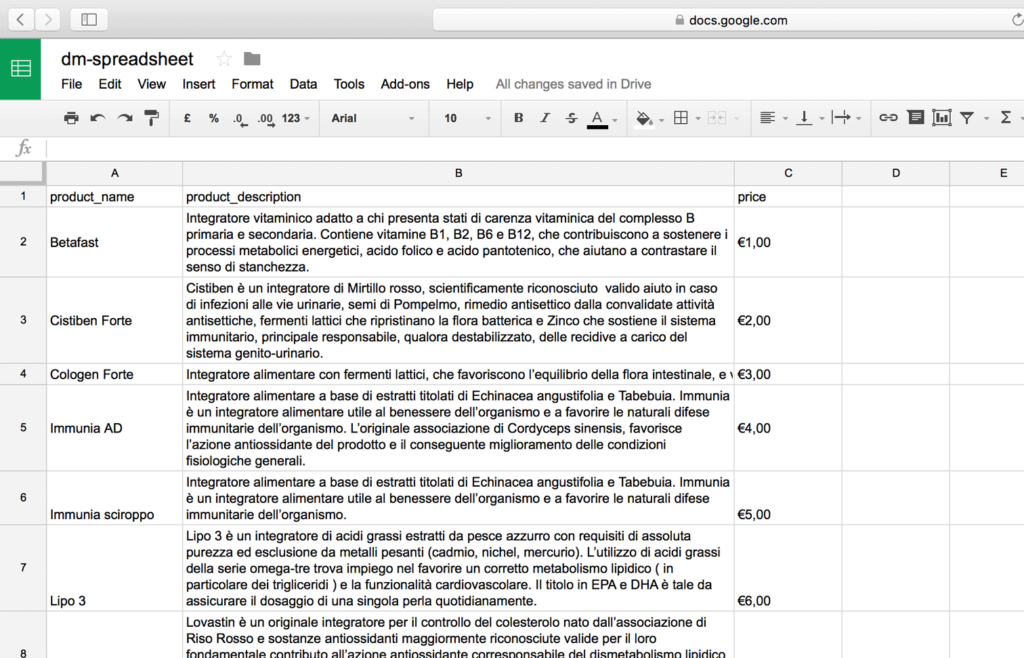
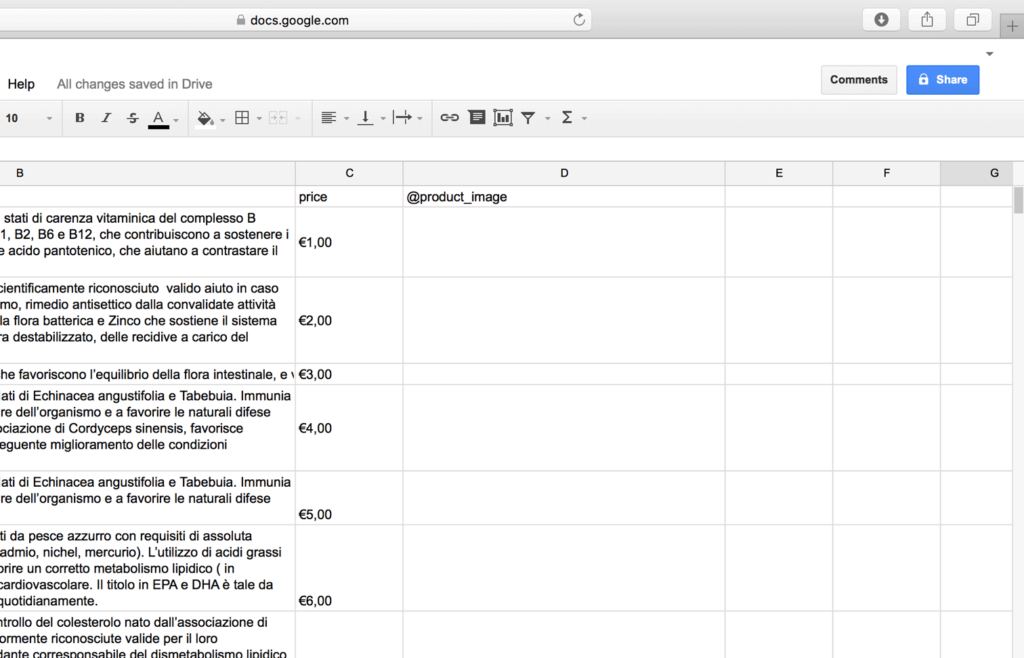
My file at the moment has product_name, product_description, and price columns. These are all textual data. To list them you just write the field name, and then fill the records with the data you want InDesign to import.
It’s OK to have empty cells in the body of the file, but make sure that each column has a description in the header row.
Images
Most of the times, images are the single issue that makes you give up on data merge. But if done right, you can make it work and the payoff will be incredible.
Create the field in the spreadsheet
For fields that list images, you need to place an “@“ symbol in front of the field name. The field name should look like this: @field_name.
I'll add @product_image to my spreadsheet.
If you are using Excel, and it prompts you with an error while writing the field name with a “@“ up front, it is because you need to set the Excel cell to text type. Write a " ' " in front of the field name (i.e., "'@field_name") and, when you exit the Excel cell, make sure that you don't see the " ' " you just typed.
Write the source path correctly
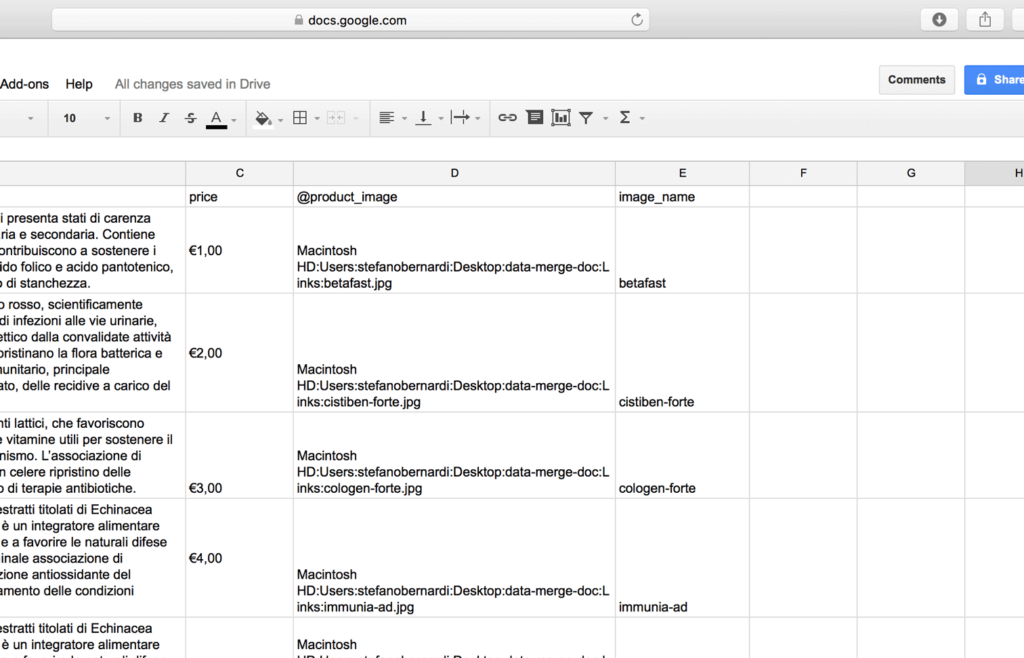
The paths of your images must follow the conventions of the operating system in which the images are stored (paths are case-sensitive).
It's OK to have data (like the image names in my spreadsheet) that you won't use in your InDesign as long as you don't leave the header cell empty. It’s also OK to have empty cells in the body of the file.
Getting the source path right
Let's use a quick trick to avoid mistakes and wasting time.
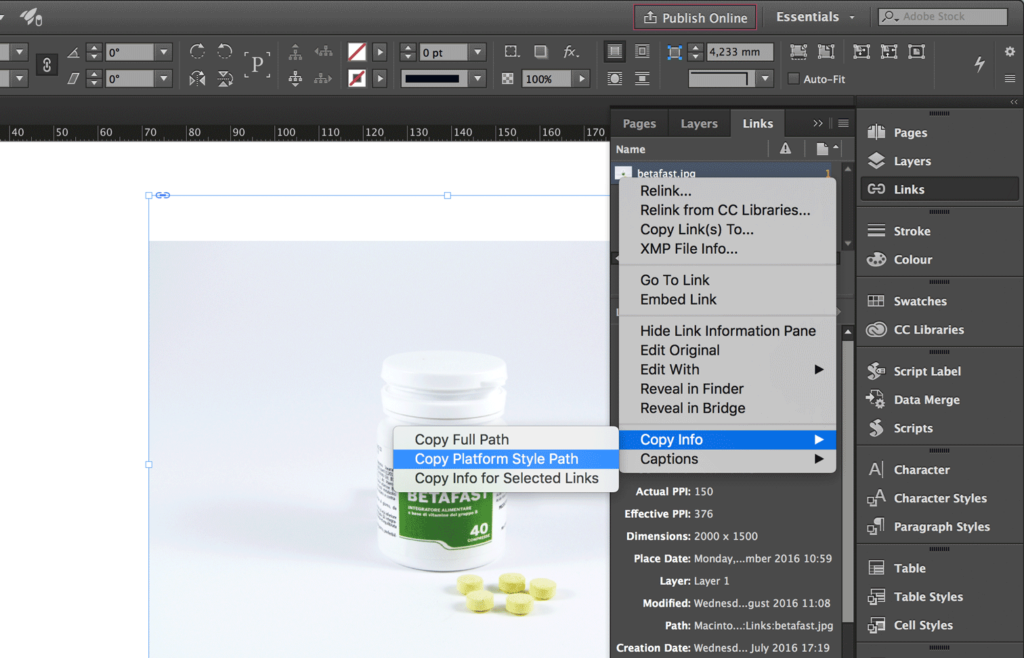
- Place in InDesign one of the images you are going to link (the image should be in the folder where you will store the images for the data merge, but it’s not mandatory).
- Select the image in InDesign and go to the Link panel.
- Right click and select Copy Info and then Copy Platform Style Path.
Here you have the correct source path. This technique is especially useful for images stored on a server, where it can be hard to guess the absolute path.
Save the data source file in .csv or .txt
So, your spreadsheet is now filled with all the data. You should save it in .csv separated by comma file format or .txt separated by tabulation file format.
Import the data source file
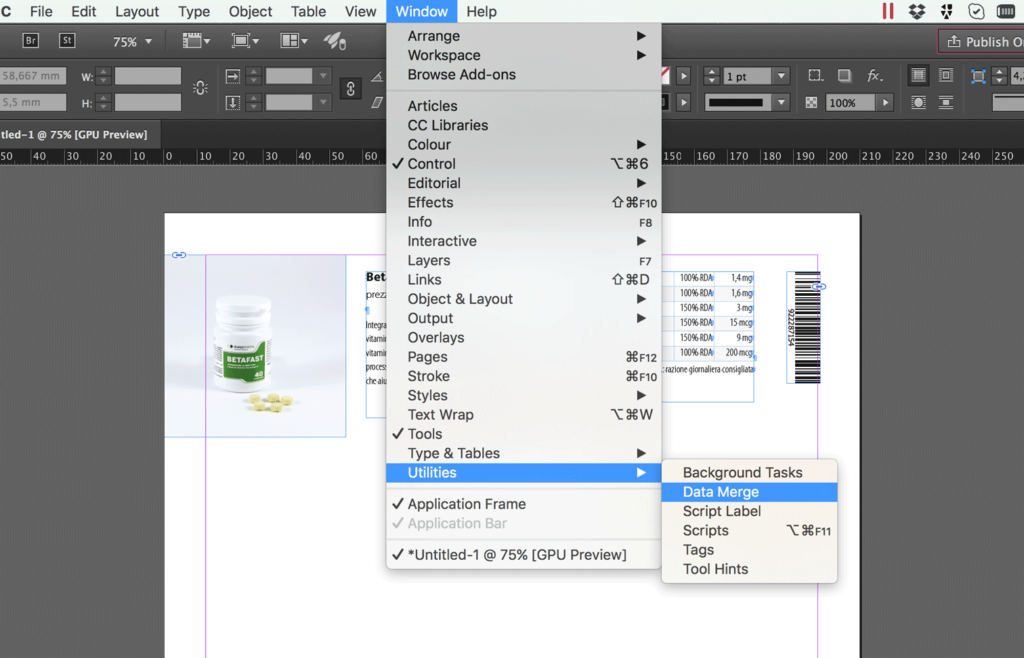
- In InDesign, open the Data Merge panel by clicking Window > Utility > Data Merge.
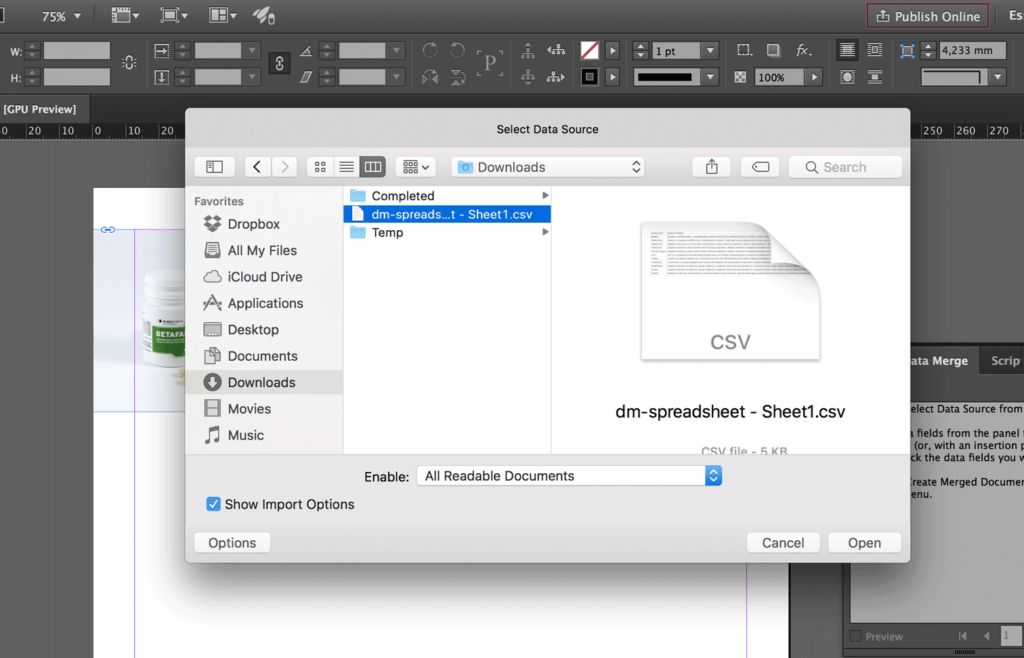
- In the Data Merge panel, click on the icon in the upper-right corner, and select Select Data Source.
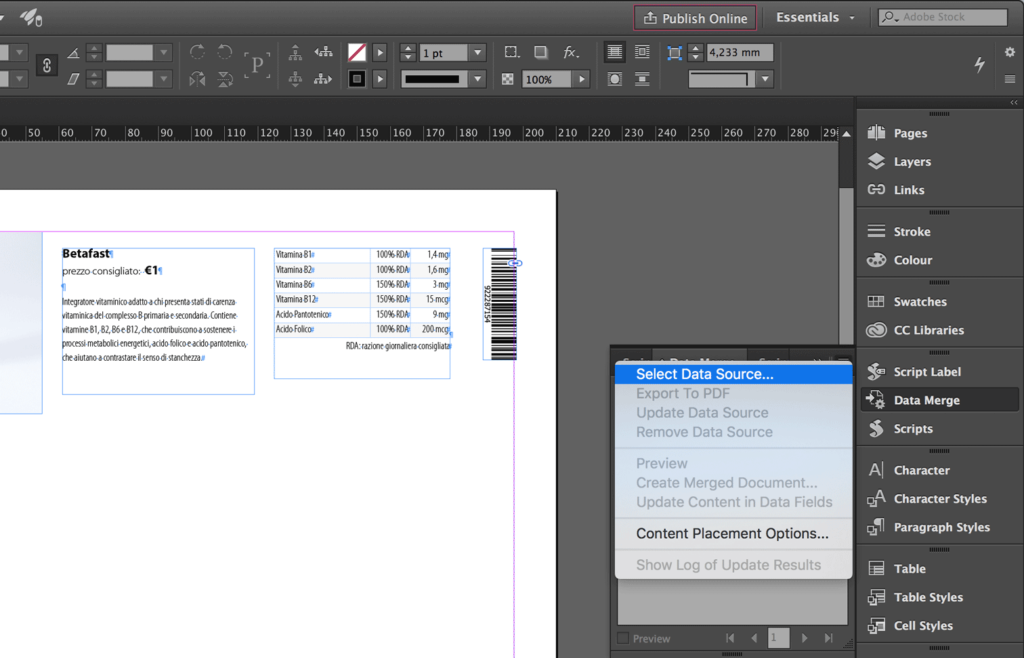
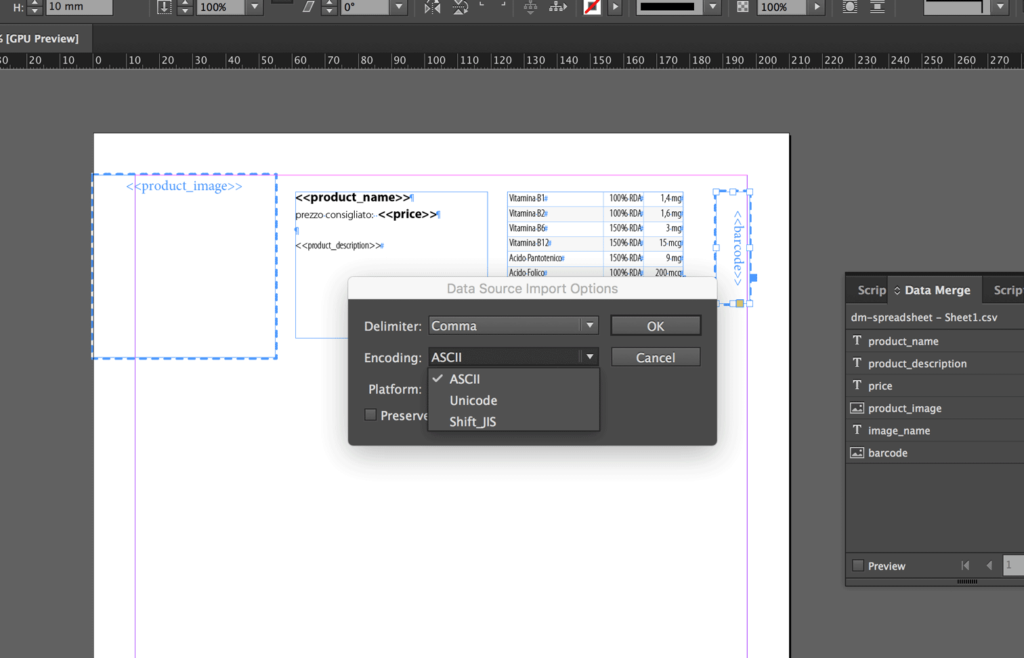
- Click on Option and check Show Import Options. Select the file and click Open.
For any error you might encounter, please read the “Errors” part below. If you don't find the error in there (or in the linked resources), please write it in the comments or send me an email—I'll try to help you figure out the issue.
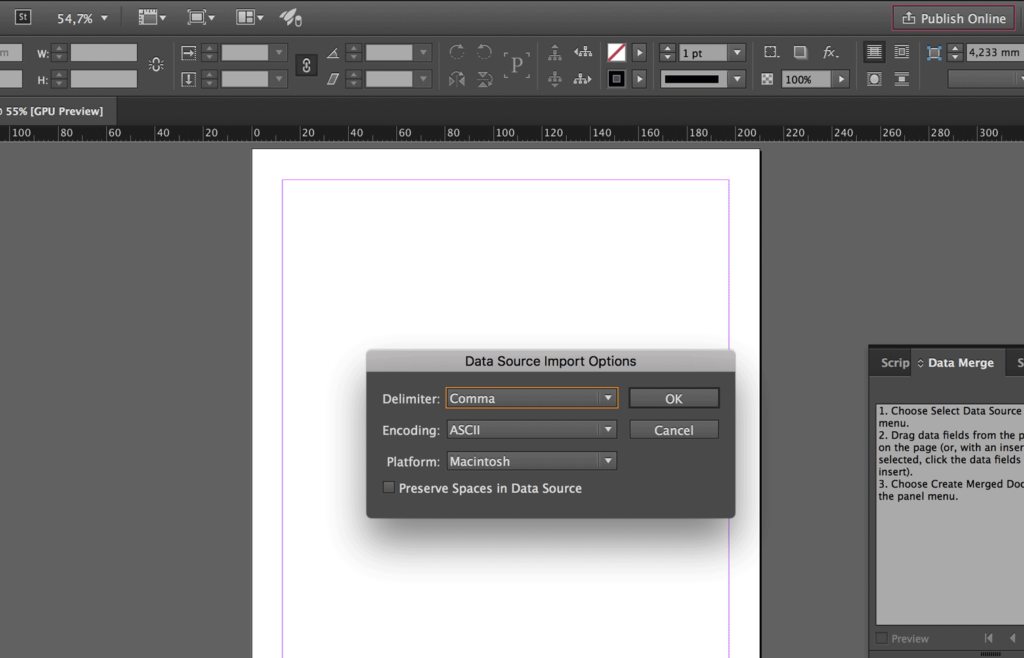
- Set the Delimiter and the Encoding used in your .csv/.txt file and click OK.
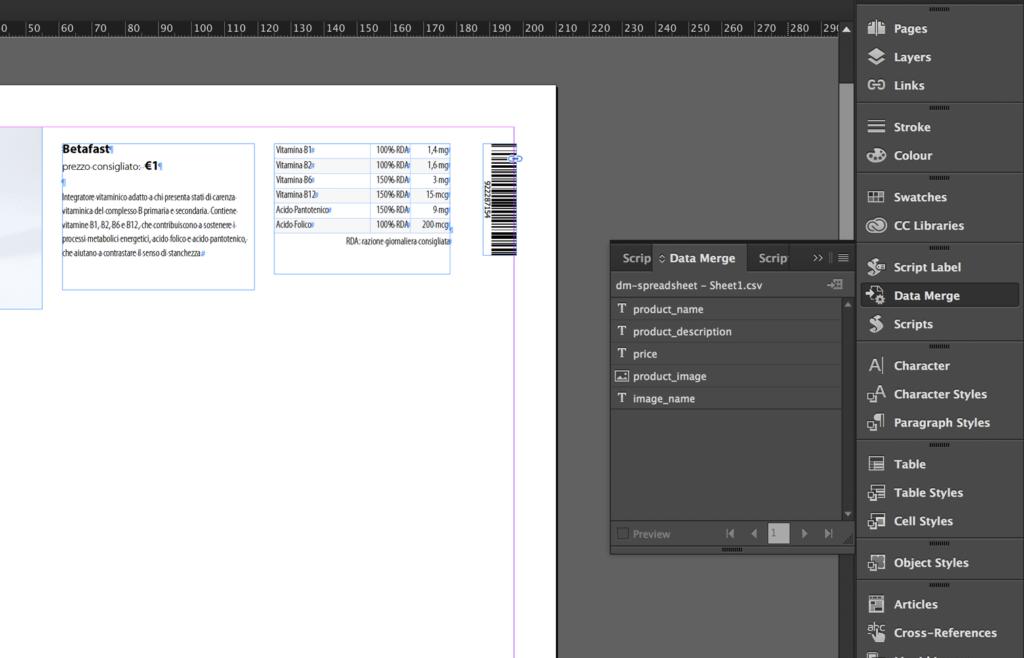
In my Data Merge panel, InDesign has created all the "variables" we previously named in the header of the spreadsheet inside Excel. InDesign indicates text-based data and image-based data with different icons.
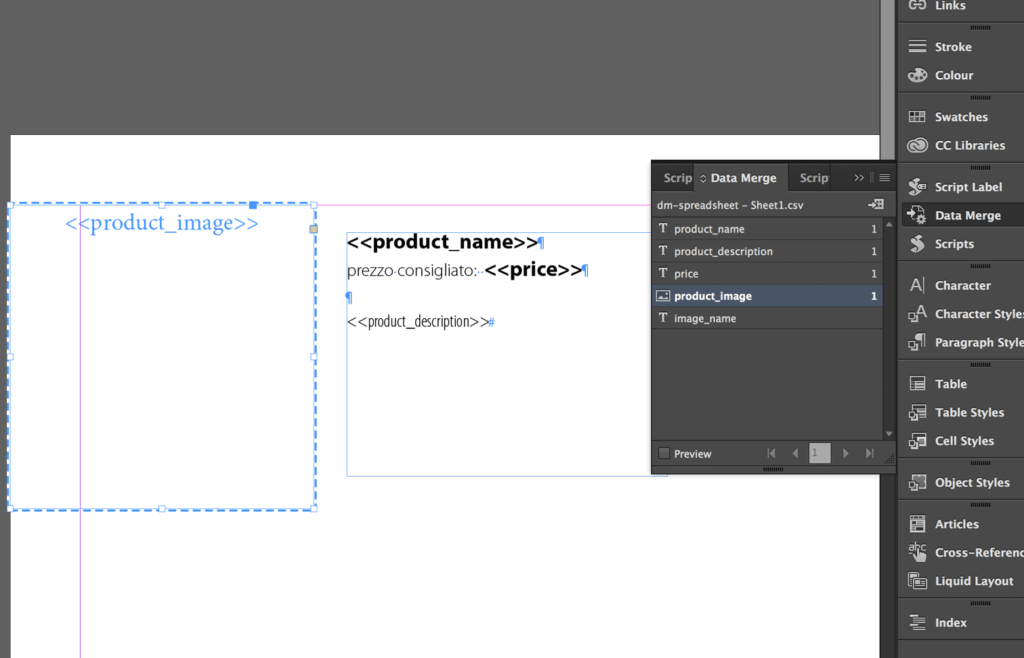
Place the placeholders
The next step is placing the placeholders into the layout-prototype we created.
- Select the text/image in the InDesign layout-prototype (I select the name of the product).
- Click on the placeholder (In my example, I click on product_name). InDesign replaces the text in the prototype with <<field_name>>.
It might happen that the characters “<“ and “>” are not visible. If that happens, it's because the font doesn't contain those glyphs. Don't worry, the data merge will work anyway.

- Repeat the same process for all the text placeholders (also for the images).
My file now looks like this.
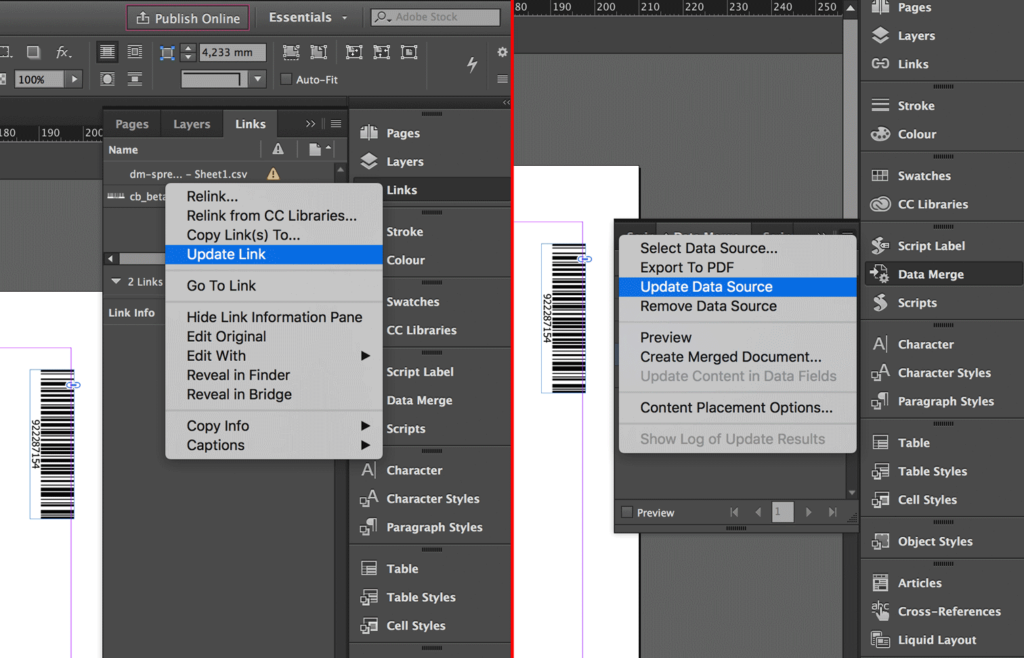
Update the data source
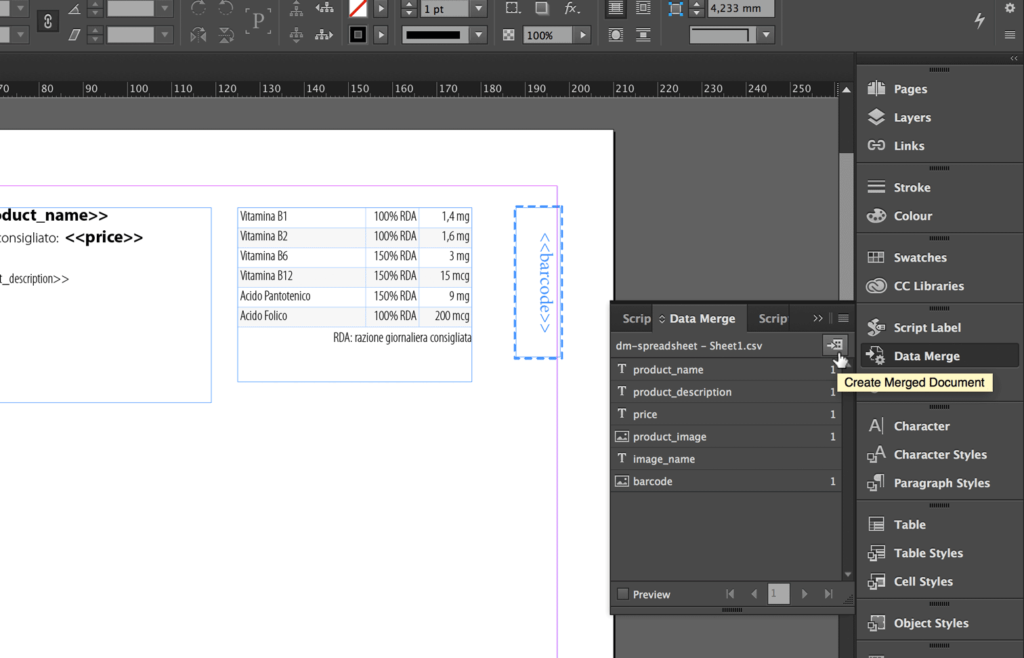
If you forget a field or need to change some data, you can always update your data source. I have to add the barcode placeholder, so I go back to my spreadsheet and add @barcode to it and fill the data.
Back in InDesign, you can update the data source both from the Data Merge panel and the Link panel.
- In the Data Merge panel, click on the icon in the upper-right corner, and select Update Data Source.
- In the Link panel, select the data source file and click on Update Link as if it was an image you edited in Photoshop or Illustrator.
Preview the result
To preview the result of the Data Merge, just activate Preview.
The product image is not shown as I wish. I want the content to fit the frame proportionally. If you prefer, you could change the object style (here's the Adobe user guide, just in case you need it). However, I'll let it stay that way—we'll see how to fix it later directly from the Data Merge options.
Look at the price imported from the source data file. The symbol “€” is missing. This might happen sometimes; if you face this issue, try to reimport the data source file and change the Encoding to Unicode (The default is ASCII).
Create the merge document
- In the Data Merge panel, click on the Create Merge Document... icon.
You can create a “Single Record” document (left part of the image) or a “Multiple Records” document (right part of the image).
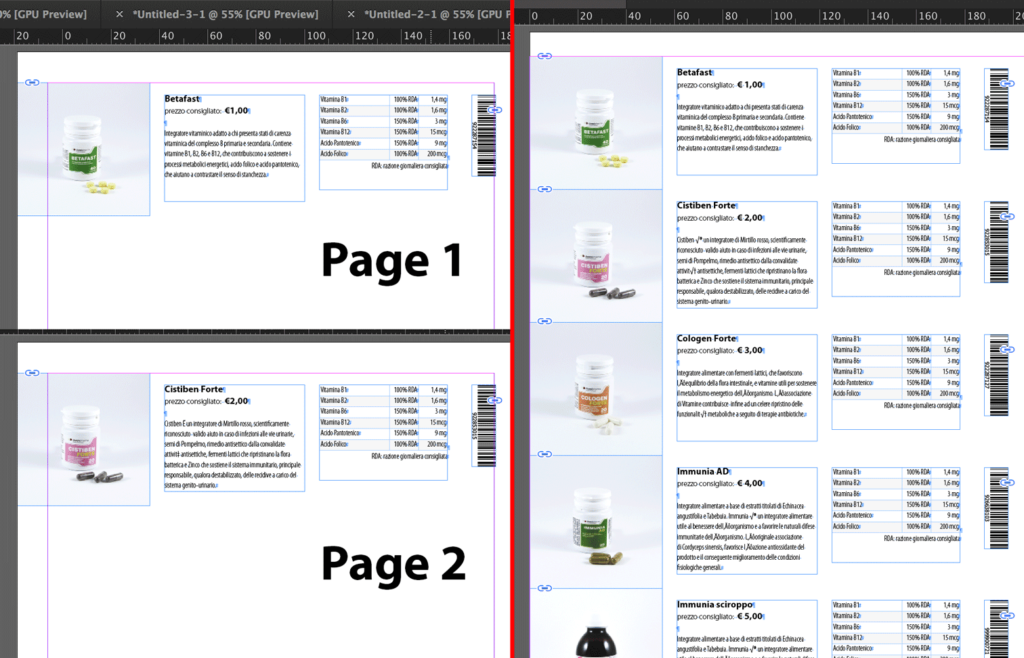
“Single Record” document
This setting is probably the right choice if you are creating certificates, envelopes, letters, etc. With this setting, InDesign will generate a document with each page containing a single record.
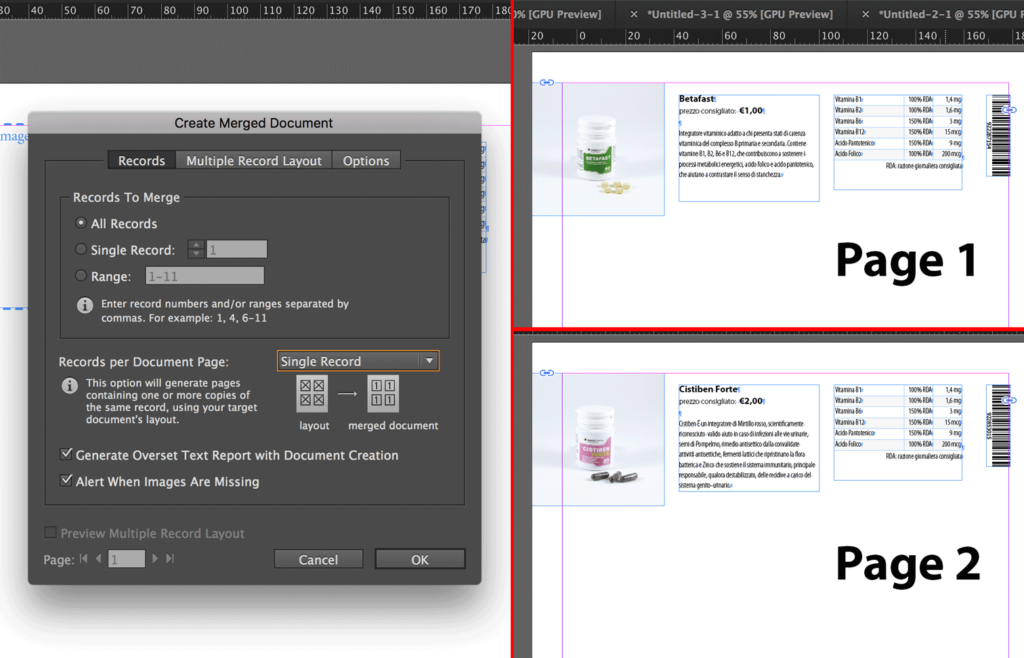
“Multiple Records” document
This is my choice in the example. You should use it for product catalogs, pricing lists, and more, in general, for documents that have pages that contain multiple records of a layout-prototype.
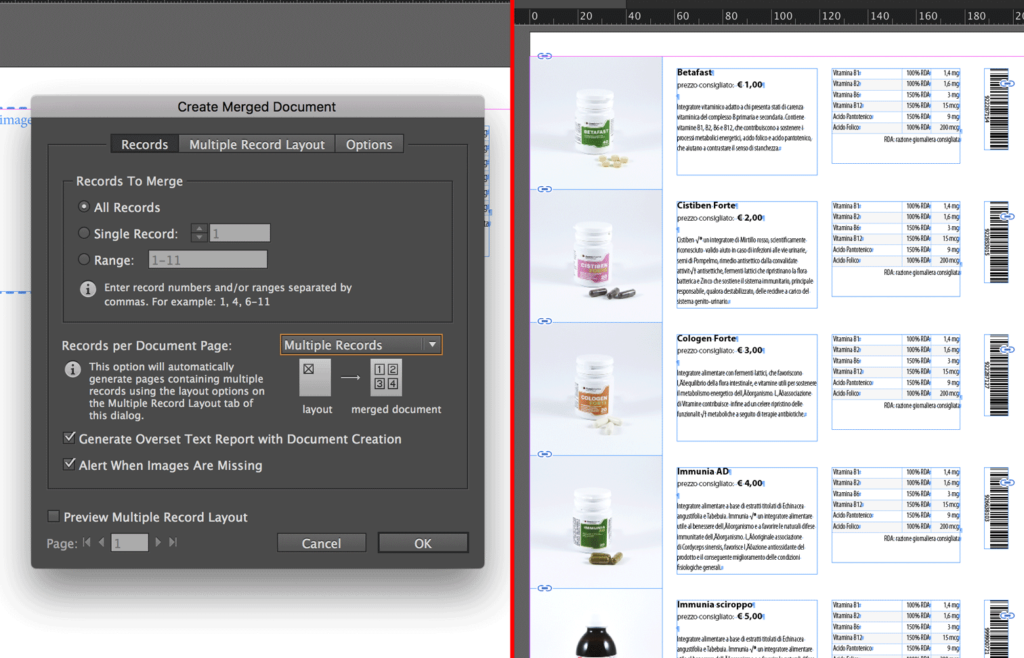
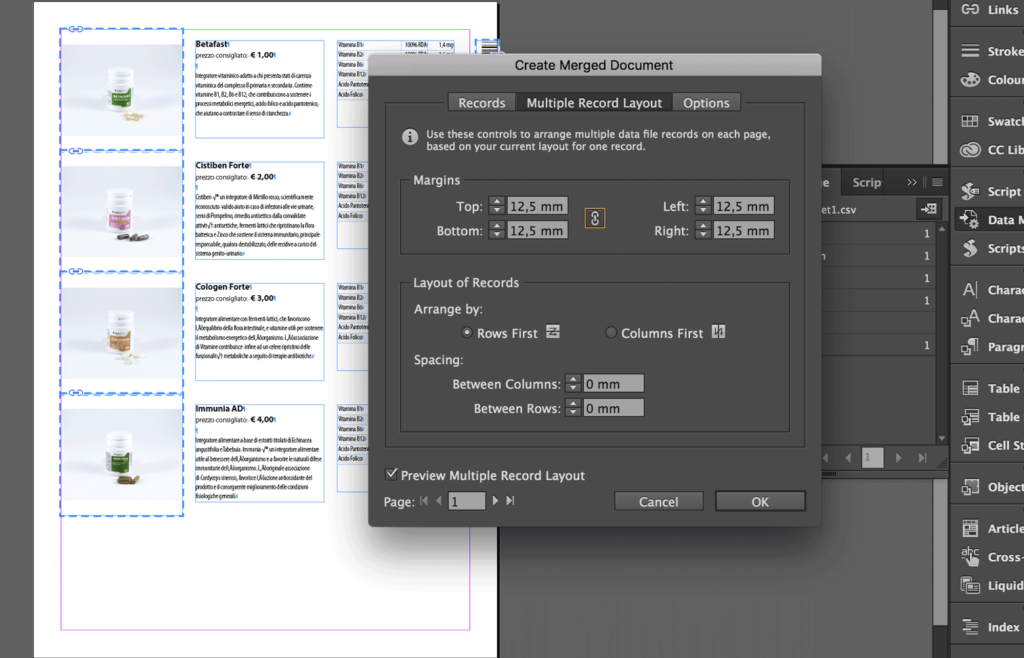
- I select “Multiple Records” and then move to the Multiple Record Layout tab. In this tab you can select how InDesign should arrange the records.
The Spacing options are to set how much space you want between the records. I want no space, so 0 on both options is fine for me.
- Let's activate the Preview Multiple Record Layout option.
InDesign shows me a preview. It's almost like I wanted it to be, but I don't like all the white space at the bottom of the page, so I'll change the Margins options until I get the result I want.
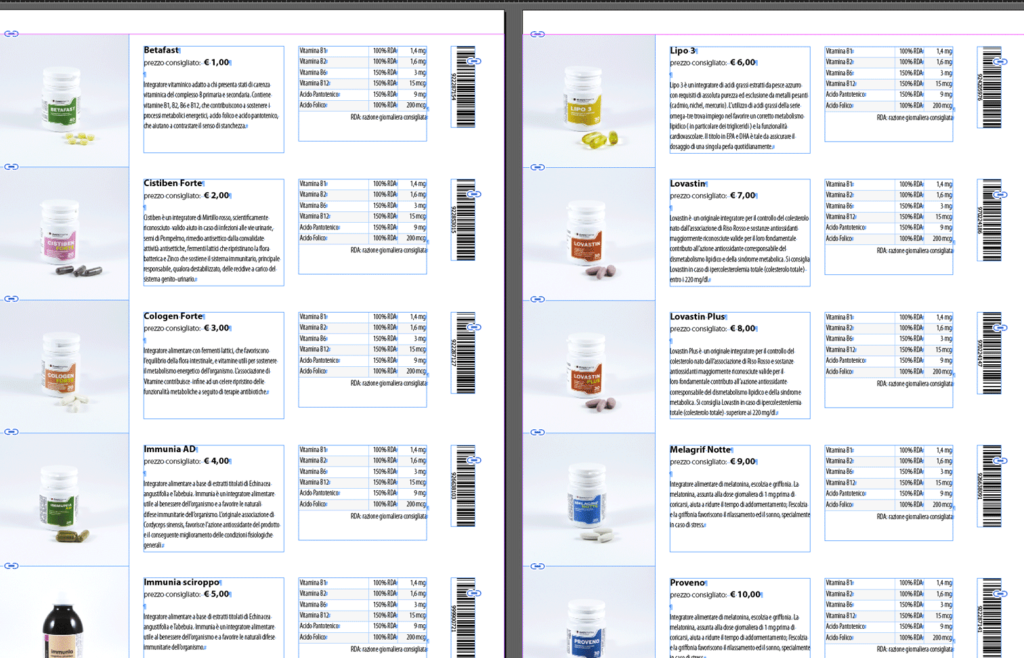
Data merge and images
Under the tab Options you can give InDesign a few instructions. The most important, though, are the image settings. From Image Placement you can choose how the image should fit the frame. I choose Fill Frames Proportionally. I make sure to activate the Link option, because without it InDesign would embed the images.

Launch the data merge
- Now we are ready to launch the merge. Click OK. InDesign automatically creates a document merging the data source file with the prototype-layout document.
Tables and Data Merge in InDesign
Unfortunately, with data merge you can import only textual data and link to images.
Of course, you can insert placeholders into a table and InDesign will replace them with your data.
However, for the tables you see in my document, I have to import them after the data merge. The best way to create a table in InDesign is by linking an Excel spreadsheet into InDesign. If you'd like to learn how to do that, click here to read the tutorial.
Otherwise, you could combine Data Merge with custom scripts in order to import the tables later.
Common errors
The selected data source has one or more empty field names
If you keep getting this error: "The selected data source has one or more empty field names. Please fix the file or select another file,” it’s because the file (.csv/.txt) you are importing is not clean. There might be some columns in the file that contain some text and that information was deleted manually. You can check that by simply placing the file (.csv/.txt) as a text inside InDesign, and activating "Show Hidden Characters.”
The fastest way to solve this issue is copying all the columns in a new file or using a text editor such as Sublime Text or TextWrangler and cleaning the content of the exported file.
Fields separated by semicolon “;”
If you are using Excel on Windows, this error might be happening because your Windows regional settings are set to use semi-colons instead of commas as the list separator symbol.
The easiest and quickest solution is exporting a tab-delimited (.txt) file, and using that for the data merge.
However, if you want to use a CSV file, you can change OS list separator to “;”. That way, Excel will use “;” to output your CSV file. You can do that in Regional Settings > Customize. Be aware that this change will affect all the applications you run on your computer.
Other issues
For other errors not listed in this guide, see this great piece of an article by InDesignSecrets.
Useful resources
In my example, I imported several barcodes in .eps file format. To create them I used this service. I was looking for a bulk generator but the only one I liked couldn't generate the type I needed. It's great for UPC-A and EAN-13 though.
Conclusion
Data merge is a great feature. It can save you so much time. But sometimes it might be tricky to get it work properly.
Feel free to drop me a comment below.
If you liked the tutorial and found it useful, let others know about this great feature by sharing the article.
P.S: You should subscribe to the newsletter. Click here.
More from the blog
- How to quickly produce ads and banners for all your markets
- Best InDesign courses and InDesign tutorials
- InDesign: Choosing a multilingual publishing solution
- 20 Most Common InDesign Mistakes
- 200+ Must-Have InDesign scripts (Free and paid) plus some advanced GREP automation
- InDesign shortcuts (Printable cheat sheet)
- 75 Fresh InDesign Templates
Until next time,
Stefano


