


I am pretty obsessed with optimization. Optimizing your processes means that you save time that you can then use to focus on what matters and have the freedom to improve your skills and creativity, which is what you should be doing rather than repeating the same task over and over.
I am constantly working with teams from all over the world, helping them to organize the way they produce their marketing material, and there are a few things I always mention before actually digging into my favorite topic – multilingual projects.
InDesign gives you many tools that can both improve your work experience with little effort and save precious time.
Update: I wrote a document with 30 practical tips, you can download it for free by clicking on the banner below:

30 practical tips for InDesign users
Well begun is half done
Using Aristotle’s words, if you do something well at the beginning, you are halfway to a successful end.
1. Create a Style Sheet for your styles
Paragraph Styles are the single most useful feature in InDesign. Integrating this feature can improve your productivity tremendously and reduce the time you spend on laying out your documents. If you haven’t mastered them already, you should learn them ASAP (check out our tutorial on InDesign Paragraph Styles).
Although paragraph styles are very practical, help you with creating a better layout and save lots of time, many InDesign users don’t use them – even when they know them and they understand the advantages. Why is that?
Creating all the styles in a document might be a huge effort and sometimes it might look like it makes little sense. But styles are very important for keeping your layout consistent, applying changes effectively, or using features like Table of Contents or Hyperlinks.
Over the years, I came up with a very practical way of structuring my styles, and I noticed I kept repeating the same structure over and over in all my documents. Despite having a regular format, it generally took me from 3 to 4 hours to structure my styles on an average project.
That was a complete waste of time because I was literally always creating the same identical structure. The little things that were always changing were the Font Families used for the titles and the body (and of course some smallest things like spaces before paragraphs and so on).
So I created a Style Sheet that I could use as a starting point for any of my projects. You can download it from this post where I also explained how my InDesign paragraph styles are structured.
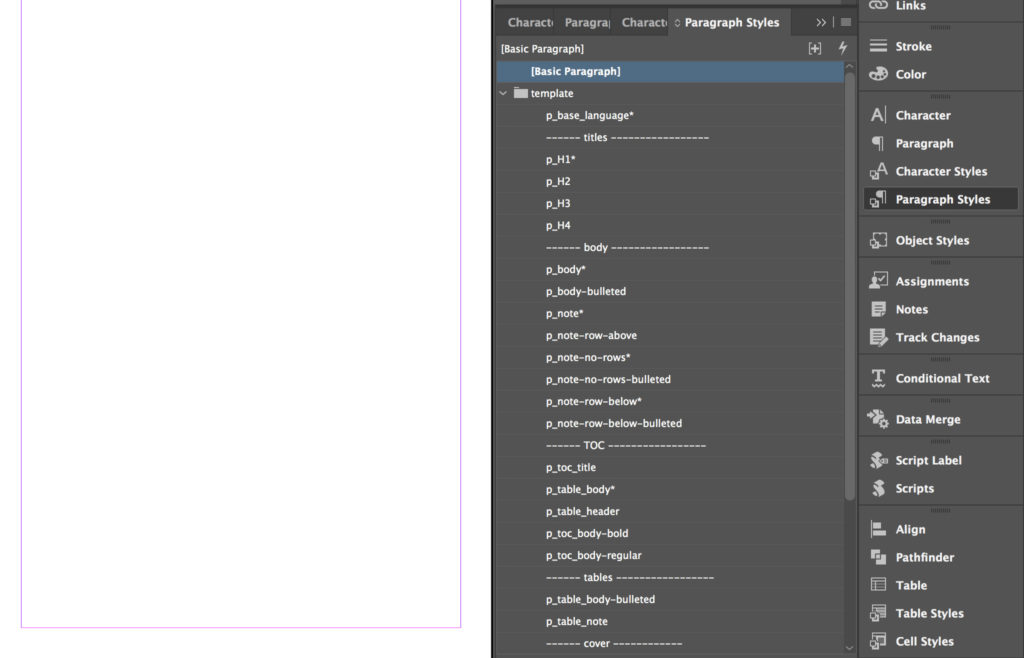
You can start your projects directly from the Style Sheet, or you can use it as a reference to create your InDesign document and import the styles from the document.
Besides the time you’ll save at start-up – this first InDesign tip reduced my start-up time from 3, 4 hours to 1 hour or even less – you’ll make sure your styles are set up correctly and no setting is missing (hyphenation, language, etc.), and by setting up “based on” and “next style” in your paragraph styles, you’ll be able to speed up the entire creation of the document.
2. Use InDesign templates
If you often work in documents that have the same layout or even content (like a user manual, a magazine, or a newsletter, etc.), you might want to expand the Style Sheet concept we’ve seen above into templates and add master pages, margins, grid lines, common parts, etc.
A template is an InDesign document that when opened, it opens as a new untitled document.

Starting your projects from a template has a clear time benefit, but it’s also great when you are working in a team because it ensures that everybody starts the project from the same place, and a consistent structure among all the files produced by the team allows each participant to work on the document more efficiently.
Clearly, you don't need to work only on your documents, but you can also download an InDesign template (in the link you'll find the best I found online) and start working from there.
Layout the content quickly
Next step after creating a solid base for your project is to import the content into your document quickly. Paragraph Styles really make a huge difference here, but there are other features that can help you, whether you are working on a book, a user manual, a catalog, or you are typing directly in InDesign.
3. Use primary text option
Most of the time, especially with books or user manuals, the text comes from a pre-formatted document either as a Word file or an RTF file.
Your job is then to import this text into your document and give it the right style.
If you’ve done it before, you know how much time it takes to create all the pages and the text flow correctly in the document.
This task is something that InDesign can do itself – with just a few clicks you can import the text and let InDesign automatically create the pages and the threaded text-frames. Like magic!
To do so, you need to set up your master pages, create a text-frame in each page of the master, thread the text, and activate the “Primary Text Frame” function. Next, you can import the text in InDesign. Find the step-by-step tutorial in this post about master pages in InDesign.
This procedure can save you loads of time and almost completely automate the process of importing your text.
If you have to work with a Word file, you might want to check out our tutorial on how to import a Word file to InDesign.
4. Data merge
Data merge is an amazing timesaver, and it is one of those features that many InDesign users don’t know about.
With data merge you can instantly layout hundreds of pages that have a “repetitive layout” – like business cards, certificates or even catalogs – starting from a spreadsheet and a template.
I use it every time I create a catalog because:
- It makes the creation faster
- It ensures my layout is consistent
- It prevents mistakes
- It allows me to outsource some tasks to my client
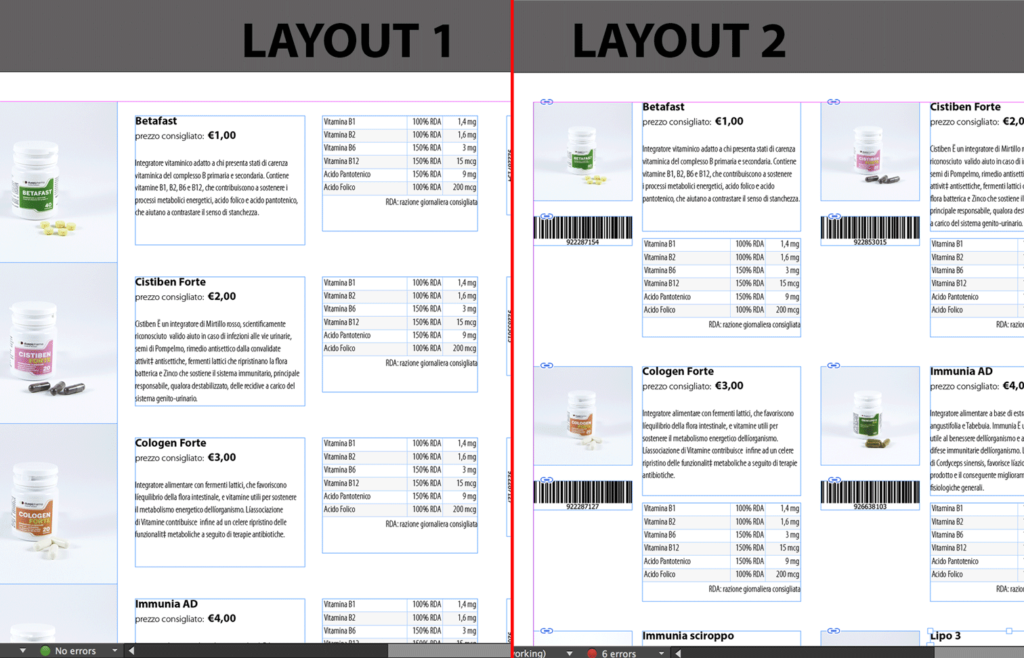
Next time you are creating a catalog, analyze the layout of your document and where you are going to place each piece of information. Break the document down into several parts if you need more templates. Make your client (or colleague) fill out an Excel file with the data you need (Prepare the Excel document so that you can use it in the data merge process).
I already wrote a step-by-step guide on how to use data merge in InDesign – have a look if you want to understand more about this amazing feature.
5. Use “Next Style”
We’ve seen how to import text or data inside your InDesign document but what if you pasted some text and you’d like to set up the styles quickly?
This is another of those times in which Paragraph Styles come to the rescue and makes everything easier and faster. We’ve seen above that you can make your text look consistent and great by applying paragraph styles to your text.
With the function “Next Style” you can apply different styles to many selected paragraphs (see here how).
“Next Style” also works when typing in InDesign. Hit “return” and InDesign will use the selected “Next Style” in the new paragraph.
6. Learn how to use Anchored Object
Anchoring objects allows you to create amazing automations in InDesign. For example, you could create a label that automatically resize its width when the text changes.

InDesign tips to improve cooperation
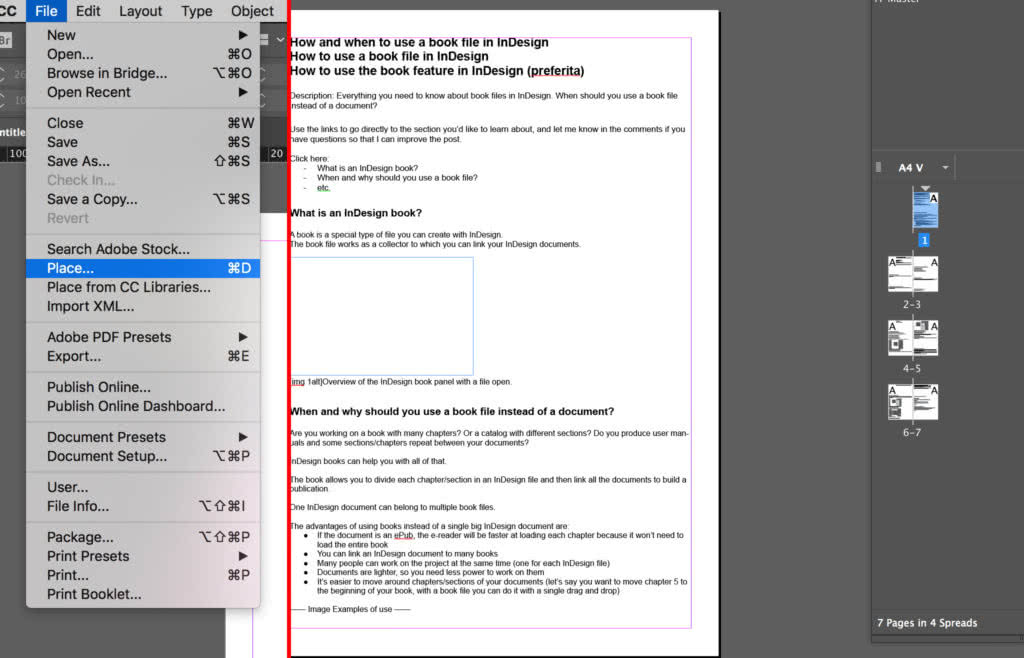
7. Use book files
Book files is another of those features that very few people use. A book is a special type of file that works as a collector to which you can link your InDesign documents.
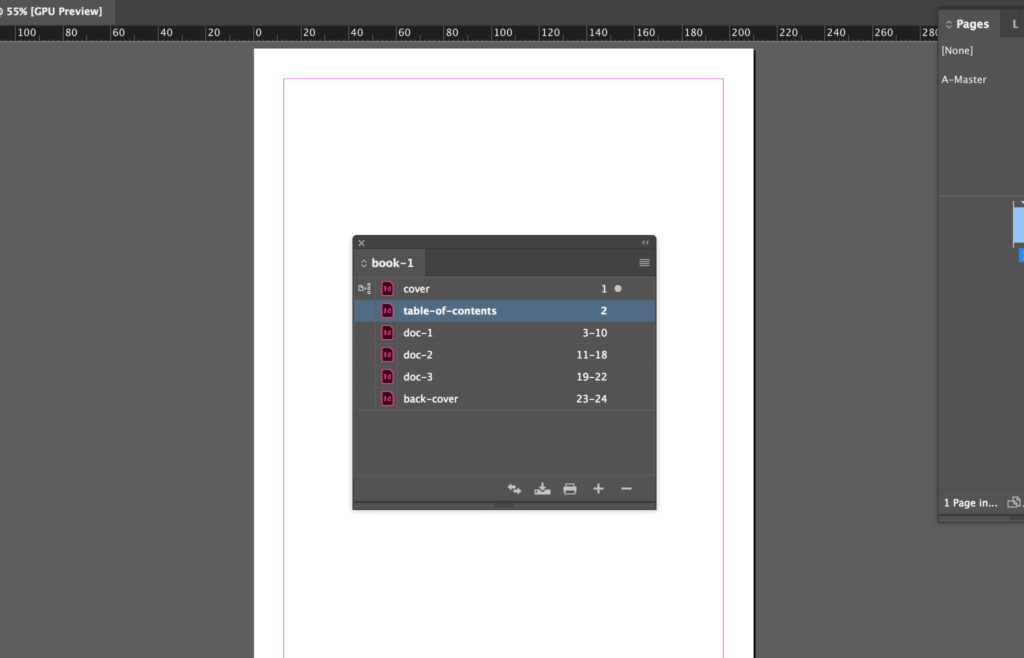
You can use book files to break down a publication so that it’s lighter to work on, and also it allows other coworkers to work on the same document since it’s divided into separate files.
Check out this tutorial on how InDesign book files work and how you can use them to their best.
Create the final documents quickly
8. Use conditional text
Conditional text is a nice solution when you need to create different versions of the same document.
In an InDesign document, you can apply conditions to parts of a text, and then decide to show or hide these parts.
Starting from pricing lists, to user manuals, conditional text is very handy.
If you had to create a Mac and a Windows version of a given document, you could create a condition for Mac and one for Windows, and activate one of the two when necessary. Or if you had a catalog or a price list, you could insert prices into different currencies and then set conditions in order to visualize Euros, Dollars, Pounds, etc.
You can even use conditions to hide or show entire sections of a document. Let’s say you are working on a user manual of an Air Conditioner. These machines are often produced with two types of motors (EC and Inverter). You could use conditional text to hide or show the instructions for one of the two motors.
Check this video to get a better understanding of how conditional text works and how to use it.
Here alternatively is the official Adobe User Guide.
9. Use PDF presets
A PDF preset is a group of settings that affect the creation of a PDF. InDesign already has a few presets, but they don’t always fit a designer’s needs.
If you find yourself needing to frequently change the PDF export setting (like adding Marks or Bleeds to the PDF), then you might want to create your own preset.
From the PDF export window, you can easily create a customized preset. Edit the settings and then click on “Save Preset.”
This simple tip might not save hours in a single use, but it’s going to be a consistent timesaving tip. Also, you’ll make sure you won’t forget to change any setting.
10. Batch export PDFs
This InDesign tip is the one that people generally appreciate the most.
Do you ever have to convert several InDesign files to PDF?
That is a tedious job and a complete waste of your time!
Luckily, there is a solution for that, and it’s a script that batch converts your document contained into a folder.
Check our list of 200+ Indesign Scripts here.
Take a course to learn all the tips
The best way of learning all the new InDesign tips and features is to take a course from an expert guru. I know, there are so many choices out there, and you never know which instructor you should trust. But luckily for you, I just made a list of the best InDesign courses there are out there (I already took them, so you are safe)! Even more, here is a helpful list with 48 different InDesign tutorials.
Share your InDesign Tips
Do you have any tips you’d love to share?
Drop it as a comment so that we can add it to this post and make sure that everybody who reads this list will learn about it!


